Cheap Easy DIY Outdoor Halloween Party Decorations Set Designers Make
Updated August 25, 2025 Are you looking for easy diy Halloween decorations that even professional set designers swear by? You’ll be surprised to learn how simple everyday items are used by set designers to achieve the impressive professional looking outdoor Halloween decor and fall porches you see in your favorite movies and haunted houses.
Scroll down to learn how to repurpose simple cheap everyday items like cardboard boxes, pvc pipes, packing tape, and foam, into your dream Halloween yard decorations using the creativity of set designers. From easy ideas for spooky cauldrons, floating ghosts, fake fire, and a photobooth, get ready to transform your yard into a Halloween masterpiece.
You’ll also find tips from professional party planners and set designers for how to create a cozy fall front porch that can take you from early Fall, through Halloween, and straight to Thanksgiving.
They can be used for both apartments, or homes and would also look amazing at a Halloween party or Halloween wedding.
PLEASE NOTE : IF ANY OF THE IMAGES IN THIS POST ARE MISLABELED AND YOU ARE THE RIGHTFUL OWNER, PLEASE CONTACT [email protected] SO WE CAN GIVE YOU PROPER CREDIT OR REMOVE THE IMAGE ENTIRELY. SOMETIMES DISHONESTY MAKES IT DIFFICULT TO FIND THE RIGHTFUL OWNER OF AN AMAZING IMAGE.
IN A HURRY? We organized it in the following sections, click on the links below to jump to the content you want:
This post may contain affiliate links. Click here to read our full disclosure policy.
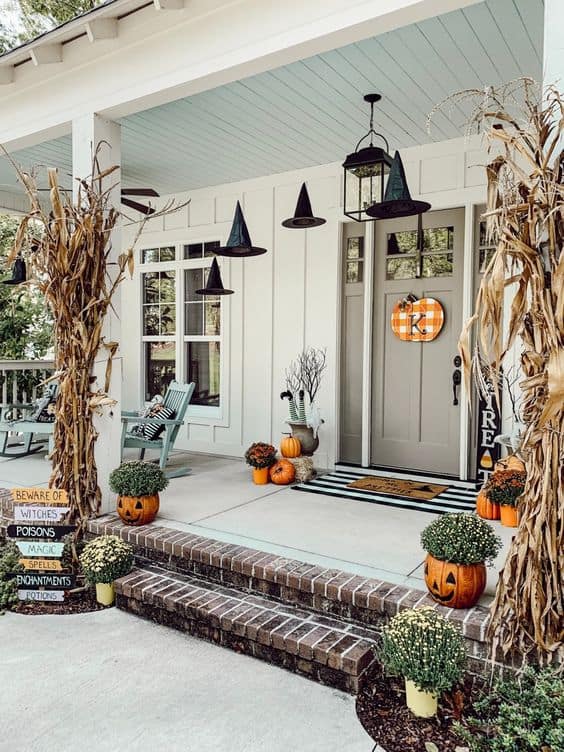
Versatile Fall Harvest Halloween Porch Decor (includes Pumpkin Wood Crate Decor)
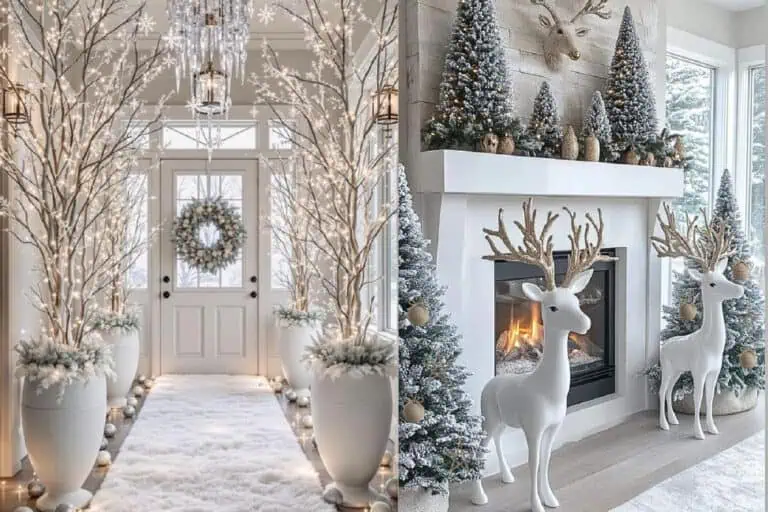
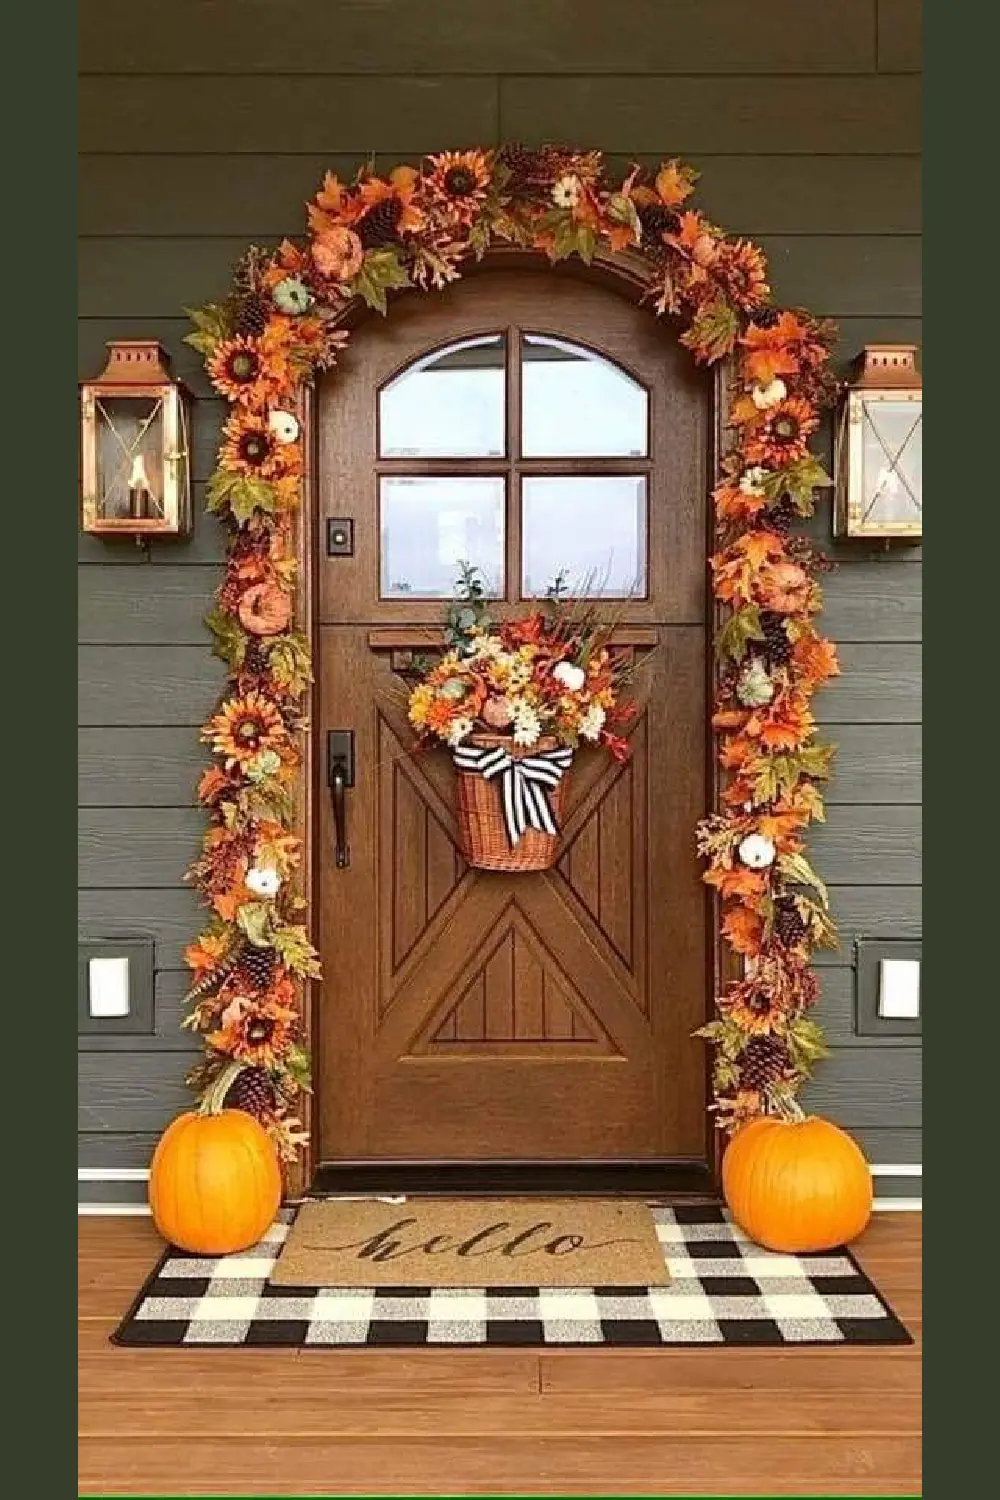
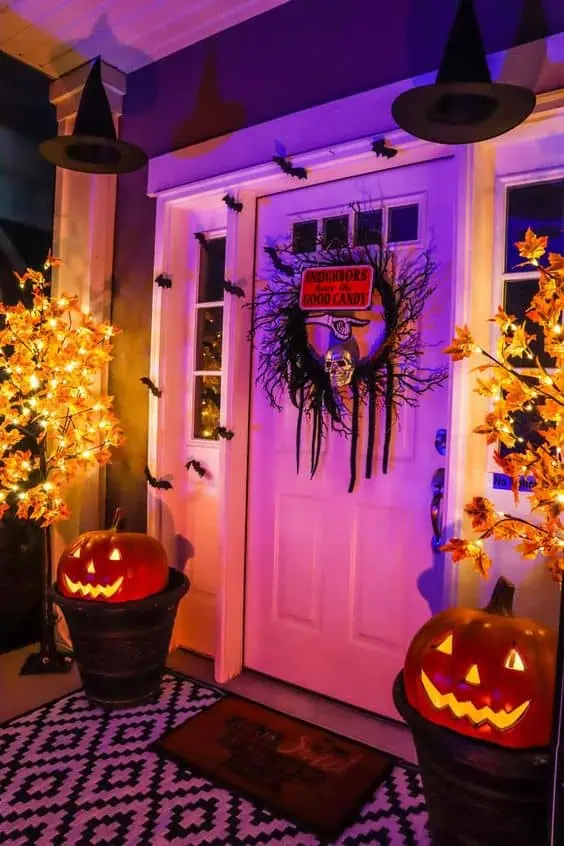
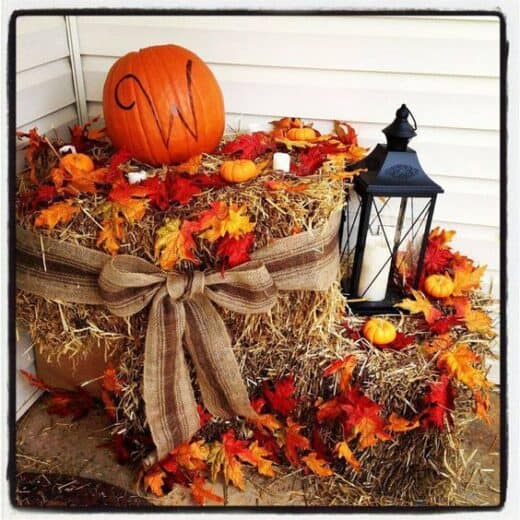
Professional haunted house designers — will tell you sometimes the secret to a truly unforgettable Halloween is to begin with a warm, inviting entryway to make everyone feel at ease before you scare them. Think stacked hay bales, cozy lantern light, friendly pumpkin displays, and a sprinkle of autumn leaves. Here are the best versatile outdoor decorations that’ll take you from Halloween to Fall to Thanksgiving and even Christmas.
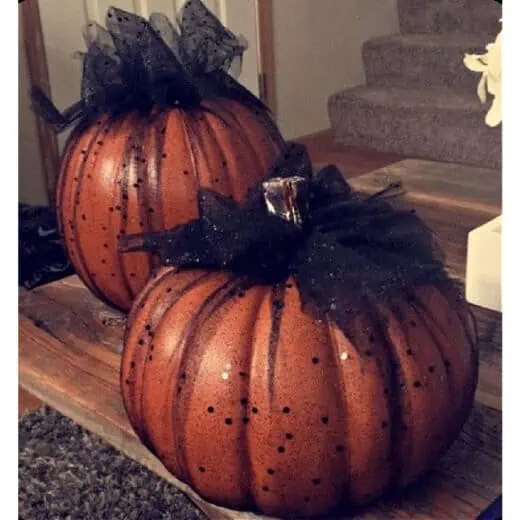
Wrap your pumpkins in tulle sprinkled with sequins or glitter for a super easy Halloween party decor idea. Just take the tulle off when Halloween is over to transition into Thanksgiving decor!
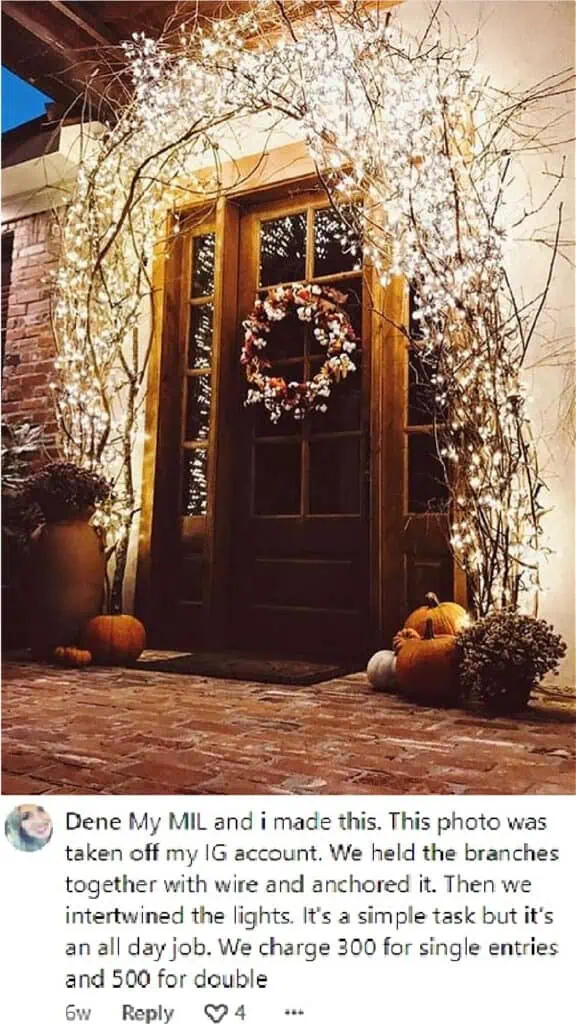
Make an archway out of branches, twigs, and lights for Fall decorations you can leave up for Christmas! The arch above was created by professional Holiday decorators Dene Masters and Amity Lynn. Follow their instructions above or use one of these YouTube tutorials.
It’s so simple to create a cozy fall aesthetic for the front door like the one above. Tie together dollar store fall flower arrangements and add an easy diy fall basket wreath.
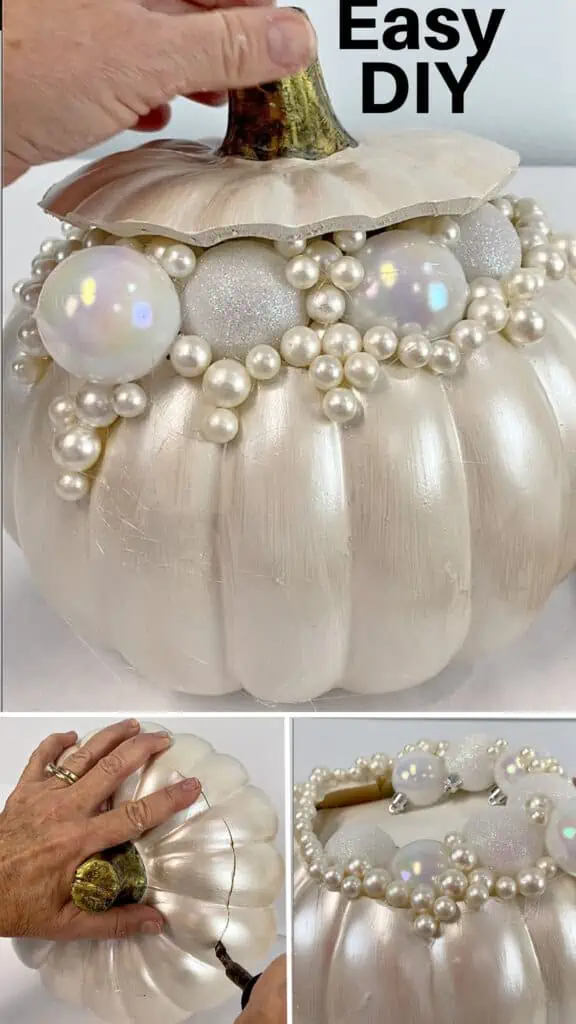
Make the beautiful fantasy pumpkins above with faux pumpkins from Michaels, paint, and ball ornaments! These whimsical pumpkins would be beautiful for a Fall wedding or Halloween decor.
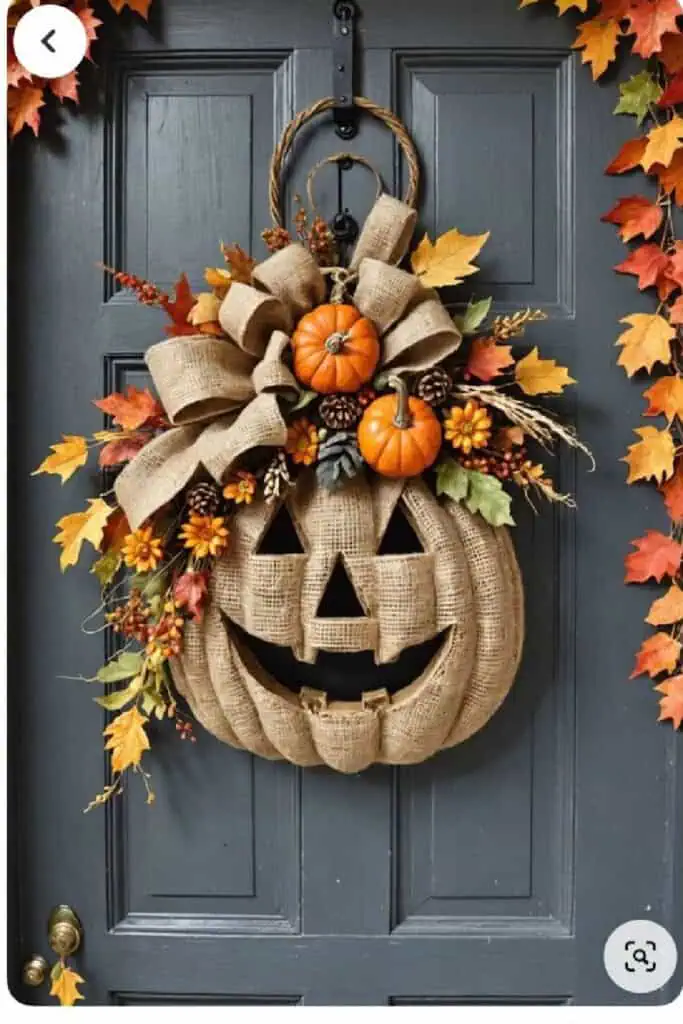
This cute burlap pumpkin wreath (pictured above) would go perfectly with a rustic farmhouse fall aesthetic.
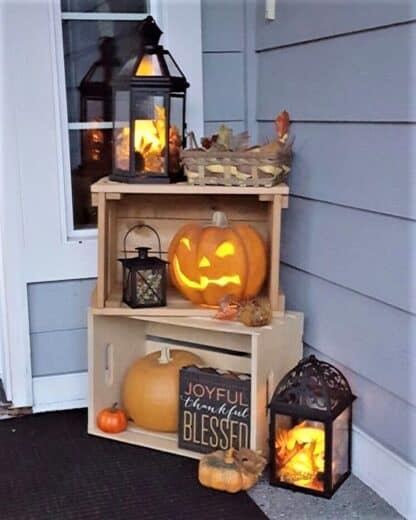
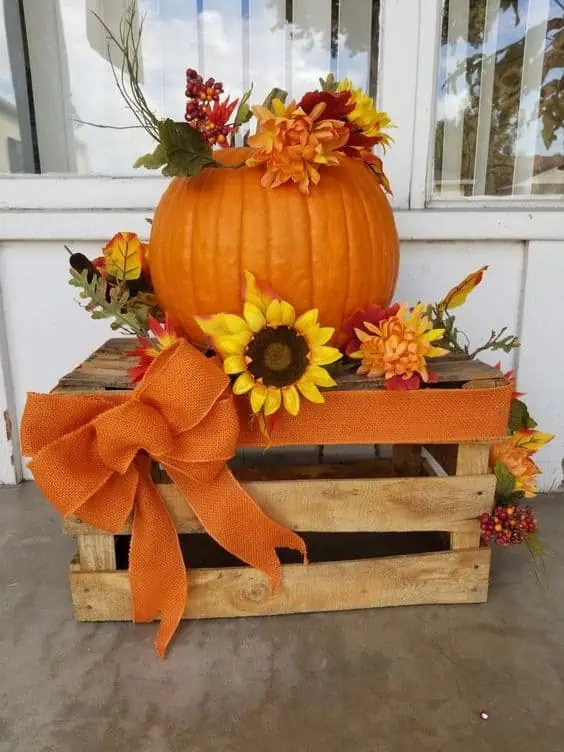
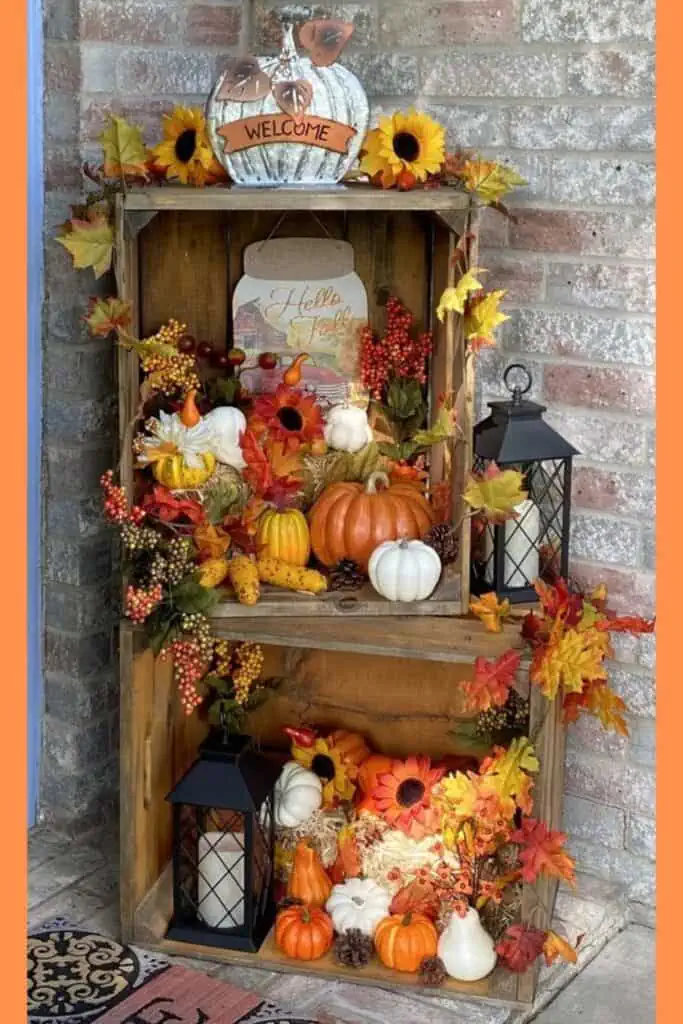
Wood crates are a versatile item professionals use to effortlessly take your decor from Fall, to Halloween, and back to Thanksgiving just by adding and removing items. We’ve seen them for as little as 5 dollars at Michaels and Hobby Lobby.
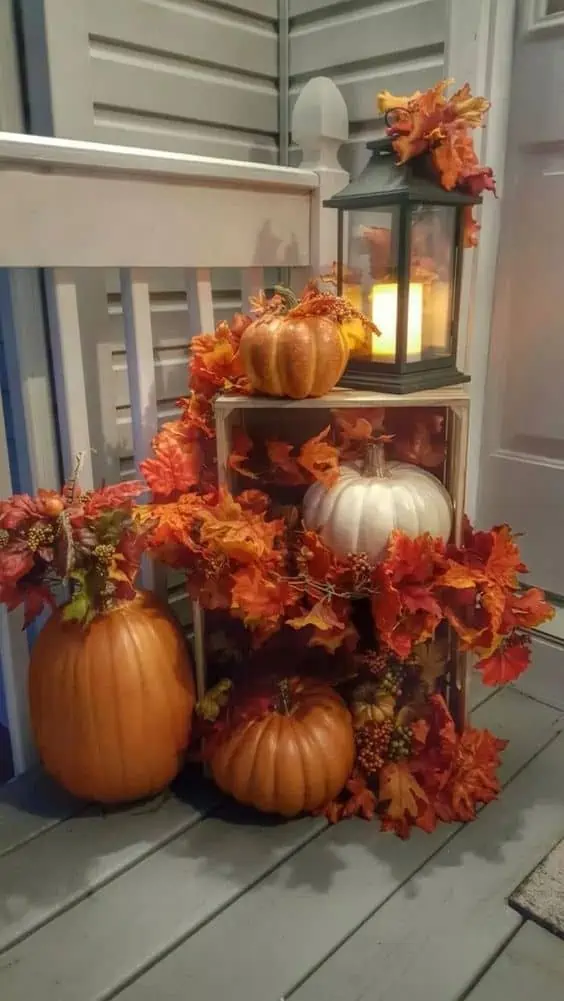
Grab some wood crates to display your pumpkins and lanterns. Add Fall leave garland, (pictured above) and even a basket of candy on top for trick or treaters.
The above photo uses dollar store faux flowers and wire ribbon!
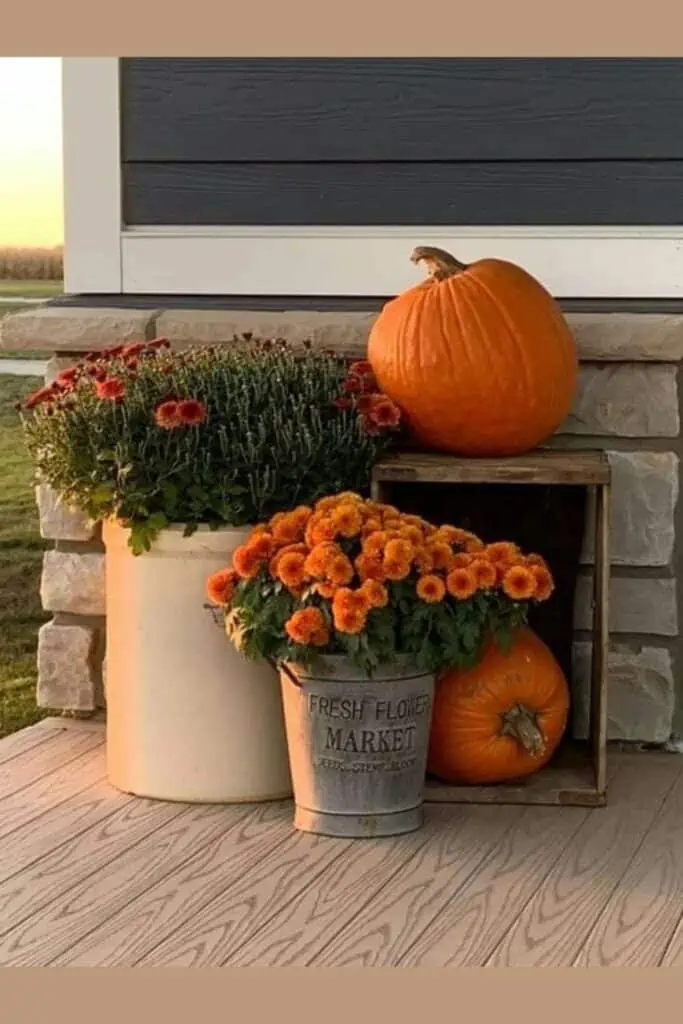
Pumpkins and wood crates added to your Mum plants is a simple way to create stunning Fall decor (pictured above)

Add a hay stack (pictured above) to your Fall Pumpkin wood crate decor and even a pinecone!
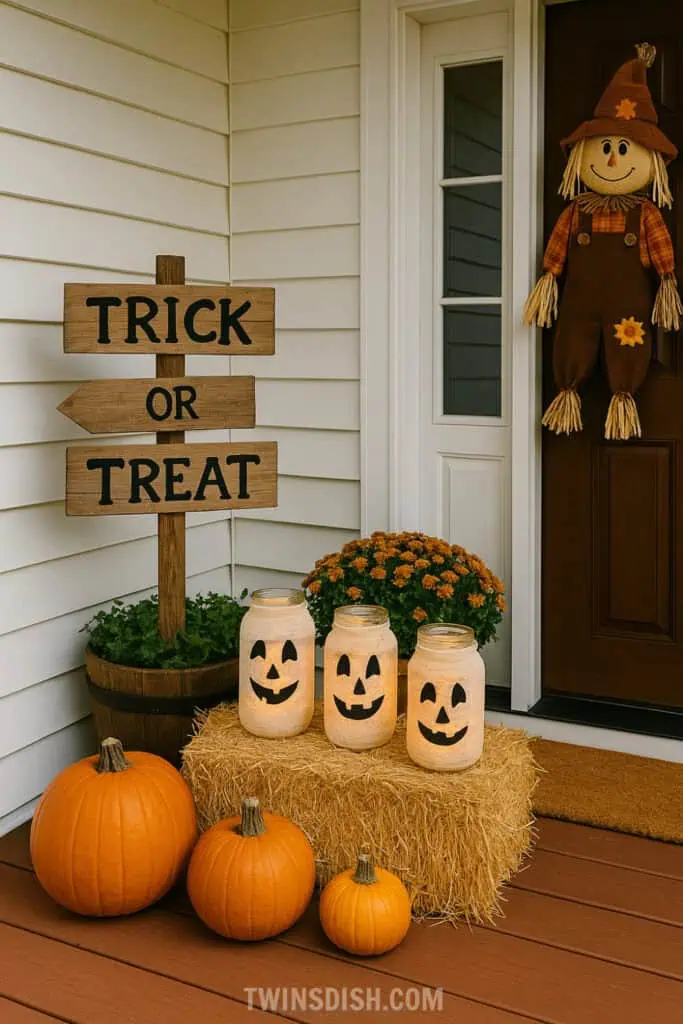
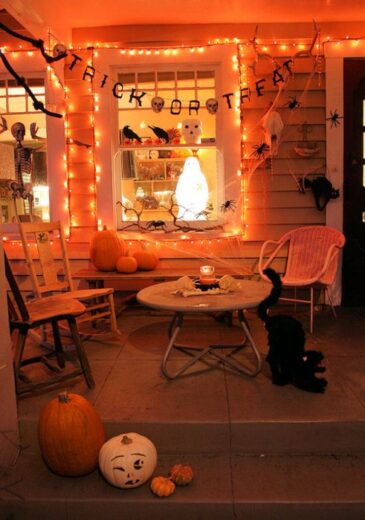
Make these Halloween luminaries and Trick or Treat sign (Tutorials below) for a versatile Halloween Front Porch Decor that can easily transition into Thanksgiving.
DIY Cheesecloth Halloween Ghost Luminaries
(as shown in the image above)
Materials:
-
Mason jars (pint or quart size)
-
Cheesecloth or gauze wrap (found at Dollar Tree or craft stores)
-
Mod Podge or clear-drying craft glue
-
Foam brush
-
Black felt or black construction paper
-
Scissors
-
Battery-operated tealight candles or fairy lights
Step-by-Step Instructions:
1. Prep the Jars
-
Wash and dry the jars thoroughly.
-
You can remove the lids if not needed,or leave the metal ring on top for decoration.
2. Wrap in Cheesecloth
-
Cut a strip of cheesecloth long enough to wrap around each jar 2–3 times.
-
Apply Mod Podge to the outside of the jar using a foam brush.
-
Carefully wrap the cheesecloth around the jar, smoothing and shaping it as you go.
-
Let some of the edges hang loosely for a “ghostly” effect.
-
Dab extra Mod Podge over the top layer to set it.
3. Make Jack-o’-Lantern Faces
-
Cut triangle eyes, noses, and smiles out of black felt or paper.
-
Use Mod Podge or hot glue to stick them onto the front of each jar.
4. Add Lighting
-
Place an LED tealight or battery-operated fairy lights inside each jar.
-
Do not use real candles, as cheesecloth is flammable.
-
For extra glow, wrap a second layer of orange tissue paper underneath the cheesecloth.
-
Use orange fairy lights or colored LED tea lights for a deeper pumpkin effect.
-
You can also use mummy-style wrapping for a different spooky look (leave eye holes).
TRICK OR TREAT WOOD SIGN FOR FRONT PORCH
The wood sign can be made by cutting wood planks and nailing them together, or you can purchase them at the Dollar Tree! Use paint, stencils construction paper or card stock, or cricut letters, and add sealant if you’re concerned about weather proofing.
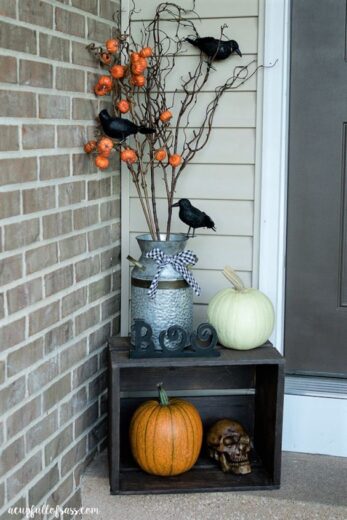
Add Pumpkin stems, a milk jug, and some crows for a beautiful yet creepy porch idea.

When Halloween is over switch out the jack o lanterns for harvest pumpkins, it’s so efficient.
Scour the Dollar Tree for plastic pumpkins and faux fall plants.
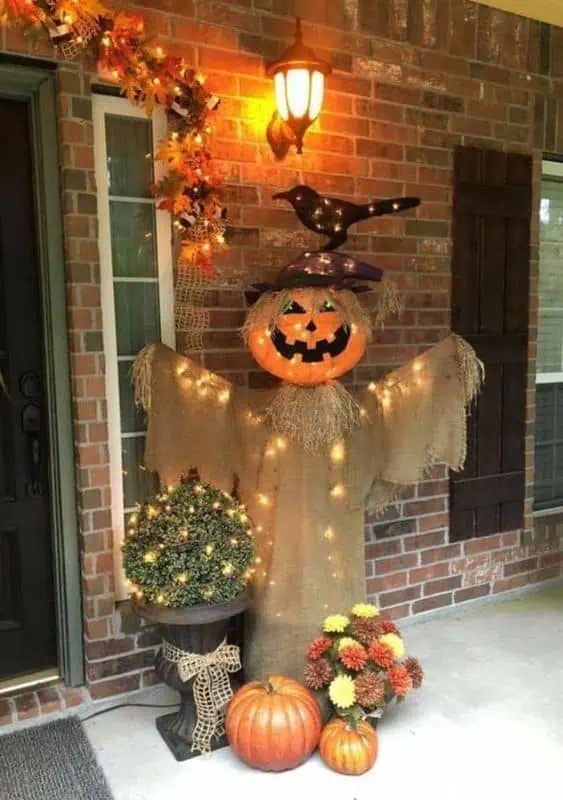
The Pumpkin Scarecrow above was purchased at Home Depot but you can recreate it using one of the following tutorials: TUTORIAL 1 or TUTORIAL 2.
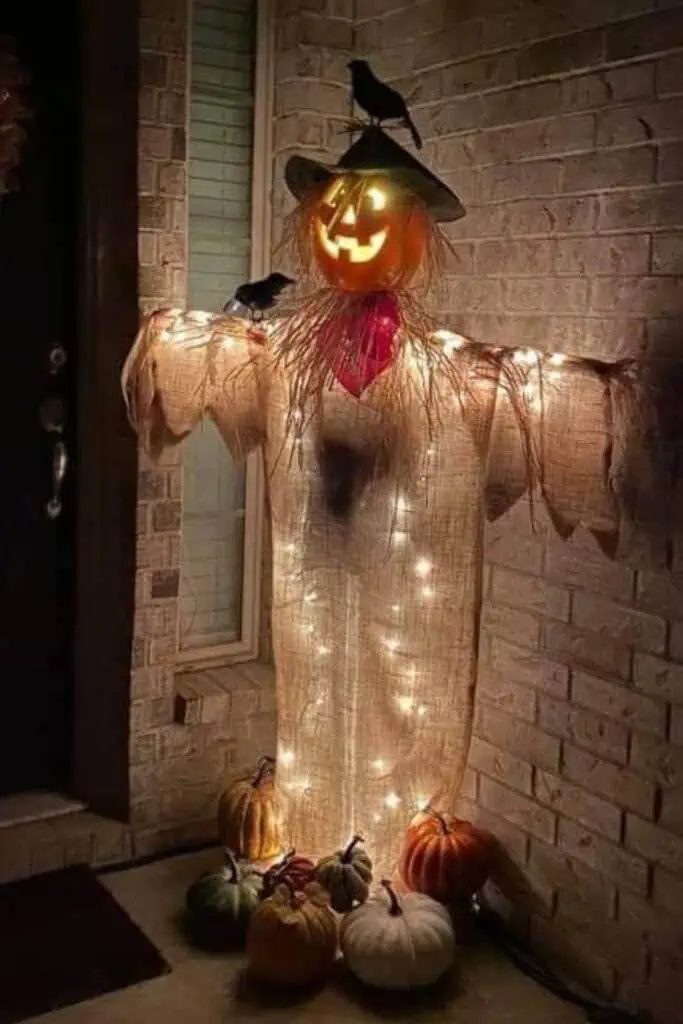
The Easy DIY Pumpkin Scarecrow above is made out of pvc pipe but you can also use a Dollar Tree broom stick! Use one of the following tutorials tp make it yourself: TUTORIAL 1 OR TUTORIAL 2
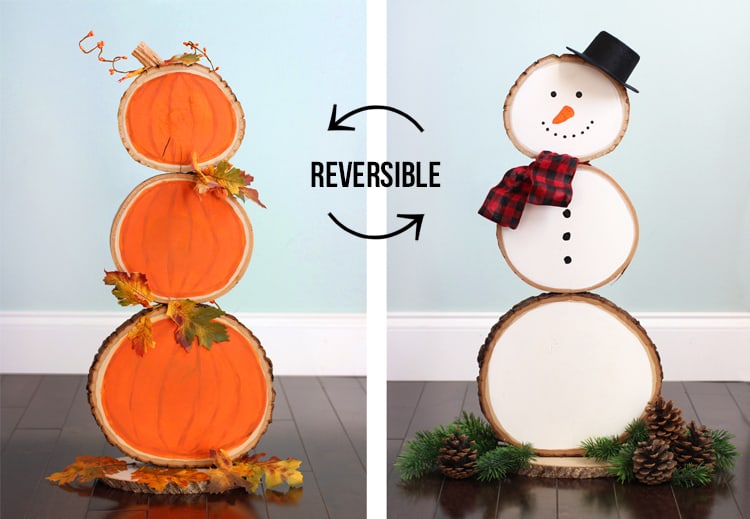
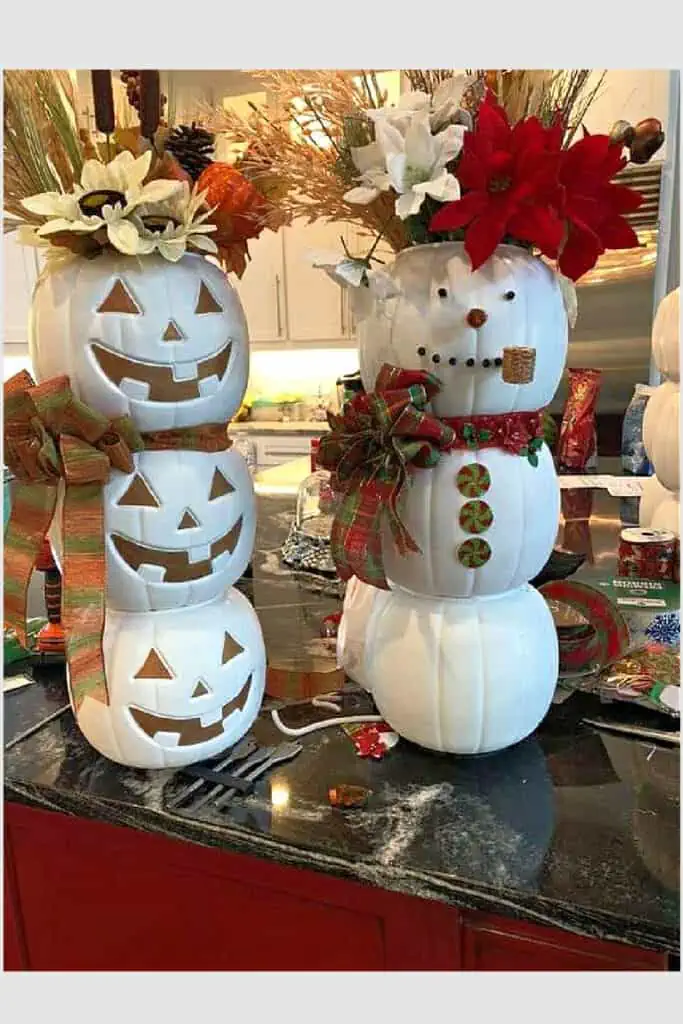
Speaking of wood, this DIY wood slice decor is reversible taking you not only from Halloween to Thanksgiving but to Christmas.
Place black stickers making a jack o lantern face on the Pumpkin side for Halloween, remove the jack o lantern face stickers for Thanksgiving, and spin around to the snowman side for Christmas and Winter.
The above dollar store pumpkin pail vase can be made to take you from Halloween, to Christmas, to Winter decor!
Like wood crates, hay stacks provide classy versatility to transition from Fall to Halloween to Thanksgiving. Just switch out the Jack o Lanterns and witches for Turkeys and Pumpkins. They’re also great for fall weddings!
Corn stalks also work perfectly for all Fall Holidays.

No need to redecorate, dollar store Halloween pumpkin pails can be turned around once Halloween is over for quick Thanksgiving decor.
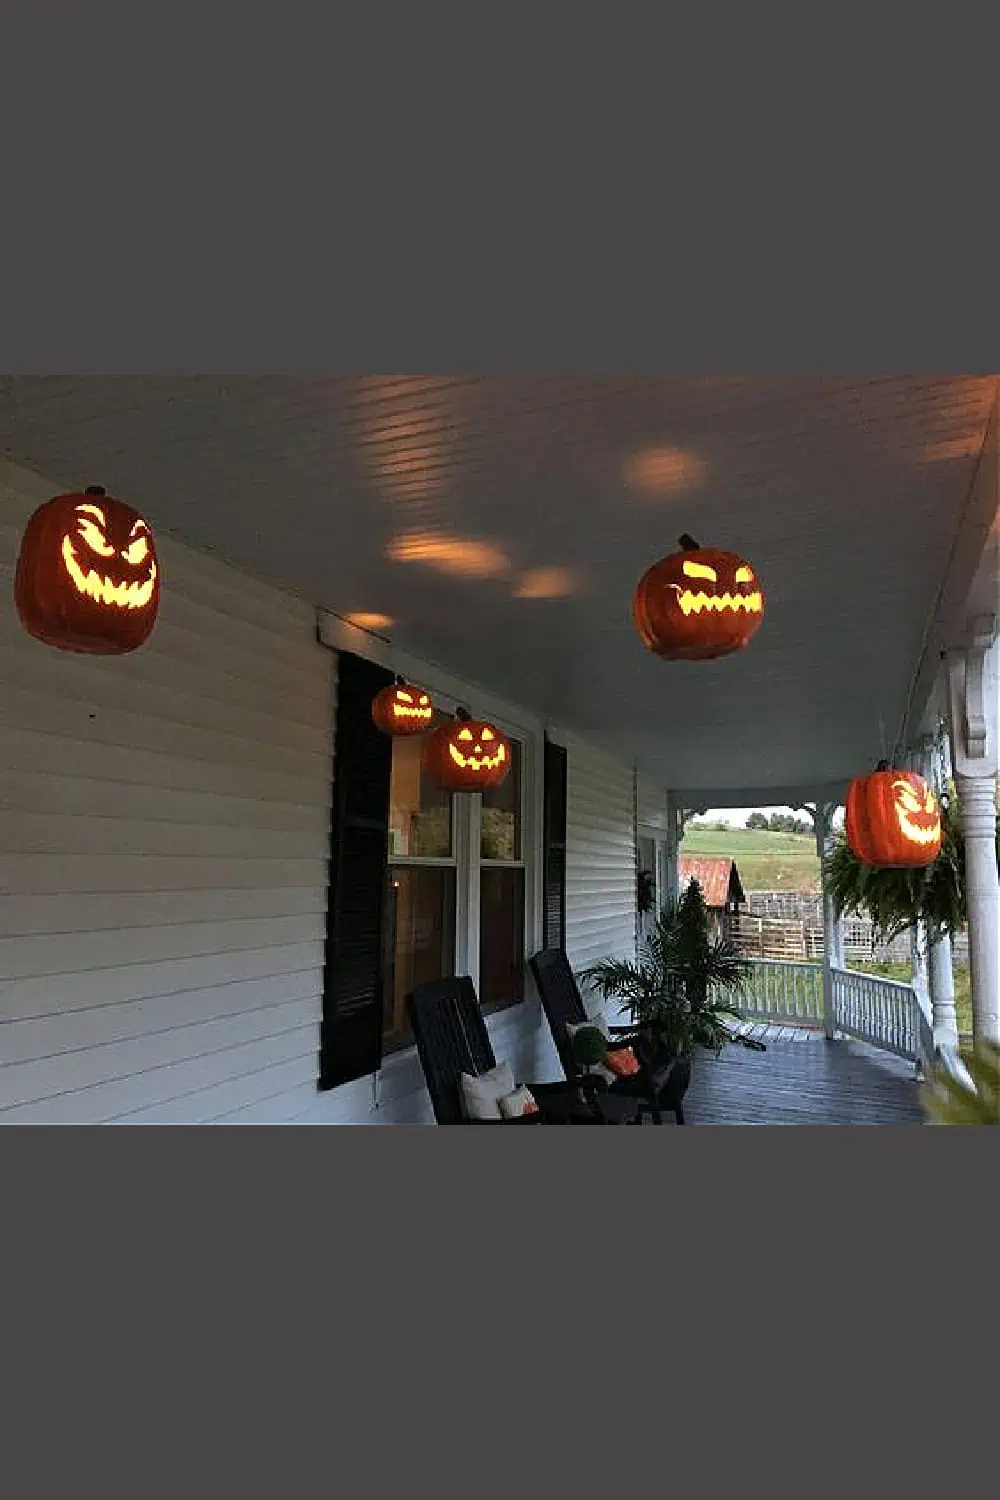
SPOOKY FLOATING DISPLAYS
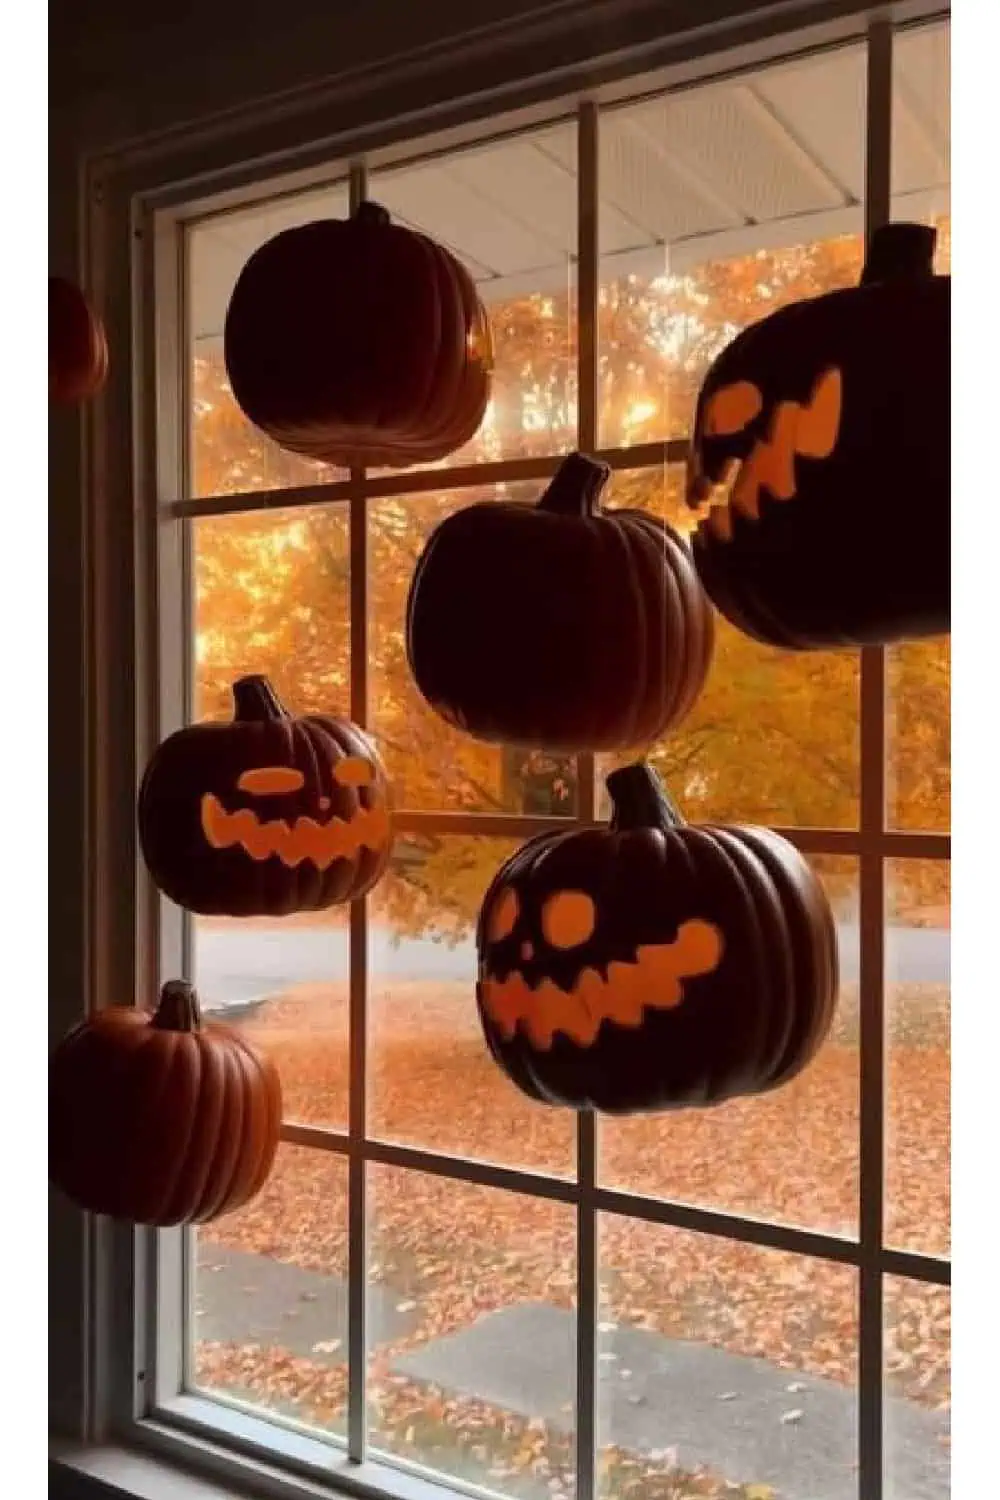
Put dollar store pumpkins, skulls or ghosts on fishing wire or nylon thread to create hanging pumpkins. Add remote controlled tea lights for an added effect. Use this tutorial.
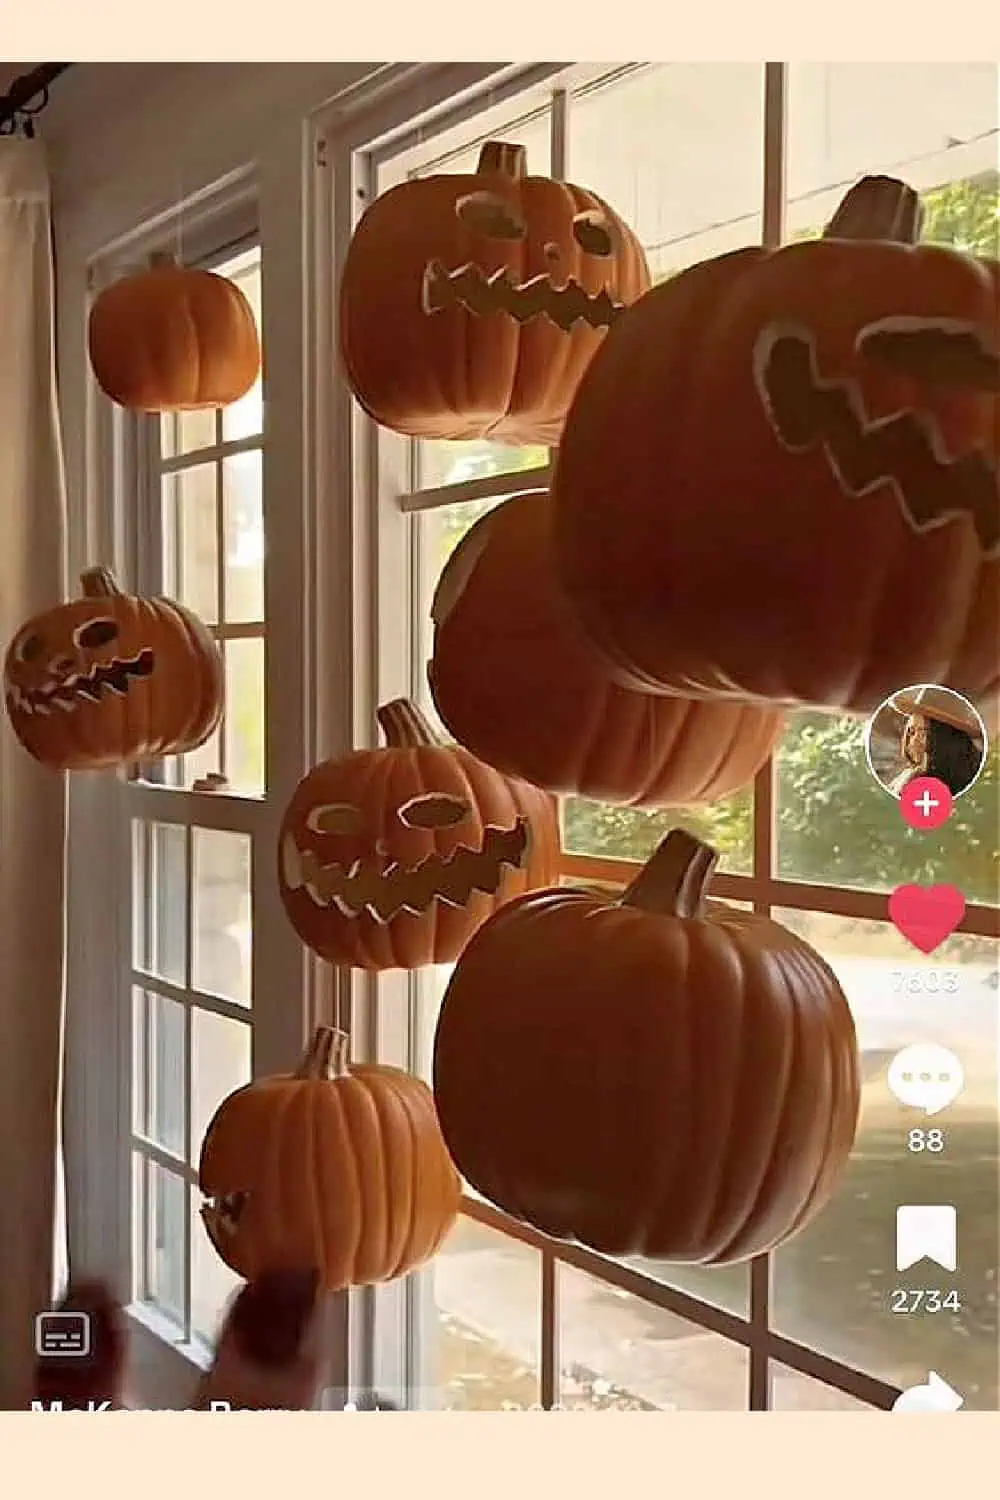
These floating pumpkins would also be perfect outdoors hanging from your front porch (as pictured below).
VINTAGE HALLOWEEN DECOR IDEAS
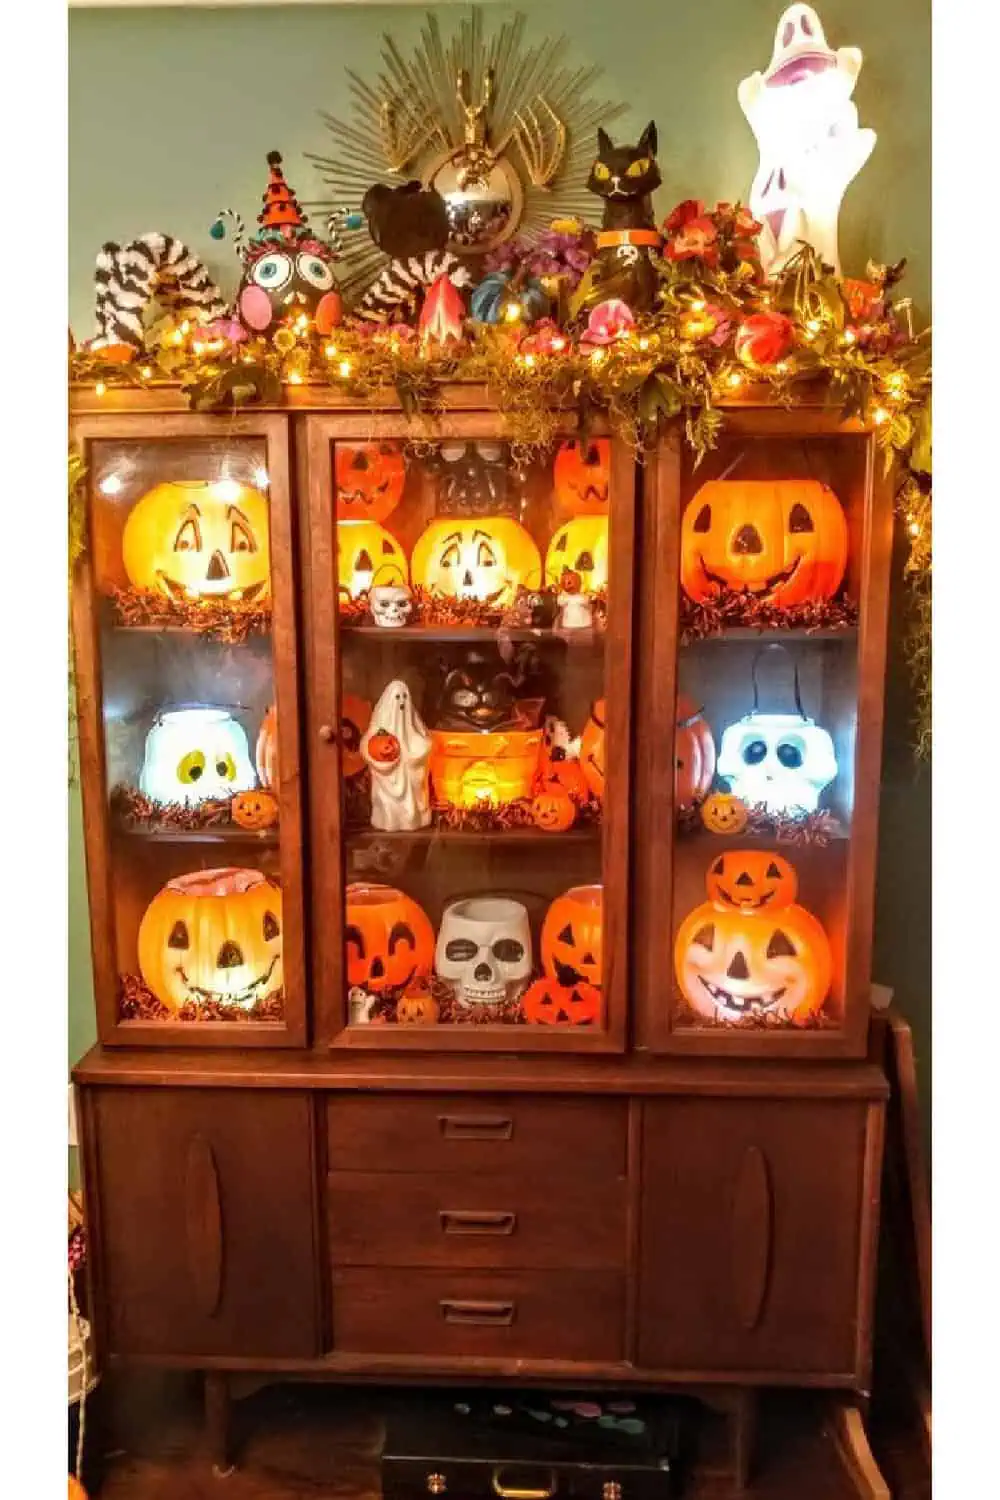
The beautiful vintage Halloween display above was created by TheEverCrafter.com using vintage Halloween pails and remote controlled tap lights in a china cabinet/hutch. The Black cat was purchased at Target.
It’s easy to Diy classy vintage minimalist Halloween decorations using Dollar Tree items and sometimes a cricut machine!
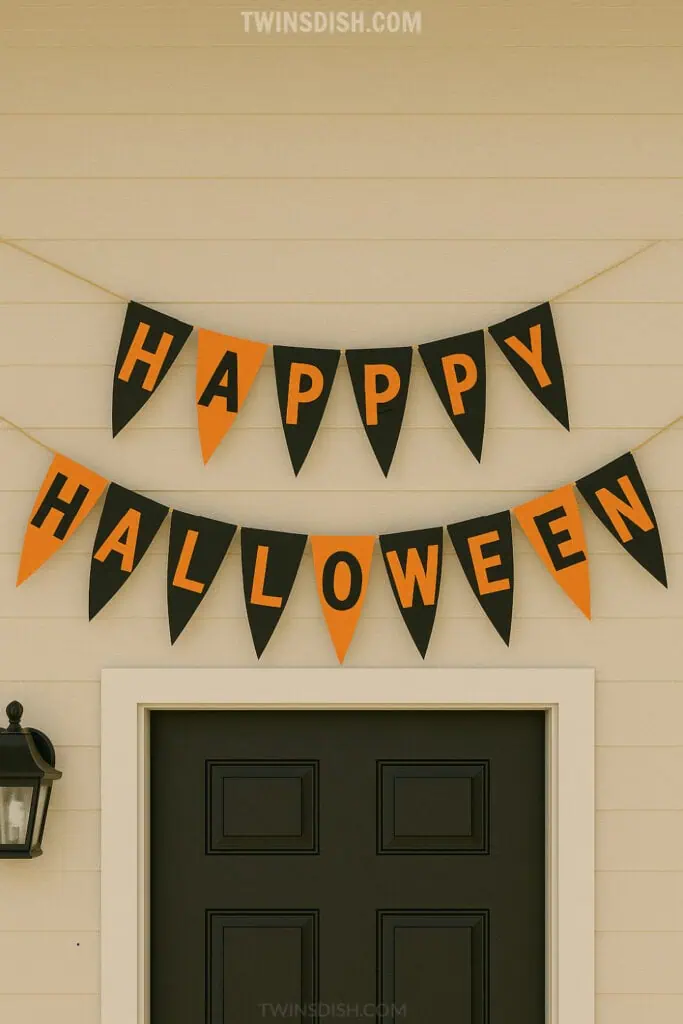
VINTAGE BURLAP HALLOWEEN BANNER FOR THE FRONTDOOR OR MANTLE Materials:
-
Burlap fabric (you can buy burlap fabric or use burlap sacks)
-
Orange and black construction paper or felt OR Black paint (for the letters)
-
Scissors
-
Hot glue gun and glue sticks or fabric glue
-
Jute twine or any strong string (for hanging)
-
Stencils or freehand lettering tools (for the letters)
-
Tape or pins (to hold things in place as you glue)
-
Ruler (optional, for measuring and cutting straight edges)
Instructions:
Step 1: Prepare the Burlap Pennants
-
Cut the burlap fabric into triangles:
-
Measure and cut your burlap fabric into equal-sized triangles for the pennants. A common size is around 6″ wide by 8″ long, but you can adjust this based on your desired look.
-
To make them uniform, fold the fabric in half diagonally, and then cut along the fold to create two identical triangles.
-
-
Cut as many triangles as needed:
-
You’ll need a pennant for each letter in “HAPPY HALLOWEEN.” That’s 14 pennants in total (one for each letter and space in the phrase).
-
Step 2: Prepare the Letters
-
Cut the letters:
-
Using orange and black construction paper or felt, cut out the letters for “HAPPY HALLOWEEN.”
-
Each letter should fit comfortably on one pennant. You can use a stencil to trace the letters or cut them freehand. Make sure the letters are large enough to be readable from a distance (approximately 3-4″ tall, depending on the size of your pennants).
-
Step 3: Attach the Letters to the Pennants
-
Attach the letters:
-
Position each letter on the center of a burlap pennant.
-
Use a hot glue gun or fabric glue to adhere each letter to its corresponding pennant. Press down gently to secure them in place.
-
Step 4: Assemble the Banner
-
Measure the twine:
-
Measure out a length of jute twine or strong string that is long enough to hold all of your pennants with some space in between.
-
-
Attach the pennants to the twine:
-
Lay the twine out on a flat surface and start gluing each pennant to the string. Position the pennants so that there is an even amount of space between each one.
-
You can glue the top of each pennant directly onto the twine or fold the top of the burlap over the twine and glue it, creating a loop for extra durability.
-
Step 5: Hang the Banner
-
Hang the banner:
-
Once all the pennants are glued to the twine, your banner is ready to be hung.
-
You can hang it across a doorway, above your porch, or on the wall. Use tape or pushpins if necessary to secure the ends of the twine.
-
Step 6: Finishing Touch
-
Check for any loose ends:
-
Make sure all letters and pennants are securely attached and that there are no gaps or uneven spacing. Adjust if necessary.
-
-
Decorate:
-
For added decoration, consider adding faux spiders, mini pumpkins, or other Halloween-themed embellishments to the banner.
-
Tips:
-
Alternating Colors: If you want to make the banner even more festive, alternate between orange and black pennants for a bold, Halloween color scheme. Paint the Burlap or use other materials such as colored paper, or felt.
-
Sturdy Glue: If you’re using burlap or other textured fabrics, make sure to use a strong adhesive, like hot glue, to ensure the letters stick securely.
-
Use Ribbon for Hanger: If you want a more polished look, you can use ribbon instead of twine for a softer, more decorative finish.
This DIY burlap banner is a fun and easy way to add some Halloween spirit to your home, and you can adjust the size and design as needed to fit your space!
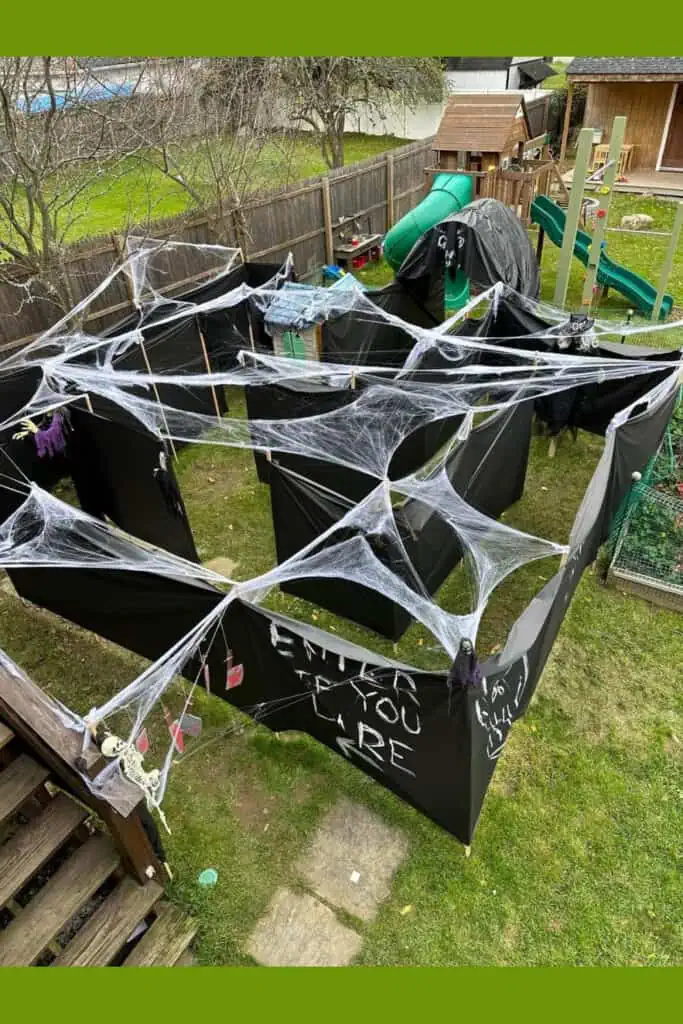
DIY Haunted House
Ghost Fake Fire Pit Decoration
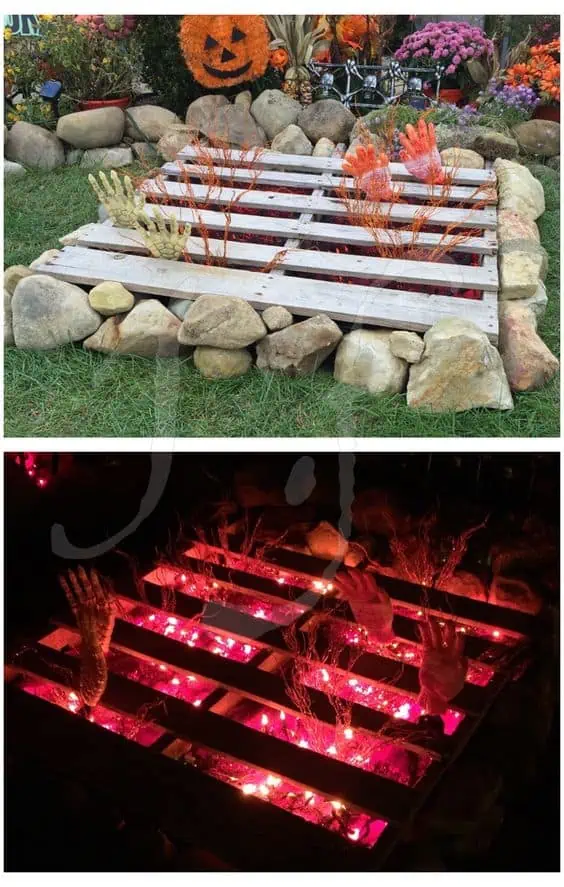
Fake Fire Halloween Prop DIY Pallet Wood Gate Way To Hell
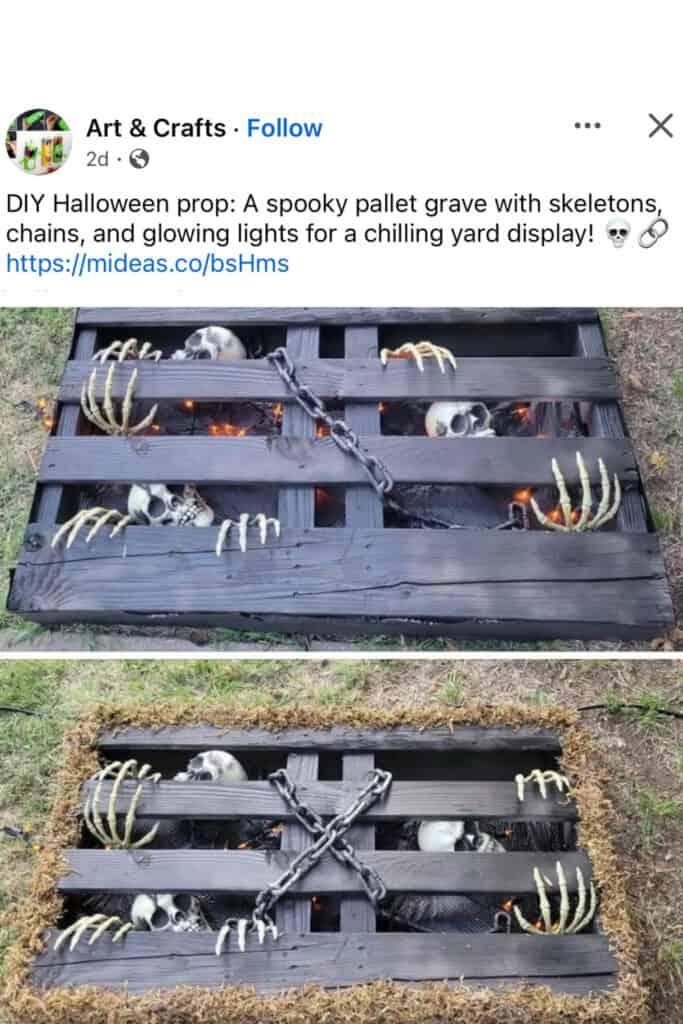
Pallet Wood with dollar store lights and hands makes a great gateway to hell with fake fire for the yard! You can find pallet wood for free on Craigslist, Facebook Marketplace, or call your local bars, liquor stores, or Construction Companies for free pallets.
Garbage BODY BAG Halloween Prop DIY
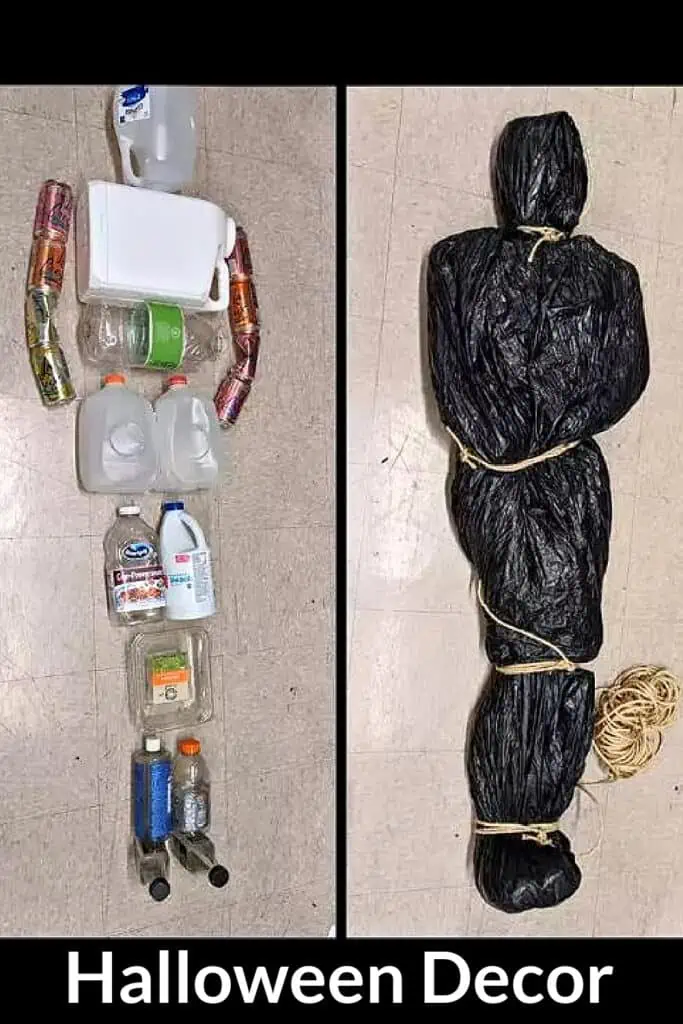
The above photo is an amazing way to reuse your trash and an excellent diy Halloween decoration for a party or haunted house.
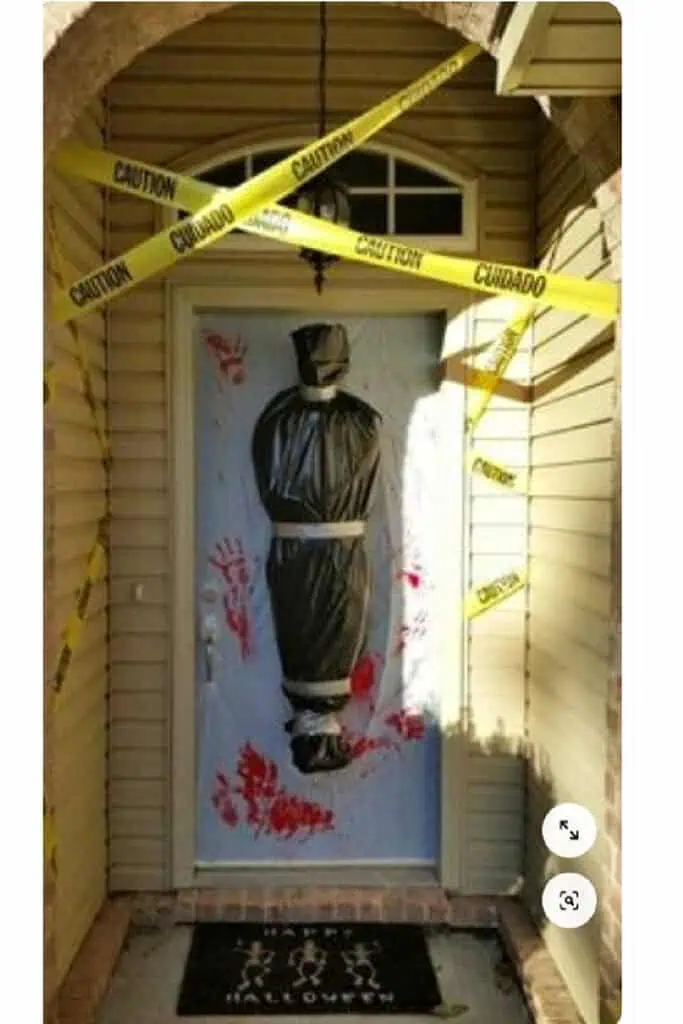
Use the free body bag idea for an easy yet effective diy Halloween decoration on your front door and porch as pictured above!
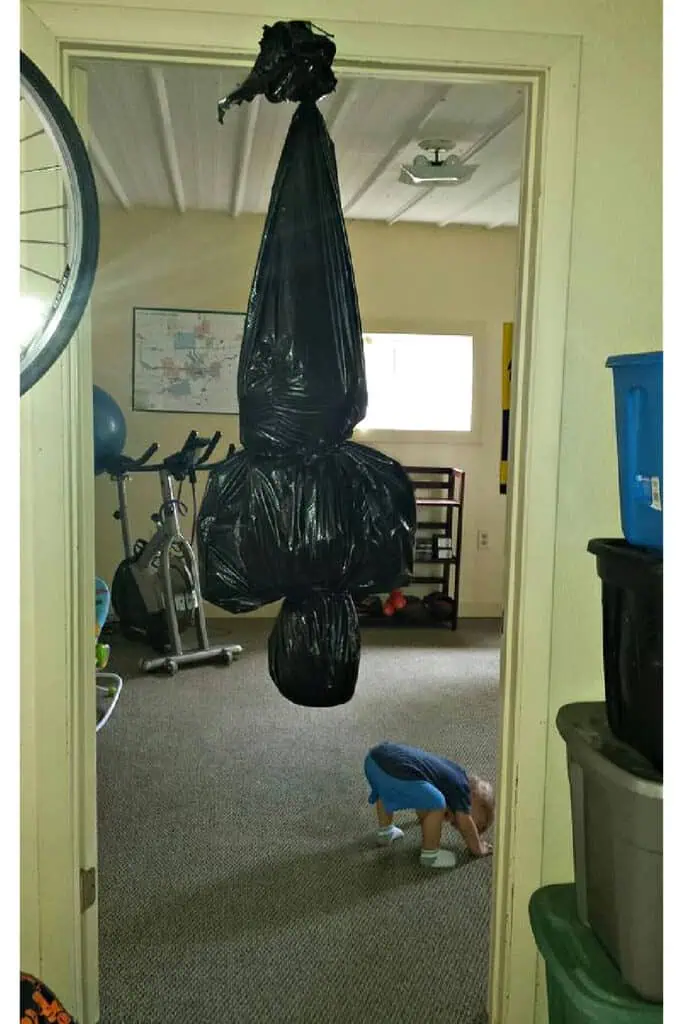
These diy body bags are soo cheap to make you can hang them in doorways indoors and outdoors as well as from the porch roof!
Foam and Spray Foam DIY Halloween Spray Props
SPIDER HOUSE DIY
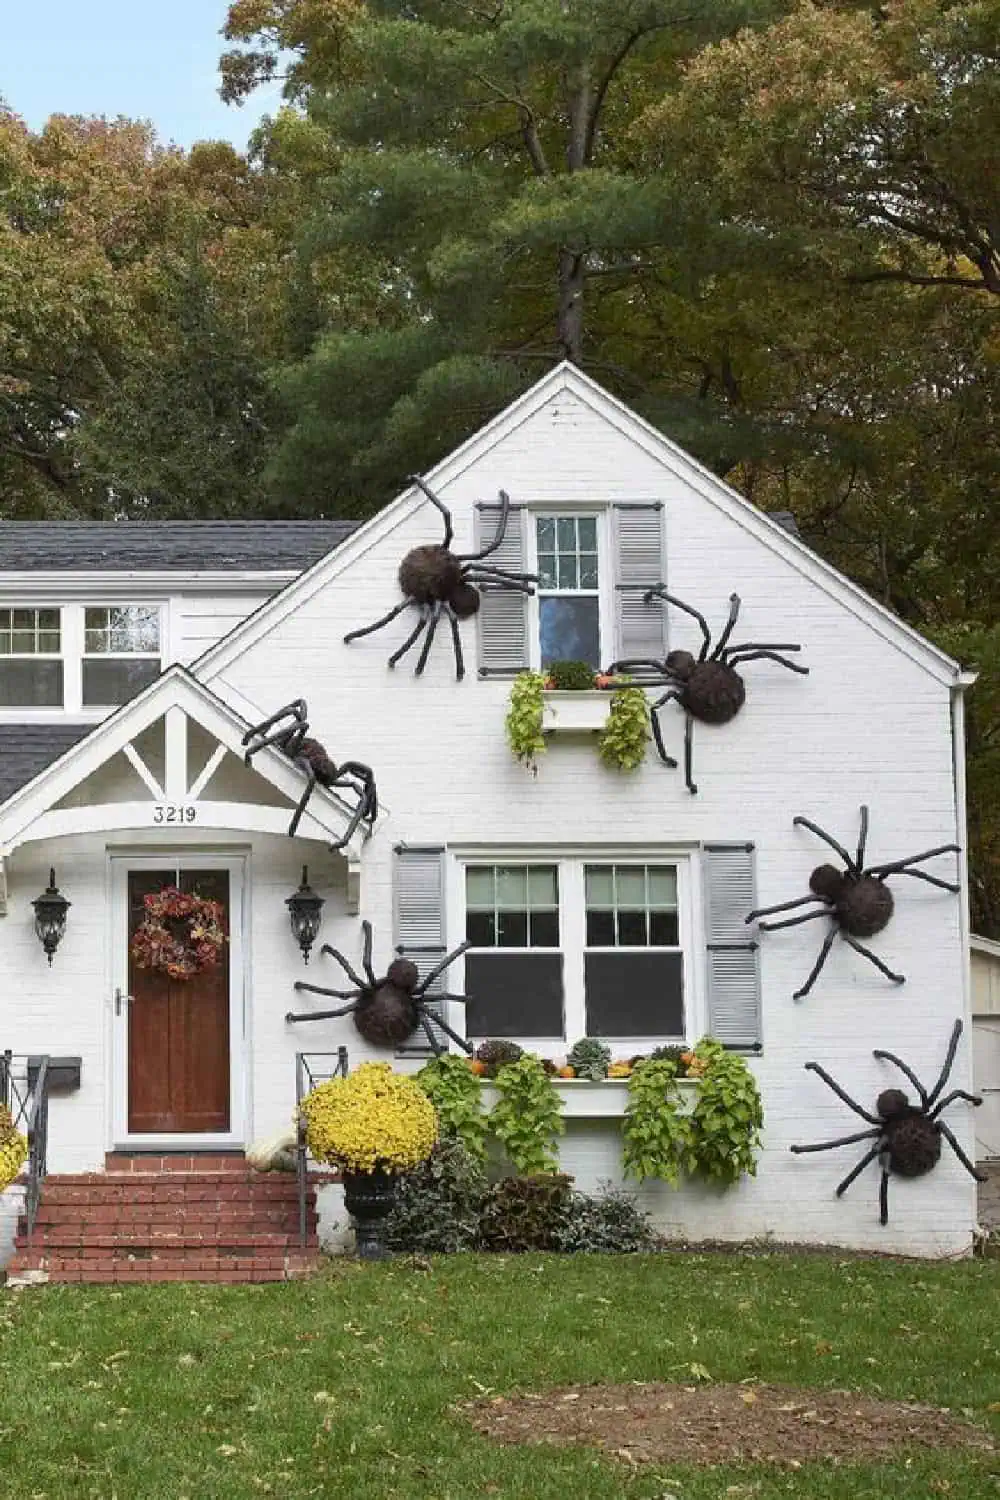
Make giant spiders for your outside Halloween home decor like the ones pictured above by Better Homes and Gardens. Set designers use foam board and spray foam for the body and pvc pipe for legs, also pool noodles with wire inserted would work. For a hairy body pack on some fur or hair texture before the spray foam dries.
Best Spooky Crow Halloween Porch Decor
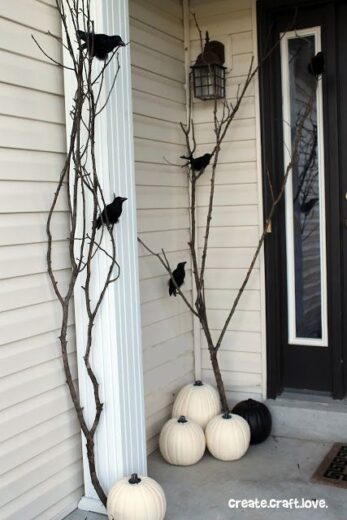
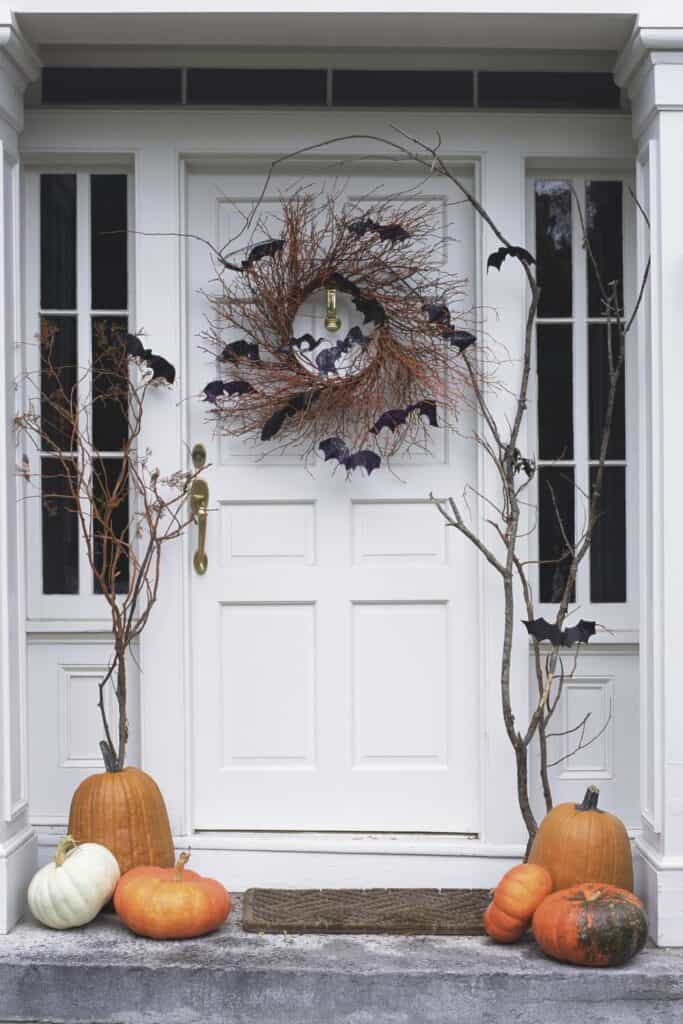
Set designers and party planners utilize branches and twigs as a cheap yet elegant way to decorate your front porch or entry way. Just add some pumpkins and dollar store fake crows.
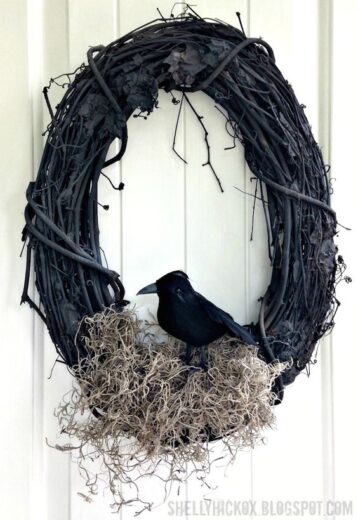
The same can be used to make a chic Halloween wreath for your front door
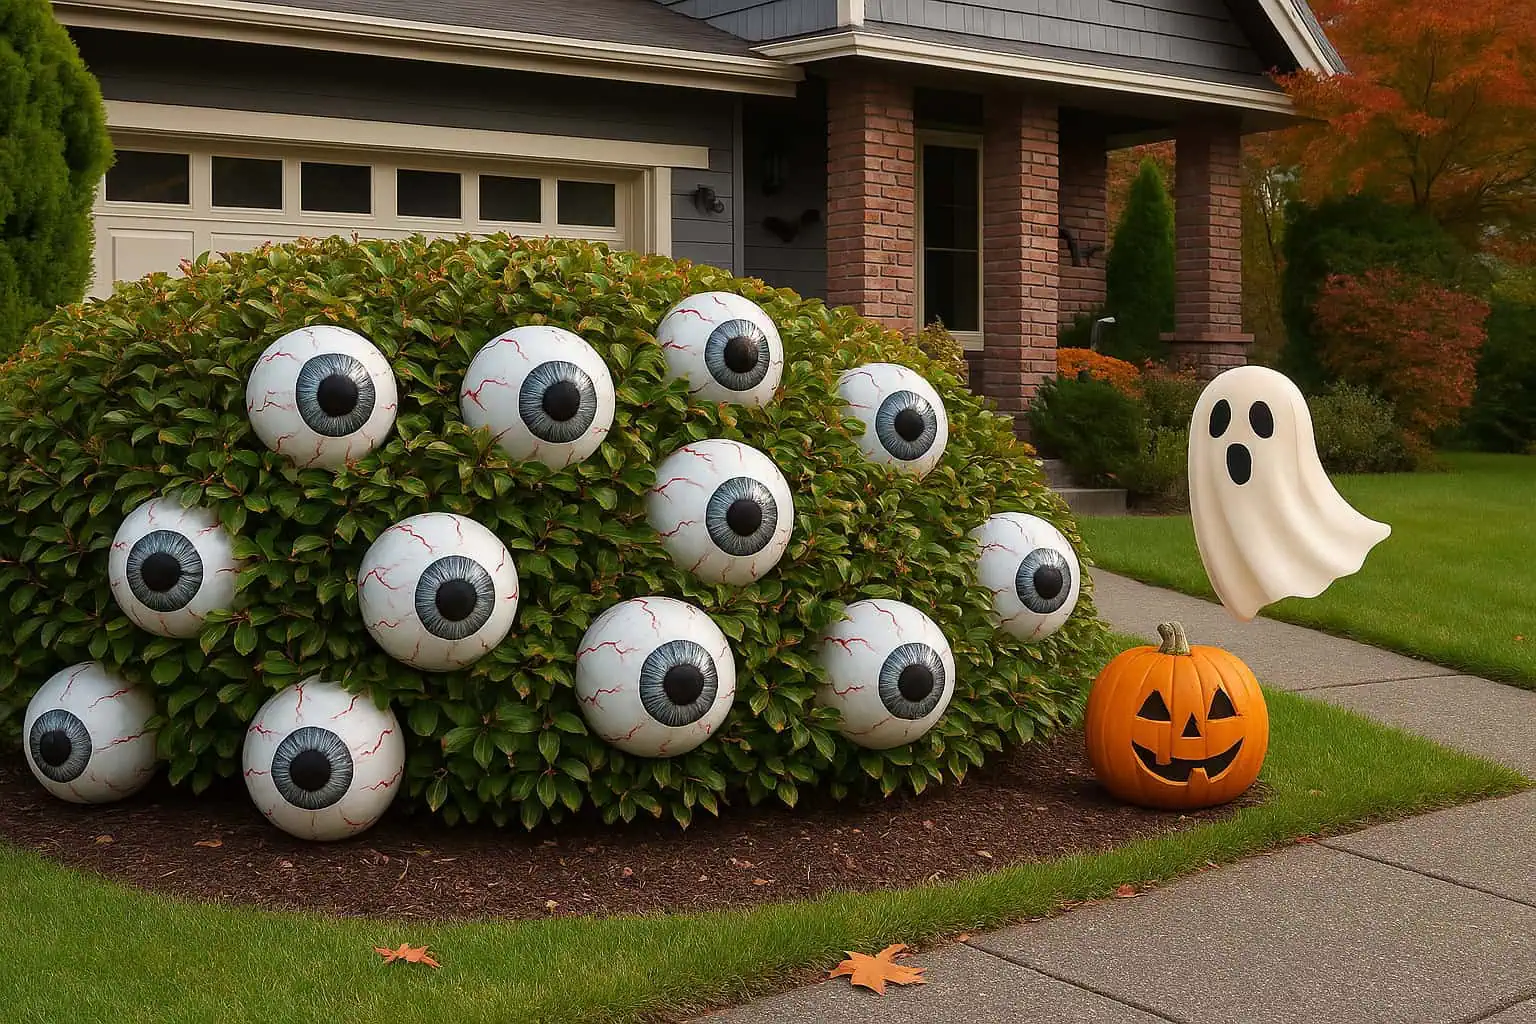
HALLOWEEN SPOOKY EYEBALL DECOR
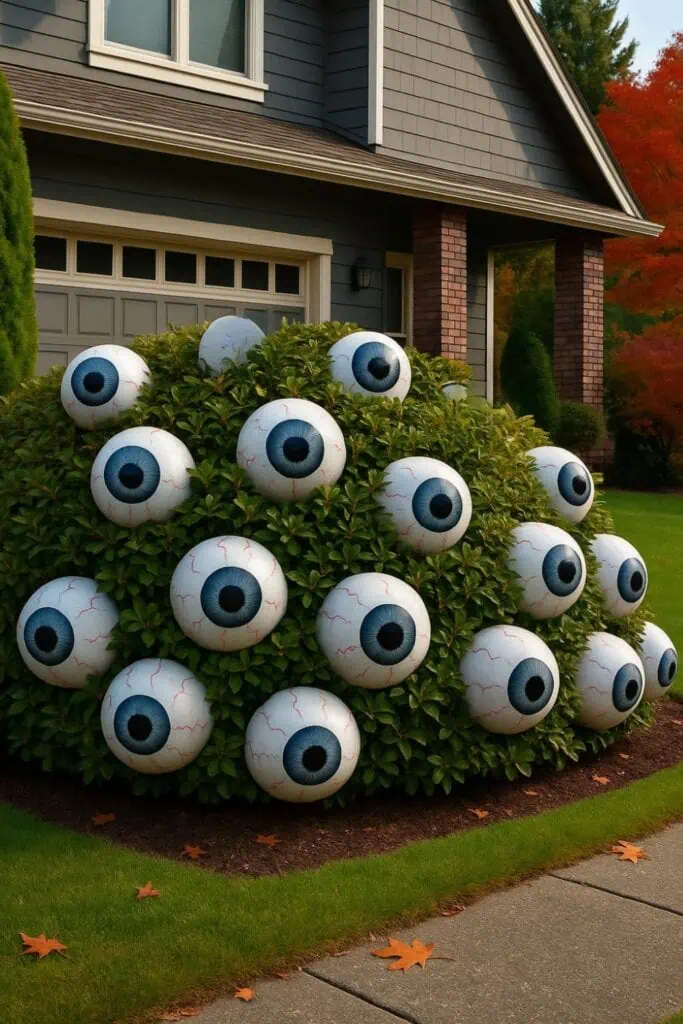
DIY Giant Eyeball Bush Instructions
Materials:
-
10–20 (OR LESS) large plastic balls (4–6 inch diameter) – white playground balls, foam balls, or bouncy balls work great
-
Acrylic paint: White, red, black, blue, green (for veins, pupils, and irises markers can also work for veins)
-
Paintbrushes
-
Optional: sealant spray for weather protection
-
Zip ties, floral wire, or long skewers (to secure them into the bush)
-
Hot glue gun (optional, if attaching skewers)
Instructions:
-
Base Coat the Eyeballs:
-
If your balls aren’t already white, spray or paint them white and let them dry completely.
-
-
Paint the Iris and Pupil:
-
Use a small bowl or cup to trace a circle for the iris.
-
Paint the iris in any bright color (blue, green, red, etc.).
-
Let it dry, then paint a black pupil in the center.
-
-
Add Veins for Spooky Effect:
-
Use a fine brush or red paint pen to draw squiggly red veins coming out from the iris toward the sides of the eyeball.
-
Let dry completely.
-
-
Seal (Optional):
-
Spray the eyeballs with a clear outdoor sealant to protect from rain or sun damage.
-
-
Attach to Bush:
-
Use zip ties, wire, or wooden skewers:
-
Zip tie/wire method: Poke a small hole into the back of the eyeball and thread a zip tie or wire through it. Wrap it around a sturdy branch inside your bush.
-
Skewer method: Hot glue or tape a skewer to the back of each eyeball and gently insert into the shrub so it stays upright.
-
-
-
Space Randomly:
-
Vary the height and angle to make it look like a monster peeking out!
-
Optional Tips
-
For waterproofing, use plastic ornaments or beach balls instead of foam.
-
Add glow-in-the-dark paint or insert battery tea lights inside clear ball halves for a night-time version.
-
Stick with odd numbers like 13 or 15 for a creepier visual effect.

A pool noodle, ping pong balls, and boa will make a wicked eyeball wreath for elegant last minute Halloween decor.
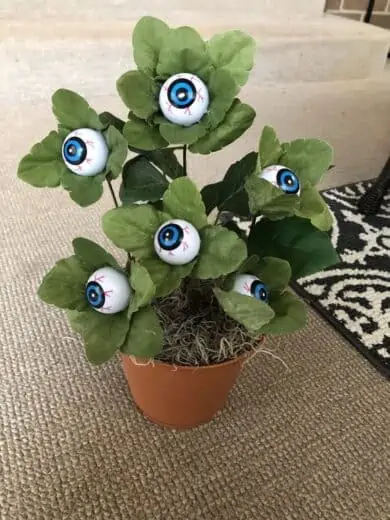
Glue those dollar store ping pong eyeballs to a fake plant! Spray paint the plant black for added effect or make the plant with black foliage.
WITCH DECORATIONS and Cauldron Props FOR YOUR HOME AND FRONT PORCH
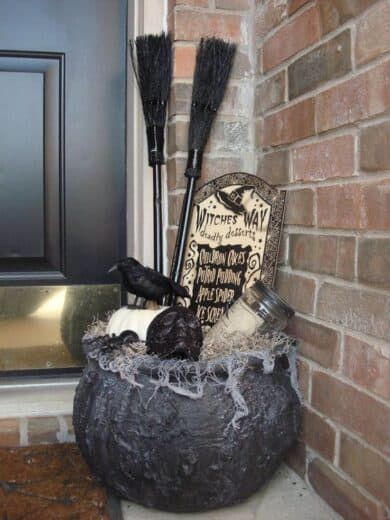
Grab a witches caulderon and fill it with wicked goodies for your front porch. Here are some filling ideas:
- Moss, cobwebs, paper filler, cheesecloth, straw/hay
- Pumpkins
- Brooms
- Spiders and bugs
- Skull
- Crow
- Potion Bottles
- Spell Book
- Lights
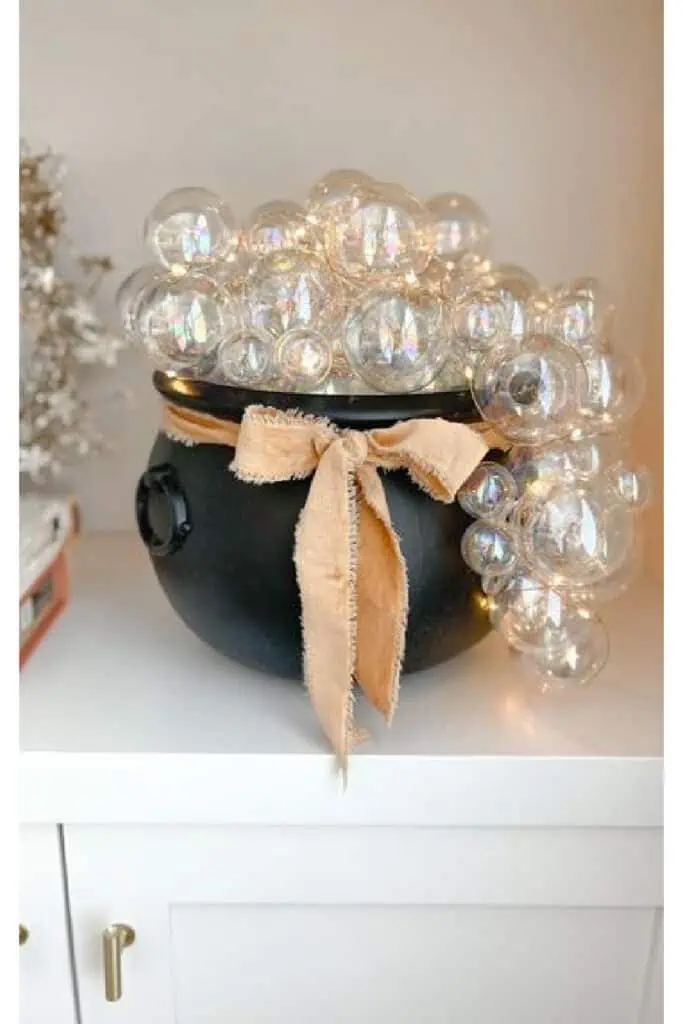
Make the Whimsical DIY Witches Caulderon pictured above using this video tutorial and the following items:
- Iridescent ball ornaments
- Witch Cauldron
- Foam ball
- Hot Glue
- Velvet Ribbon
- Twinkle Lights
Practical Magic inspired decoration! This cheap and creative DIY Halloween decor idea can be made with dollar store supplies (such as pool noodles) and adds a fun, eye-catching touch to your front porch or entryway. Perfect for budget-friendly Halloween decorating that will wow trick-or-treaters and party guests!
STEAMING CAULDRONS DRIVEWAY DECOR
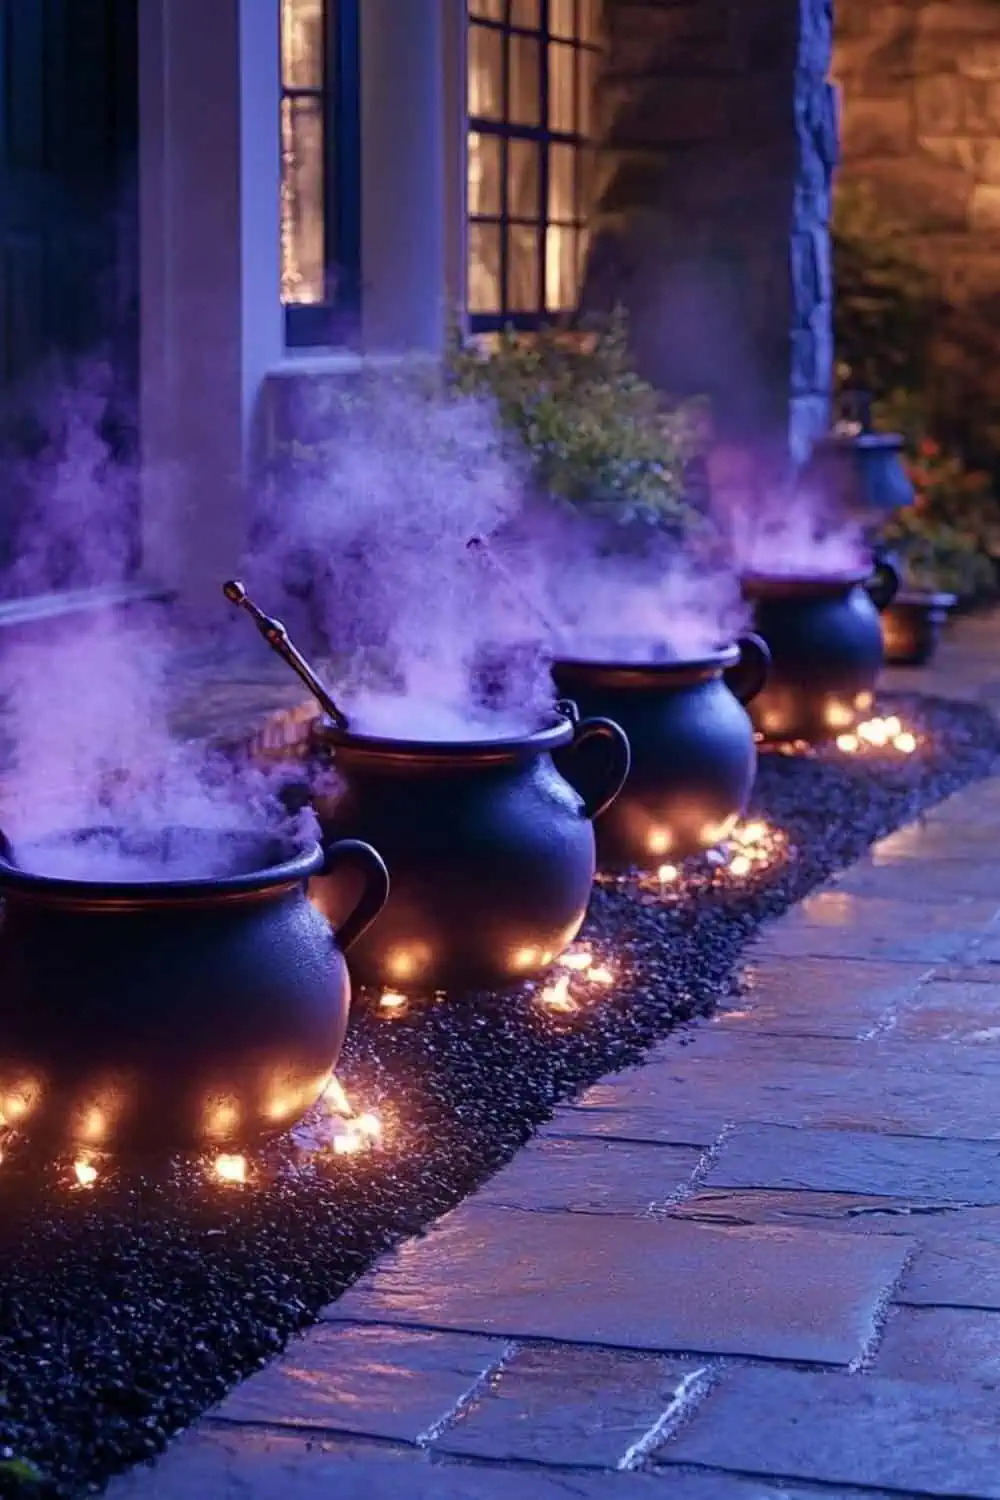
Place cauldrons outside, each on a bed of fairy lights, add purple lighting and dry ice or mist makers inside the cauldrons for an eerie fog effect.
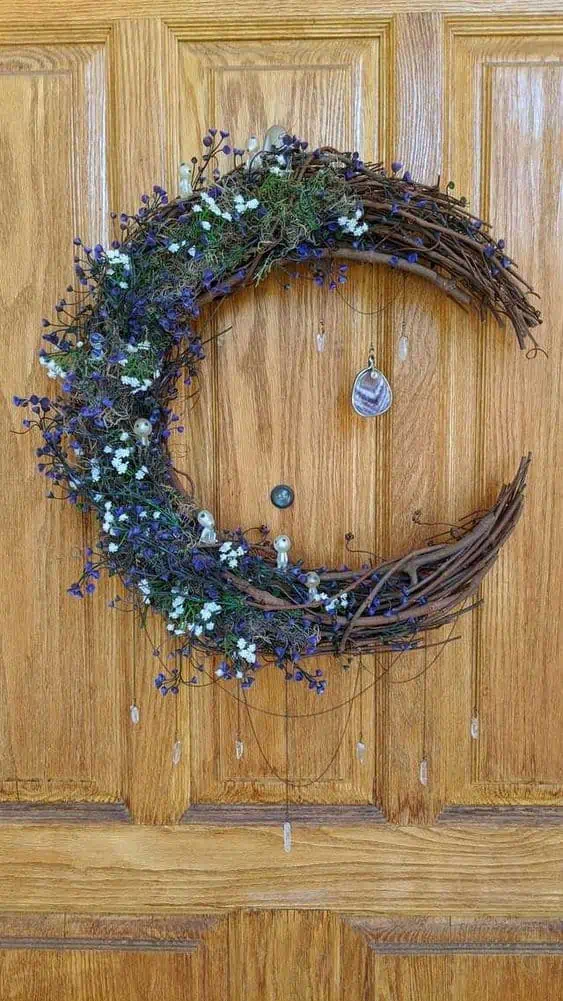
This easy DIY Dollar Store Witch’s Moon Wreath screams Practical Magic to us! You can use grapevine garland (or backyard twigs), and this helpful tutorial to make the dollar store wreath form shape. Here is another great tutorial that will give you more inspiration and tips on how to decorate it!
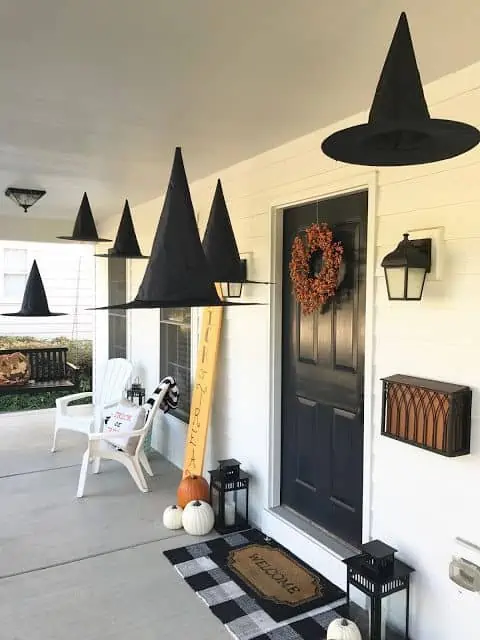
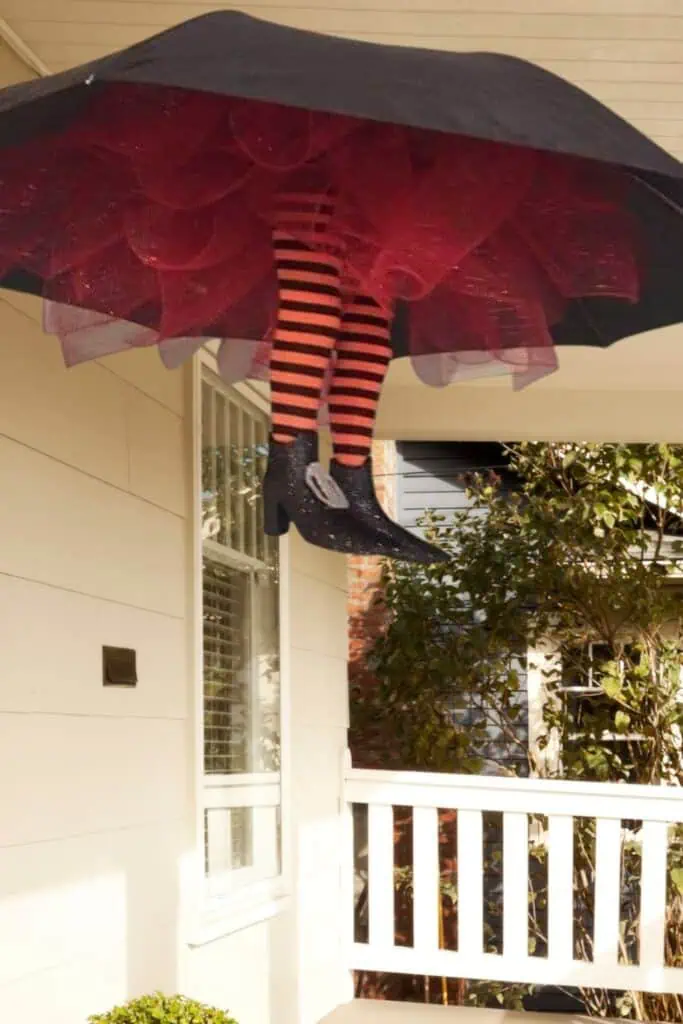
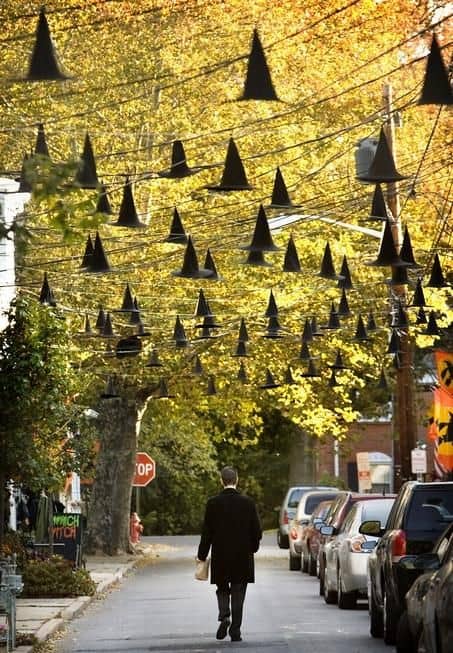
Suspend dollar store witches hats on nylon string for a floating witches hat effect.
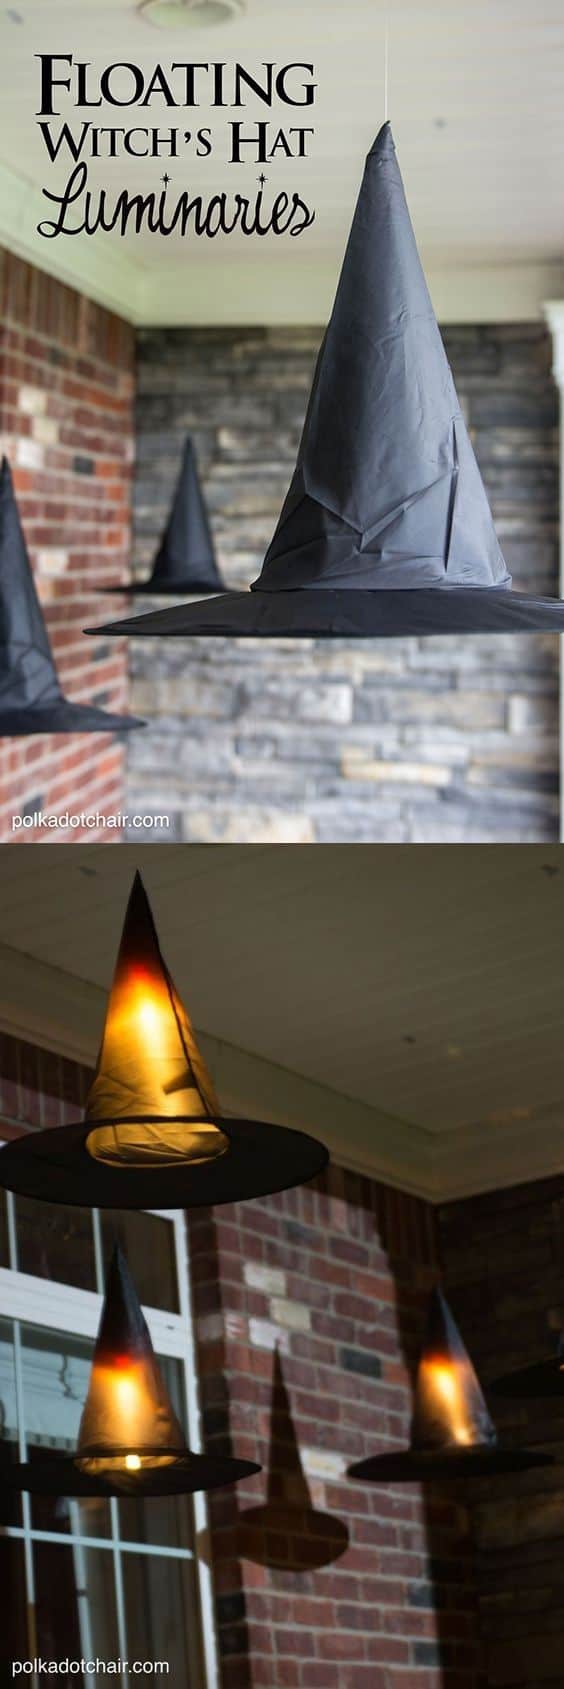
Floating dollar store witches hats may be all the haunting your front porch needs. There is a DIY option to make them luminaries.
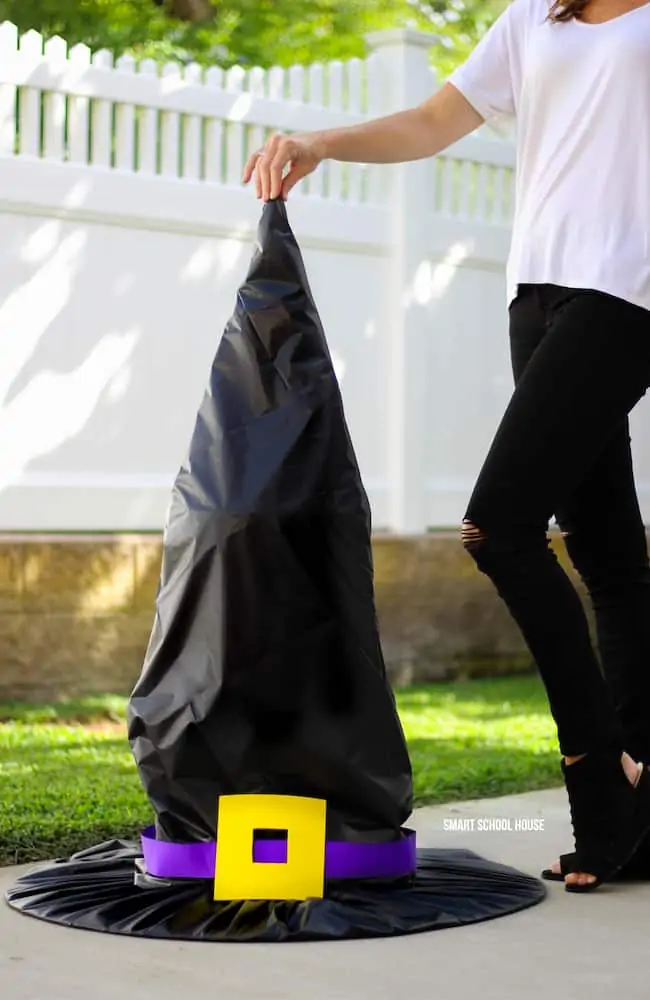
A tomato cage and a garbage bag can make an amazing witches hat for your porch or front yard.
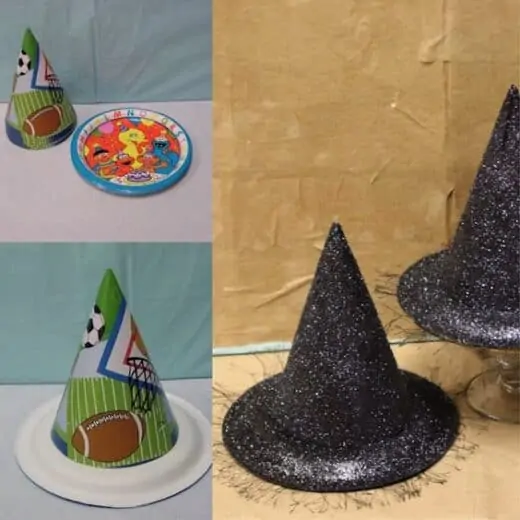
Make your own smaller witches hats with leftover paper Birthday hats and plates, glitter, and paint.
This lovely front porch Halloween decor idea comes from Old Time Pottery. This can take you from Halloween to Thanksgiving by just turning the pumpkin planters around and removing the signs, witches hats, and skeletons
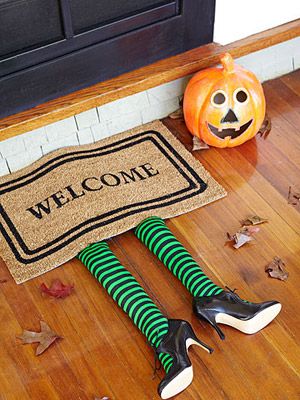
Stuff some stockings with filler or a pool noodle and add some witchy shoes to make a cheap yet chic witches doormat.
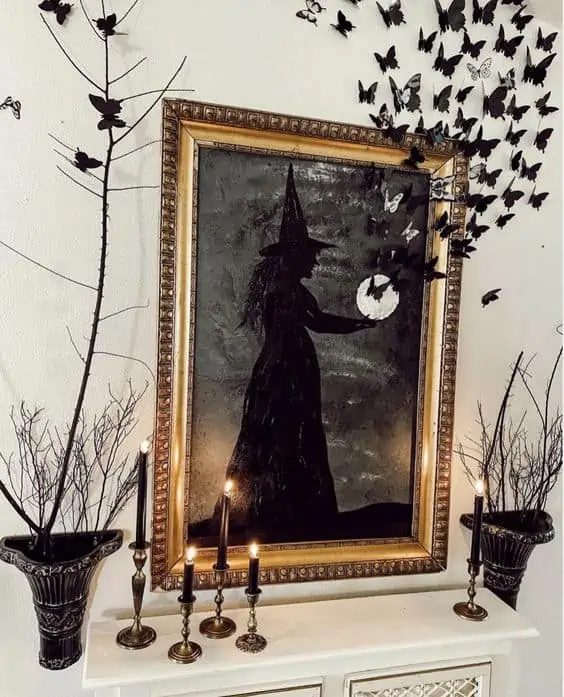
Use a vintage frame to make the elegant witchy painting above for your wall or mantle! You can purchase the black butterflies or bats on amazon.
BAT AND VAMPIRE DECORATIONS
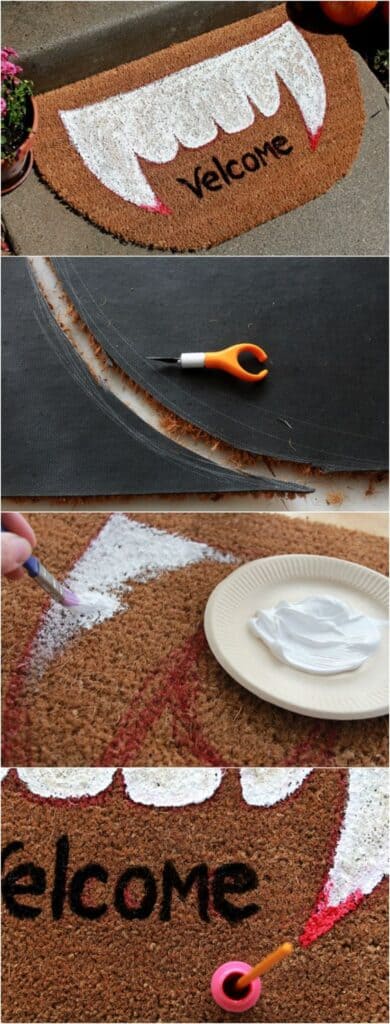
Paint a dollar store doormat for a fun Halloween craft you can use as decor.
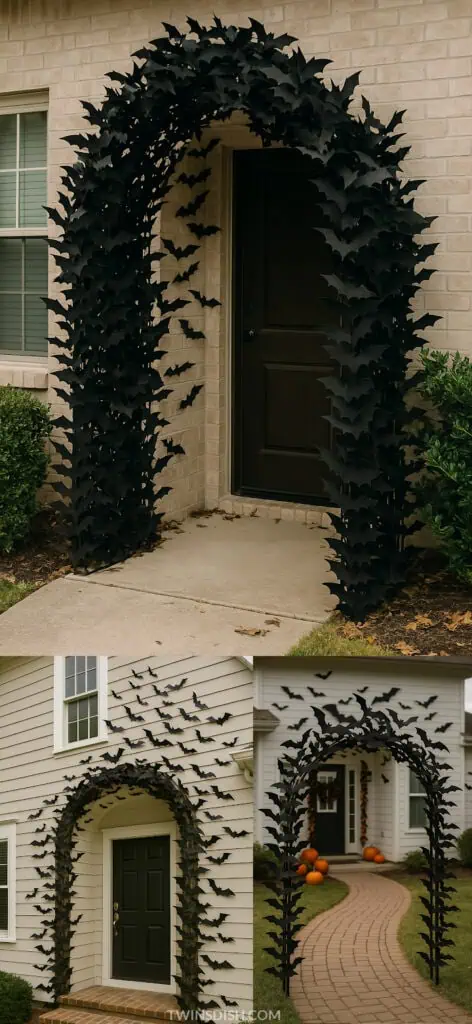
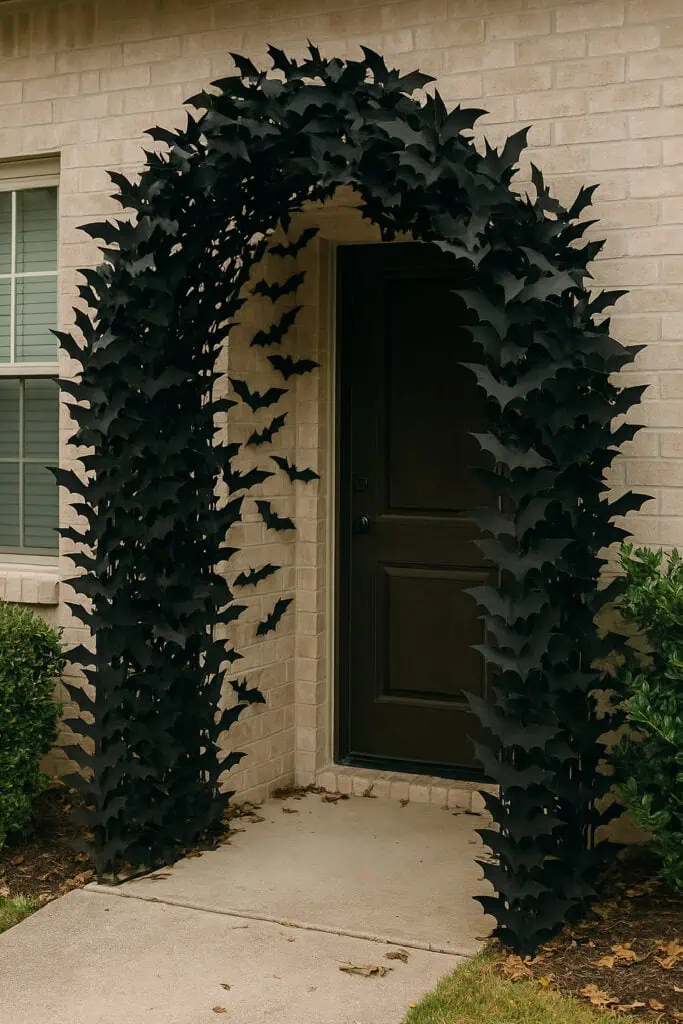
Gather those twigs and fallen branches for this cheap and easy yet chic Halloween outdoor decor idea using cheap bats.
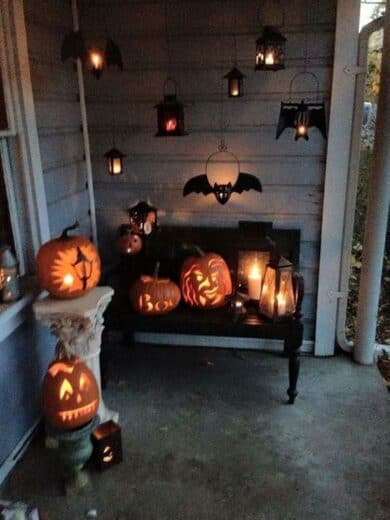
Bats, Pumpkins, and votives make an elegant and spooky front porch or apartment balcony decor for cheap.
DIY HALLOWEEN DECOR: FLOATING CANDLES AND CHANDELABRA
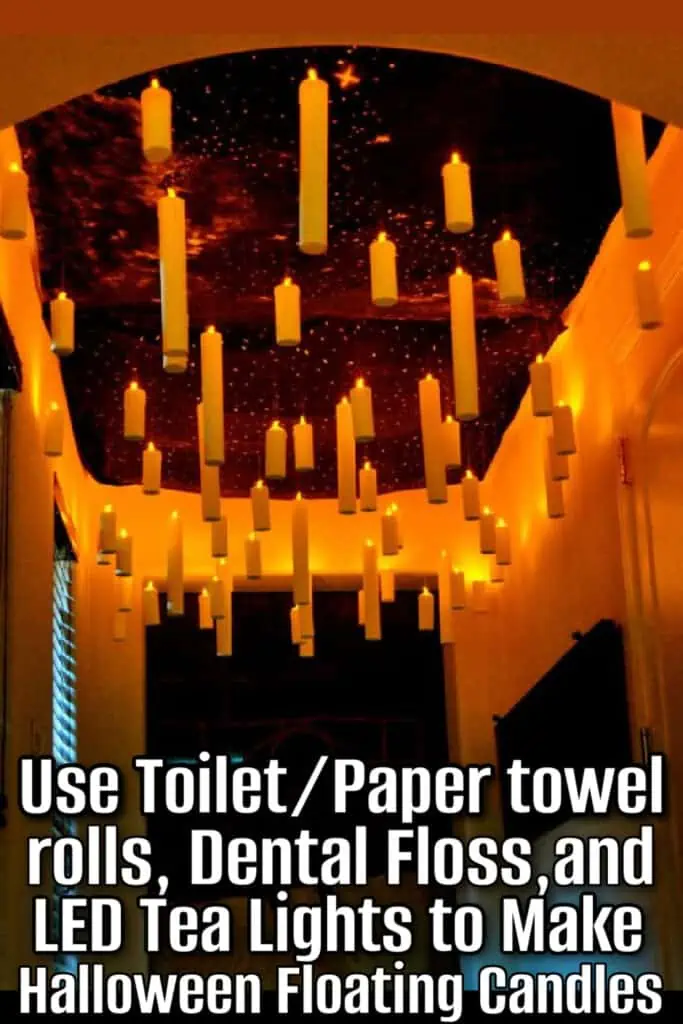
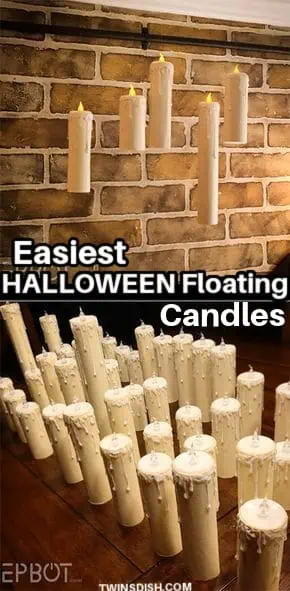
You can find another method for making the Halloween floating candles using cardstock by clicking here.
Best Halloween Outdoor Party Decor Ideas for your Porch or Balcony
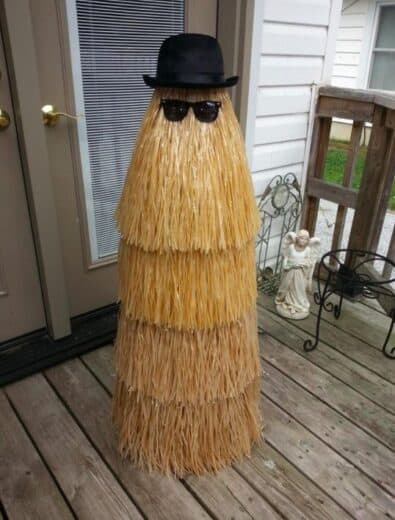
Buy a couple of those dollar store grass skirts to make your own Cousin It to greet guests at your front door.
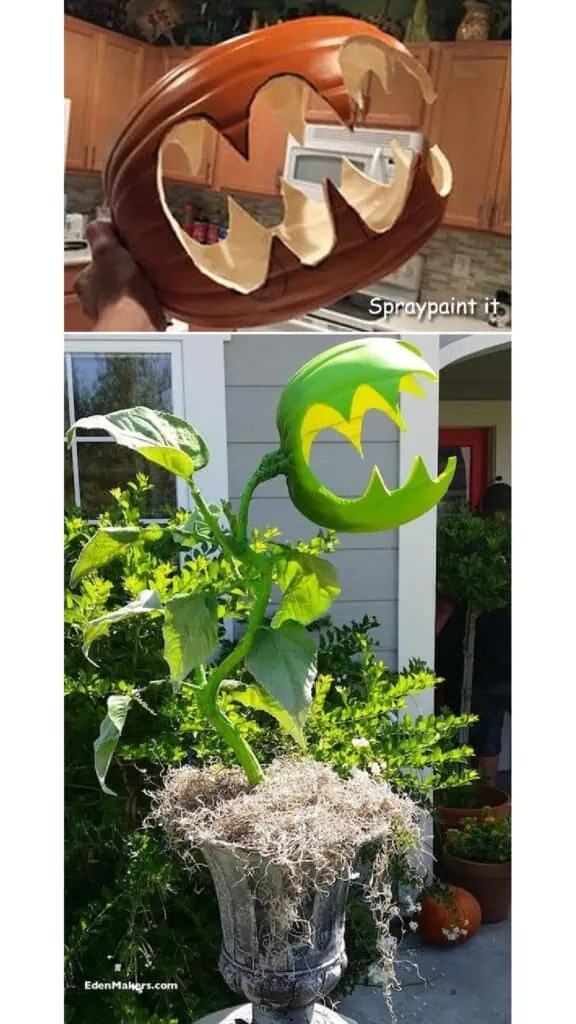
Make a man eating plant with a plastic pumpkin from the Dollar Store or Michaels! This is such a professional looking edition to your Halloween landscape!

Don’t forget those pumpkins leading up your stairs.
Have a haunted party on your porch with lighting, cobwebs and plenty of seating. This decor also works for an apartment balcony or patio.
Lay out your goodies on a table for an elegant Halloween porch party idea.

Dollar store plastic table clothes turn into illuminated tables when you place a tap light or camping light underneath the table. This could even work for a Halloween wedding.

Pumpkin luminaries make an excellent base for an outdoor Halloween party table! Click on the “Source” link to copy the look. When Halloween is over, simply spin around for Thanksgiving.
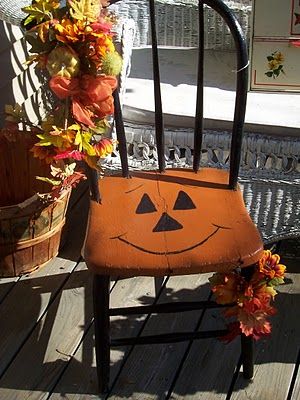
Don’t forget the seating! Paint a face on an orange chair, or buy dollar store pumpkin face stickers you can remove after Halloween.

Use white Pumpkins and Christmas lights in your yard to light the way to your home or event.
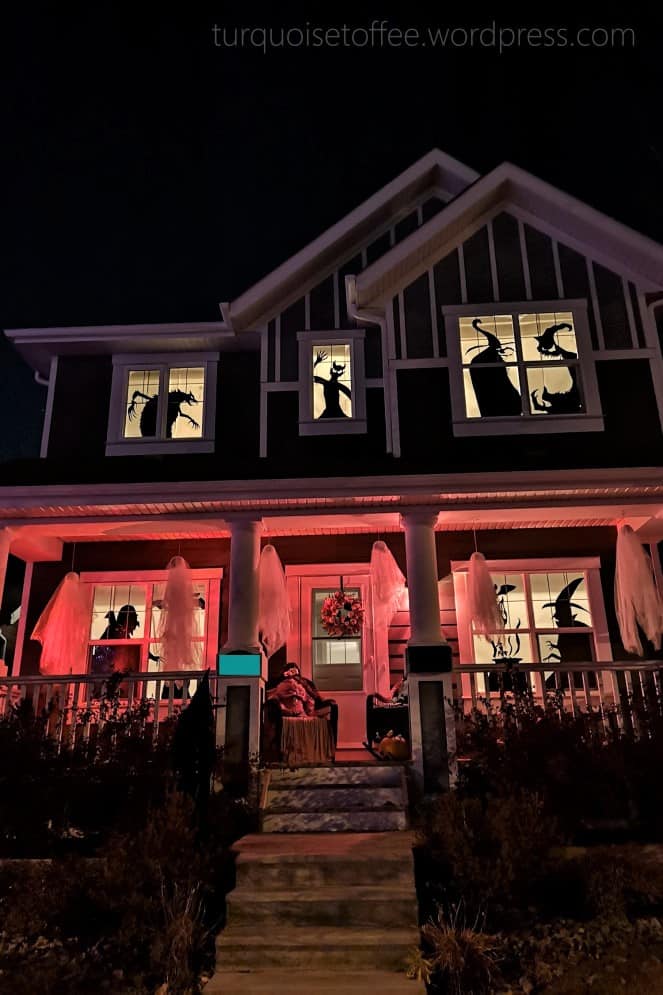
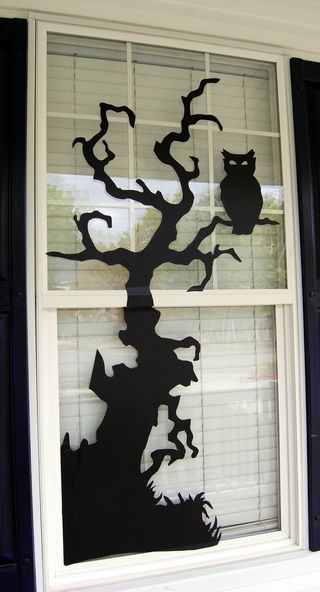
CARDBOARD Halloween Silhouettes for Windows and Doors
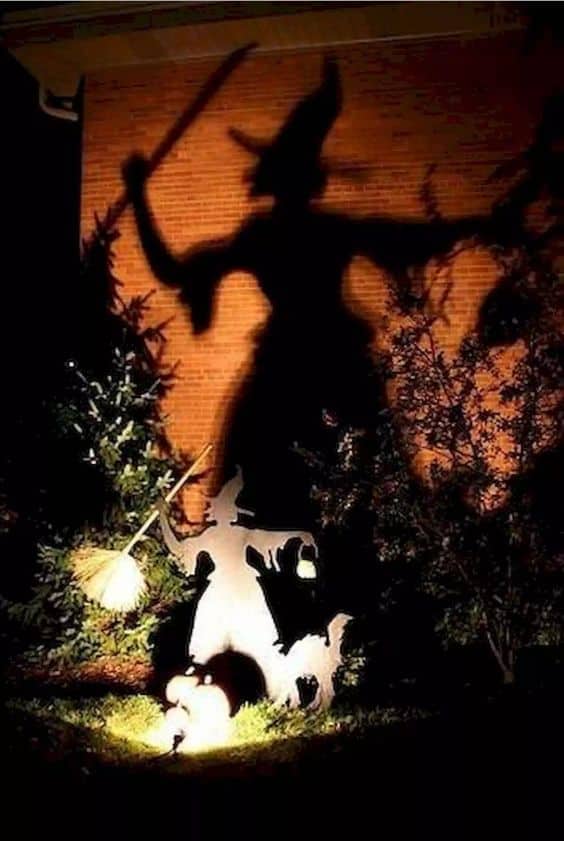
No need for labor intensive decorations and lights, Halloween silhouettes placed infront of a light will cast an eerie shadow on your home walls.

They’re creepy by day and night! Martha Stewart has an excellent tutorial. You can make them as simple or elaborate as you’d like.

Make these shadow witches out of thin wood board, cardboard, or posterboard.
Just add some lights behind them or infront of them to get your desired effect.
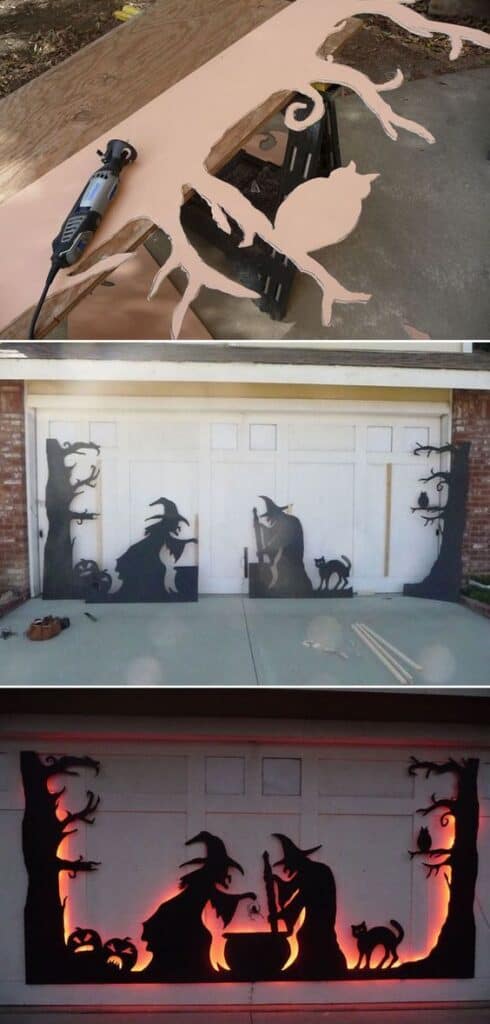
Don’t forget that garage, lighted silhouettes work great for that too.
Make these super easy Halloween silhouettes for your windows out of garbage bags to make the neighbors think you’re having a ghostly party.
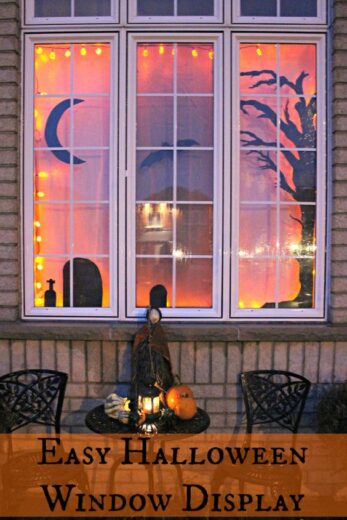
There is plenty of inspiration for window design ideas.
The method above uses vinyl sheets instead of garbage bags.
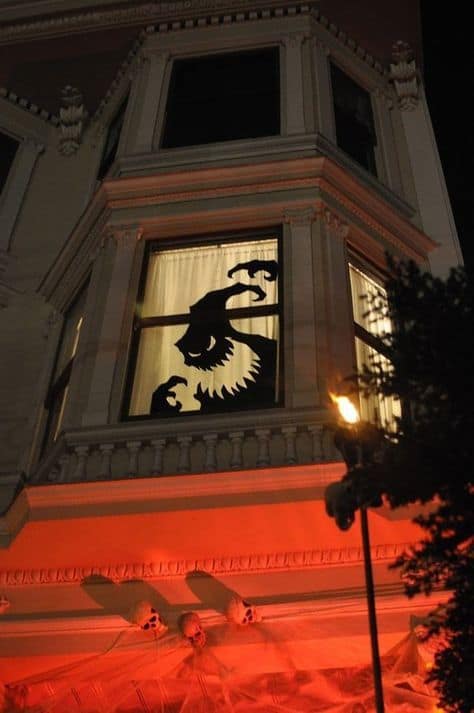
OOGIE BOOGIE man will make even an apartment window come to life.
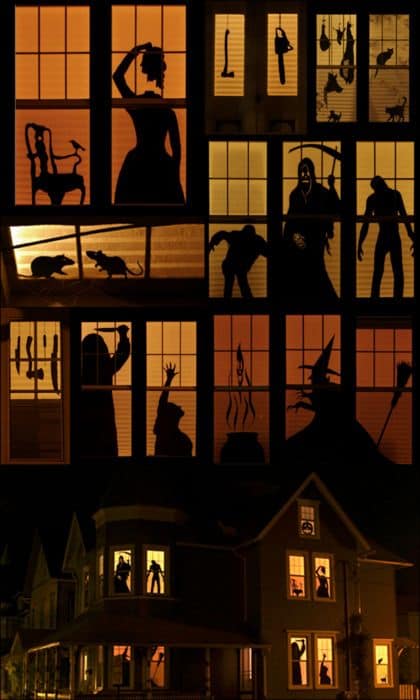
Here are plenty of horrific silhouette design ideas.
View this post on Instagram
You can also paint your windows too! For the details on how to do this visit the instagram page above.
Best DIY Outdoor Ghost House Decor
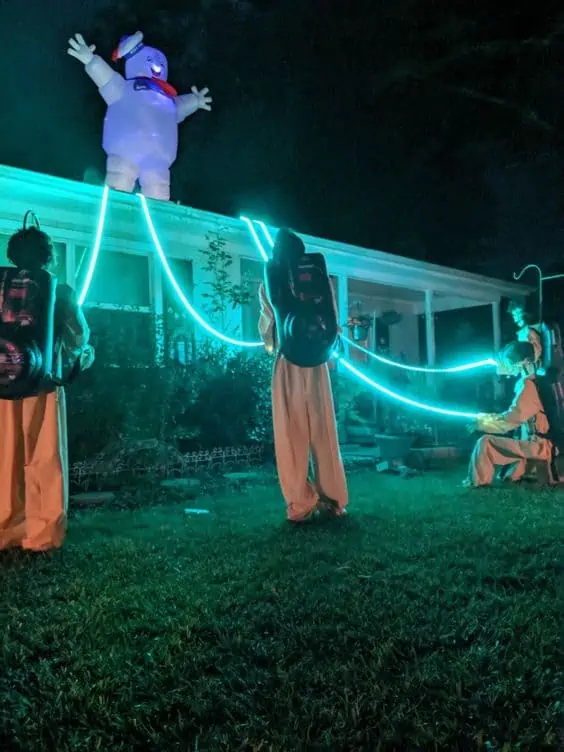
Dress your skeletons up as Ghostbusters and add some outdoor rope lighting for the proton pack beams.
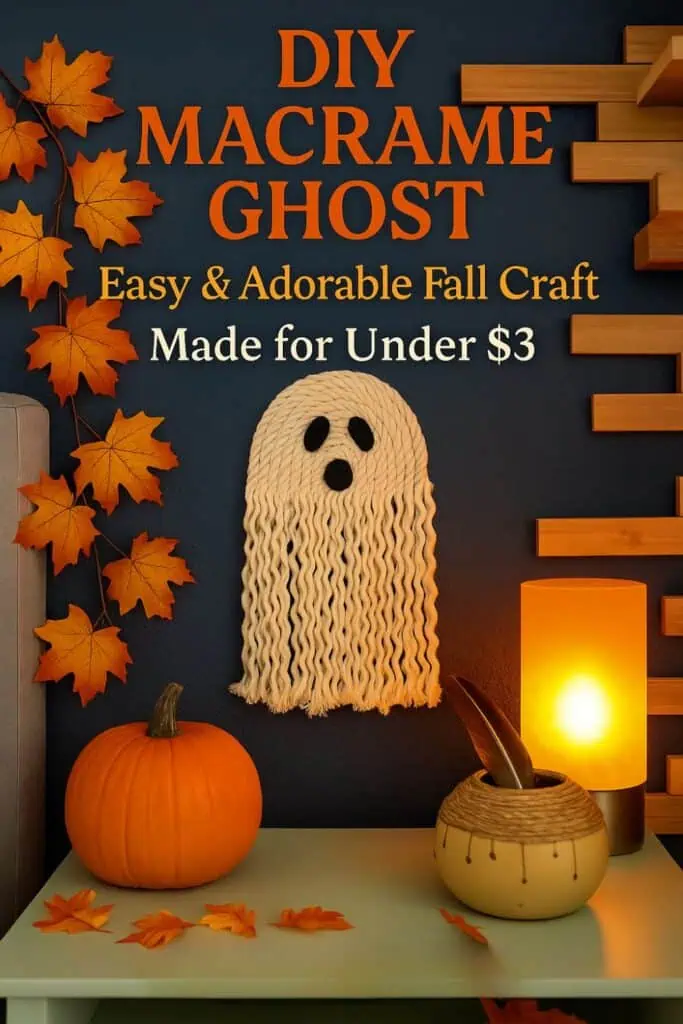
This viral macrame ghost by The Navage Patch is the cutest thing you can hang on your wall this Halloween indoor or outdoor — and it costs under $3 to make! Check out their easy full tutorial here.
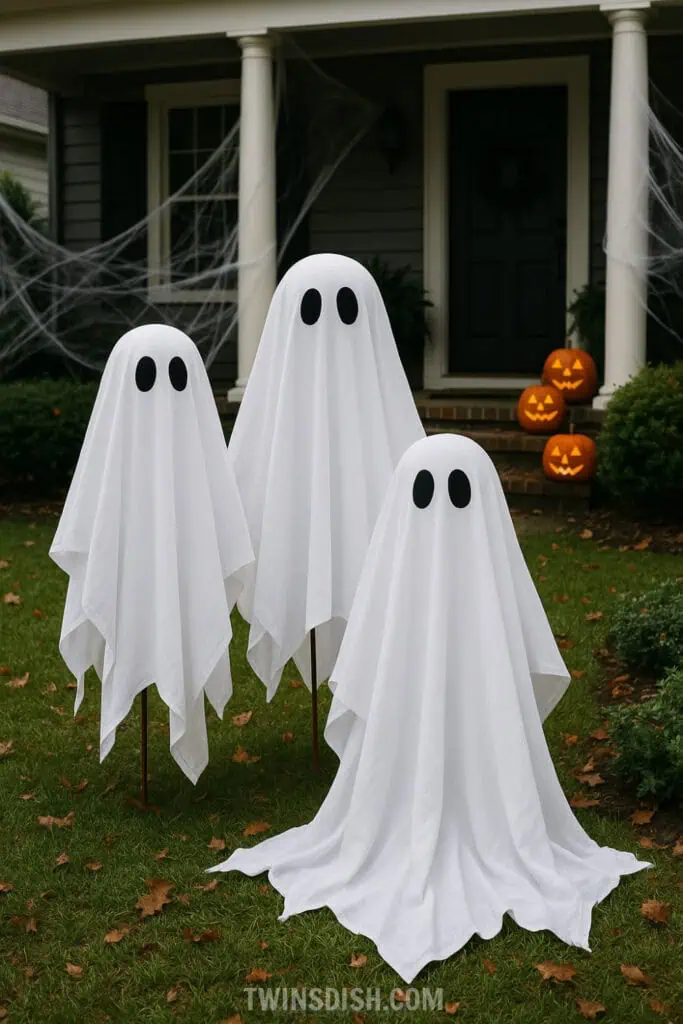
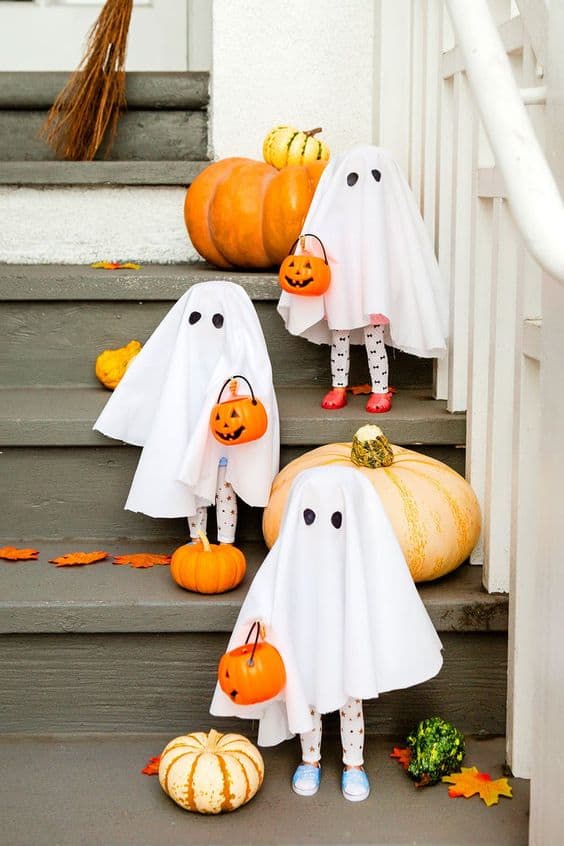
Lawn Ghosts Materials:
-
White sheets or fabric (Large enough to cover a person or to drape over a frame)
- Styrofoam or Floral foam ball
-
PVC pipes or wooden dowels (for the base, to stand them up)
-
Black fabric or felt (for the eyes)
-
Scissors
-
Hot glue gun or fabric glue
-
String lights (optional, for added effect)
-
Stakes or heavy rocks (optional, to secure the base)
-
Bucket or container (optional, for a weighted base)
Instructions:
Step 1: Prepare the Ghosts’ Shape
-
Cut the fabric: Take your white sheets or fabric and cut them into large squares or rectangles (about 6×6 feet or larger, depending on how tall you want your ghosts).
- Place the Styrofoam ball or floral foam: on PVC pipe or yard stick dowel
-
Shape the fabric over the frame: Drape the fabric over a structure of the PVC pipe or wooden dowel. You can create a stand by inserting the pipe/dowel into the ground or place it in a container or bucket filled with sand or gravel for added stability.
- Secure the sheet onto the head of the Ghost incase of wind: Use pins or even glue to secure the sheets to the head of your ghost.
Step 2: If Creating the Base for the Ghosts
-
Prepare the base: For each ghost, take a PVC pipe or a wooden dowel about 5 to 6 feet tall. Push it into the ground or place it in a bucket (weigh it down with rocks or sand if using the bucket).
-
Secure the ghost on the base: Drape the white fabric over the top of the base and let it hang down. Adjust the fabric so it creates a flowing, ghostly appearance.
Step 3: Add the Eyes
-
Cut out eyes: Using black fabric or felt, cut out two large, circular shapes for the eyes. They should be around 5 to 7 inches in diameter, depending on the size of your ghost.
-
Glue the eyes: Attach the black fabric to the white fabric using a hot glue gun or fabric glue. Position them in the center of the ghost’s face, about a foot or two below the top.
Step 4: Add Lights (Optional)
-
Optional glowing effect: For a spooky touch, you can add string lights inside the ghost to make it glow at night. Simply wrap the string lights around the PVC pipe or inside the fabric. We used solar string lights with amazing results!
Step 5: Secure the Ghosts
-
Anchor them: If it’s windy or if the ghosts aren’t standing sturdy, use stakes or heavy objects (like bricks or rocks) to weigh down the bottom of the fabric, ensuring the ghosts stay upright.
Step 6: Enjoy!
-
Place the ghosts: Once you’ve finished setting them up, place them around your yard where they’ll be most visible, like near the walkway, in the front yard, or near a porch.
Tips:
-
Multiple Sizes: Make a few of varying heights to add dimension to your display.
-
Personalize: You can add additional decorations like hats, scarves, or even a spooky message on the fabric to make them more personalized.
These lawn ghosts are simple to make, budget-friendly, and create an eerie, fun look for Halloween!
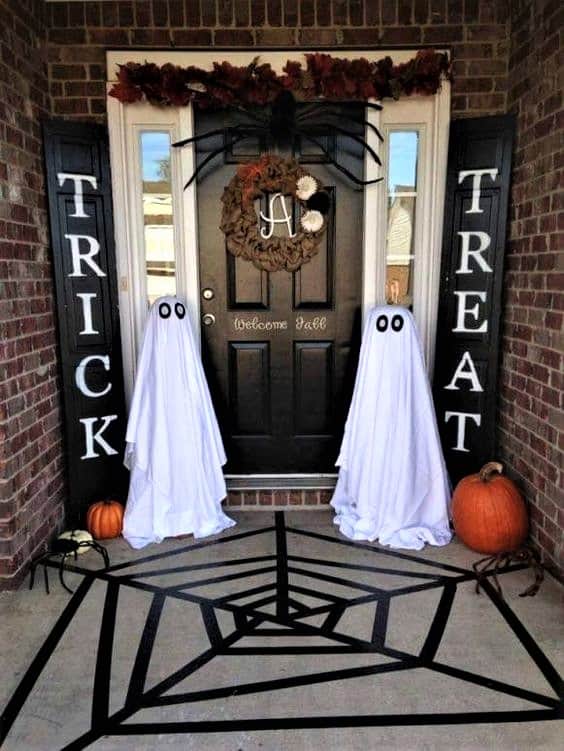
Tie them around the neck (as pictured above) if high wind is a concern or you want them less scary for little kids.
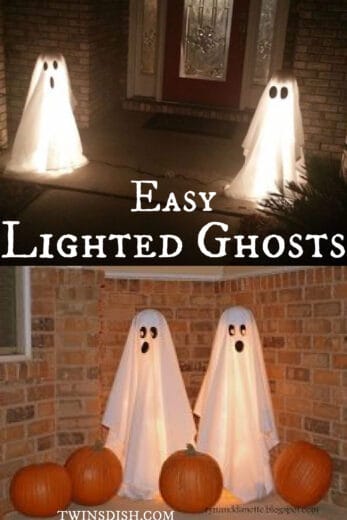
TOP PHOTO TUTORIAL, BOTTOM PHOTO TUTORIAL
The above is another version using Tomato cages and tap lights to transform into cheap and easy ghosts you can place next to your front door or porch entrance.
Make Cheese Cloth Ghosts (pictured above). These are perfect for placing over outdoor lights too! Use one of the following methods to make them: Method one, method two
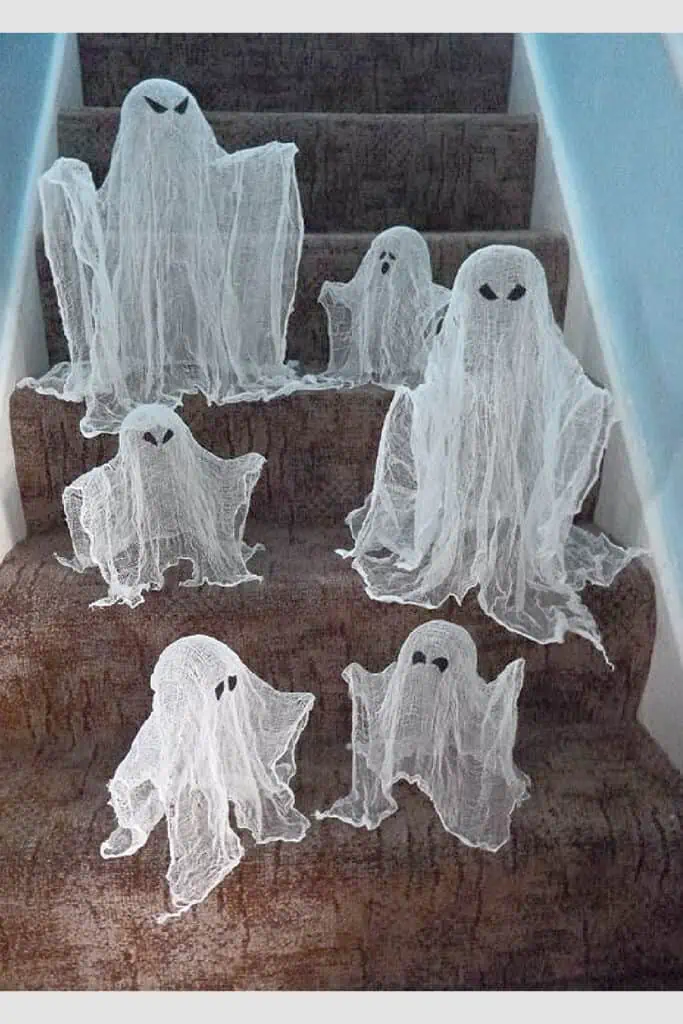
You can add creepy smaller doll ghosts to your stairs or even tables. This takes Chucky doll fears to a whole new level
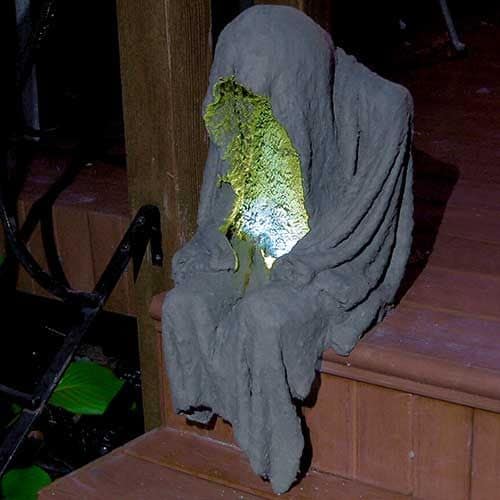
Make an eerie cement ghoul or spook to sit on your steps or creep in the bushes.
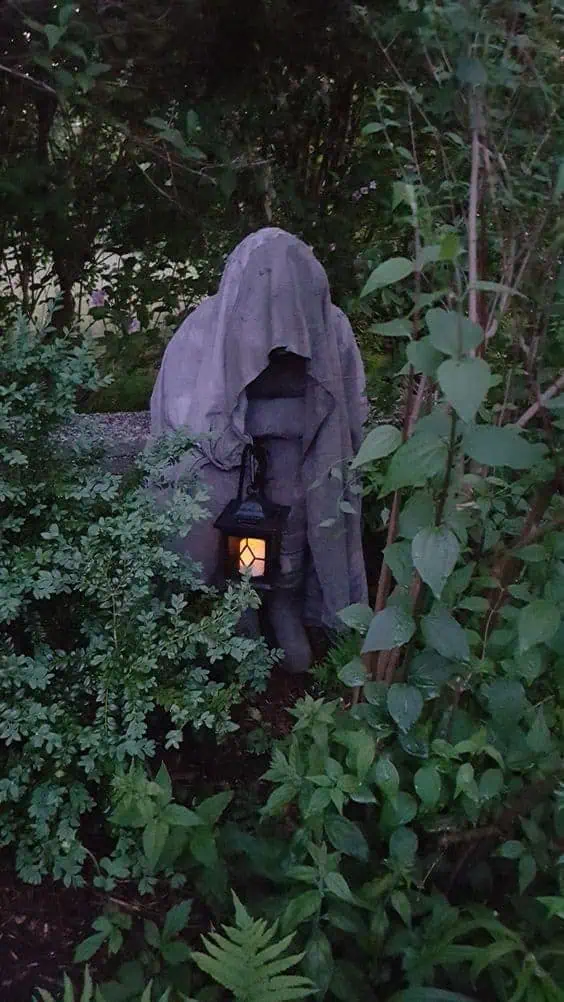
To Diy, drape fabric dipped in fabric stiffener (buy it or try one of these Diy recipes) on a mannequin or coat hanger and let dry.
Some black tape can create an elegant yet spooky design for cement floors.
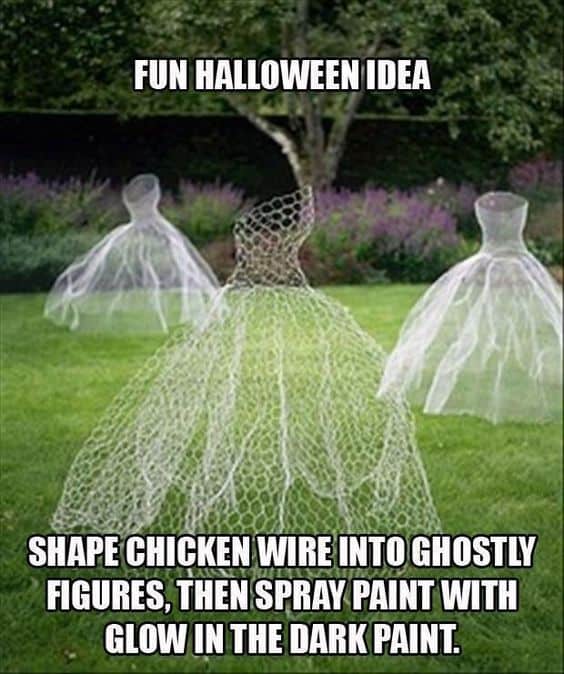
For more realistic and ethereal looking ghosts, you can use the chicken wire method, just be careful when handling chicken wire as it is sharp.
Make a spooky yet elegant masking tape ghost. This method provides professional looking results.
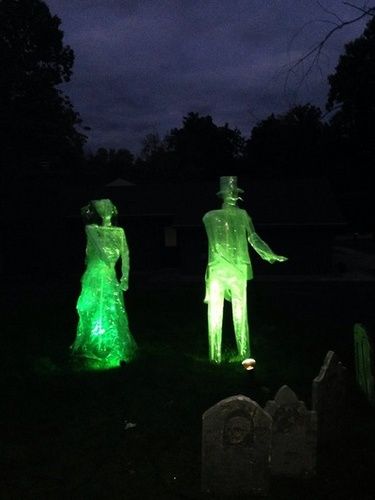
Illuminated ghosts are the perfect addition to your Halloween cemetery.
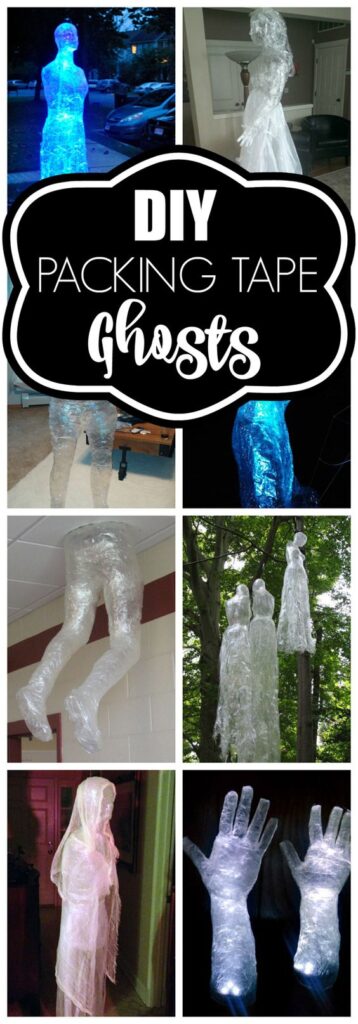
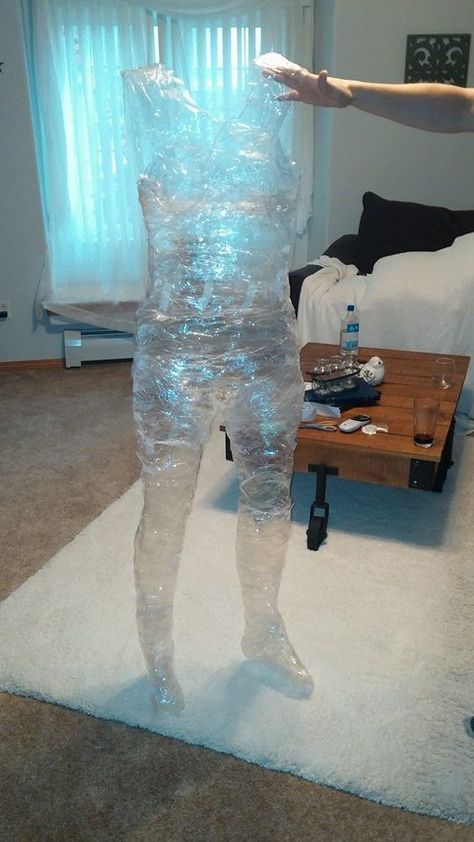
There are plenty of ideas for shipping tape ghosts to fit ever ghostly need and style.
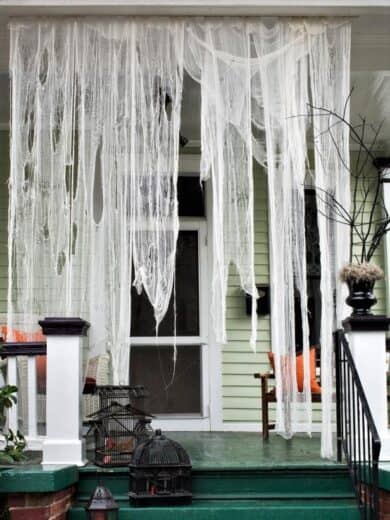
Make ghostly tattered drapes to give your porch a haunted look.
Best DIY Skull and Skeleton Decor Ideas
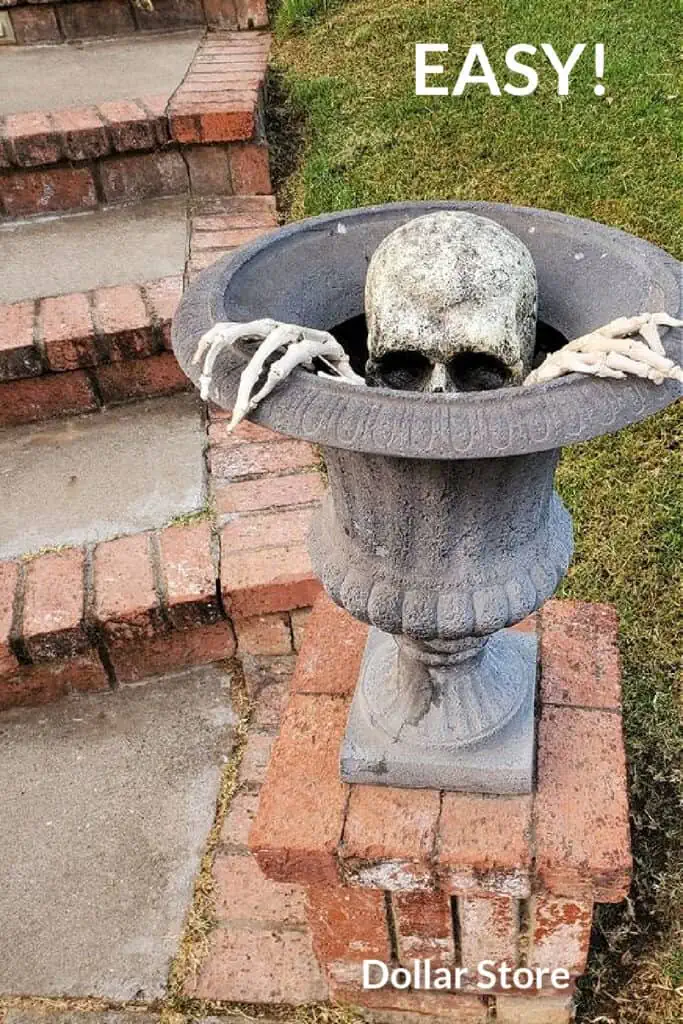
Grab a skeleton head and hands from the Dollar Store and have them creeping out of your flower pots and Porch vases!
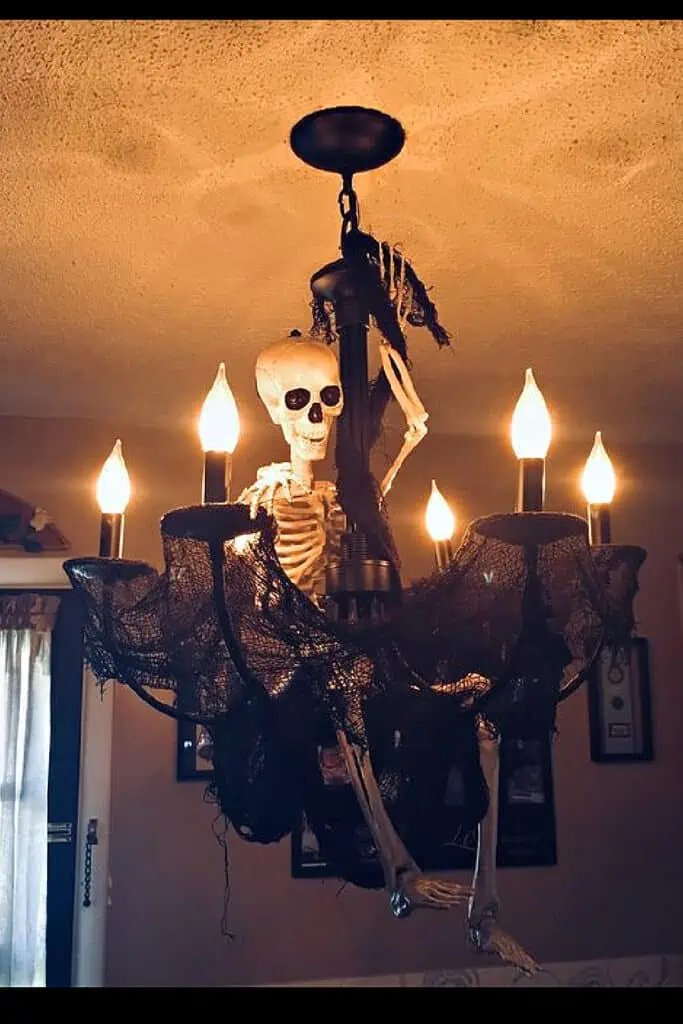
Hang a skeleton from your chandelier or light fixture. Just be sure to steer clear of the bulbs if they aren’t LED. Top it off with spider webs or black cheese cloth!
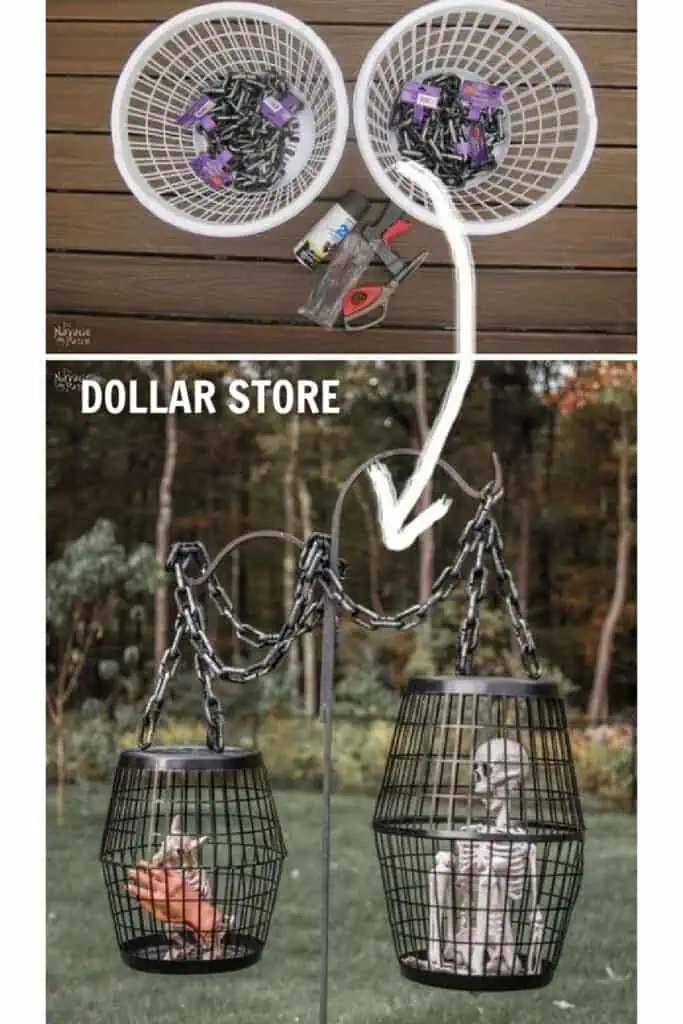
Everyone loves the easy dollar store cage Halloween Decoration pictured above! It’s ridiculously cheap and easy!
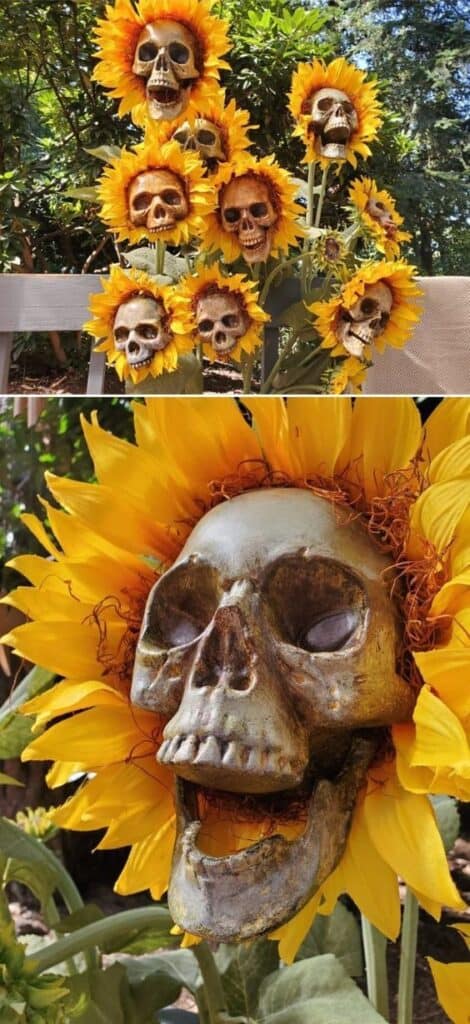
Haunt your garden with DIY skull sunflowers.
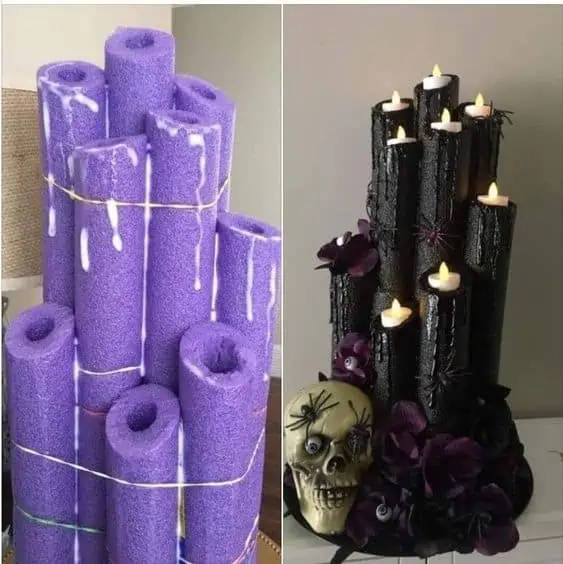
Make a skull Chandelabra out of dollar store pool noodles, use hot glue for the drippings.
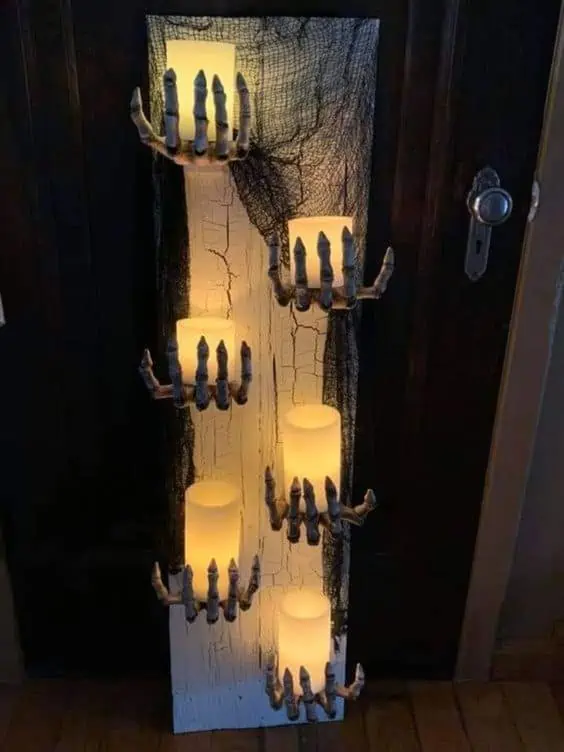
Use dollar store skeleton hands, black cheese cloth, a piece of foam board or scrap wood, and this tutorial to create these easy DIY Skeleton hand sconces for your home or porch.
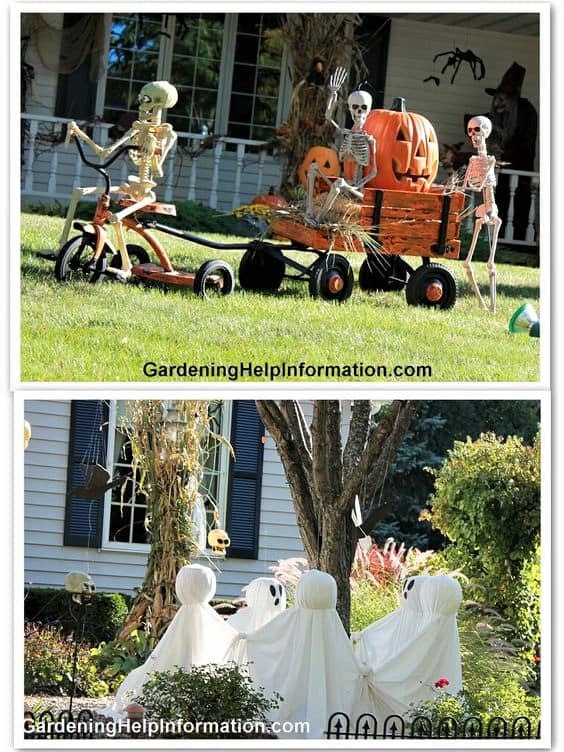
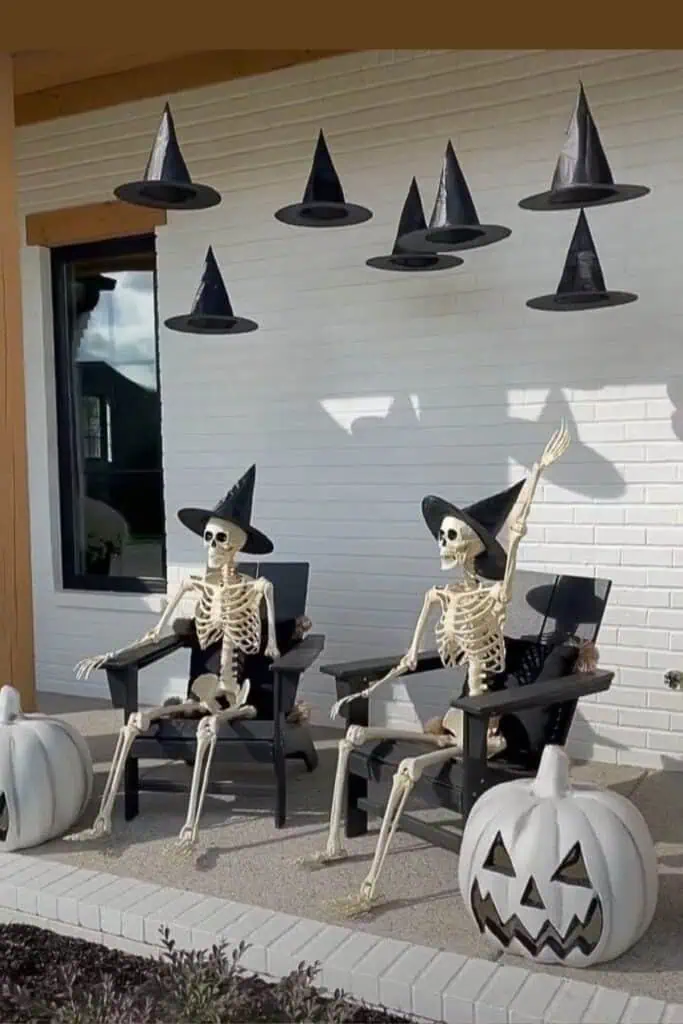
Full bodied skeletons are one of the easiest and most versatile ways to decorate your home or apartment for Halloween.
Place them on old tricycles or bikes…
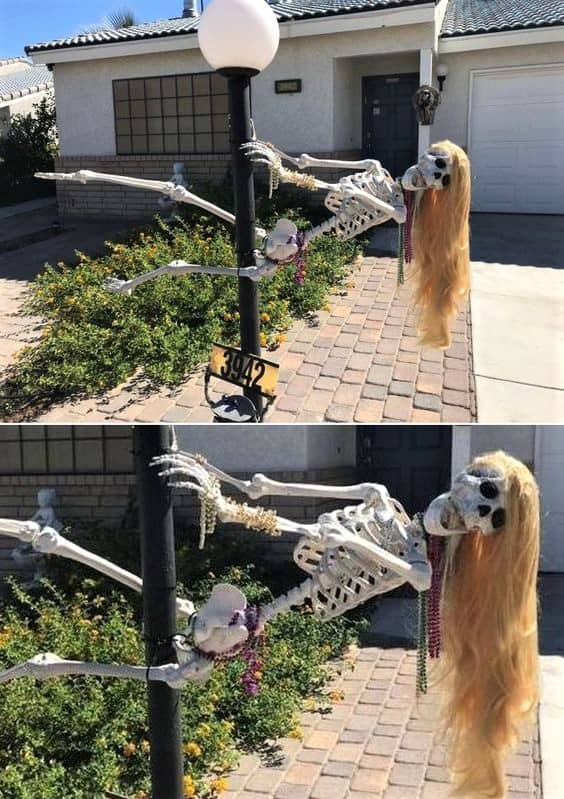
Hang a skeleton from your lamp post for a haunted stripper Halloween decoration idea.
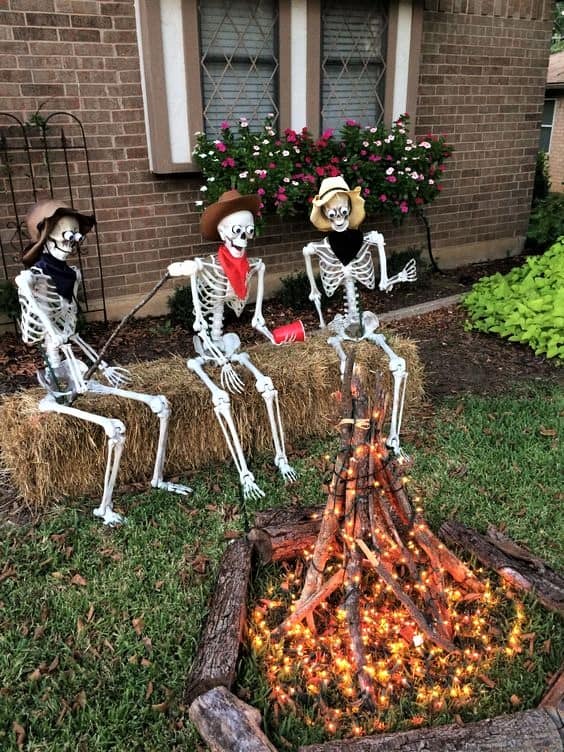
Sit them on a haystack for a camp fire to greet the neighborhood!
View this post on Instagram

Skeletons can even lounge in your pool for a quick and easy Halloween decoration for your party. Add balloons with glow sticks in them to your pool for added effect.
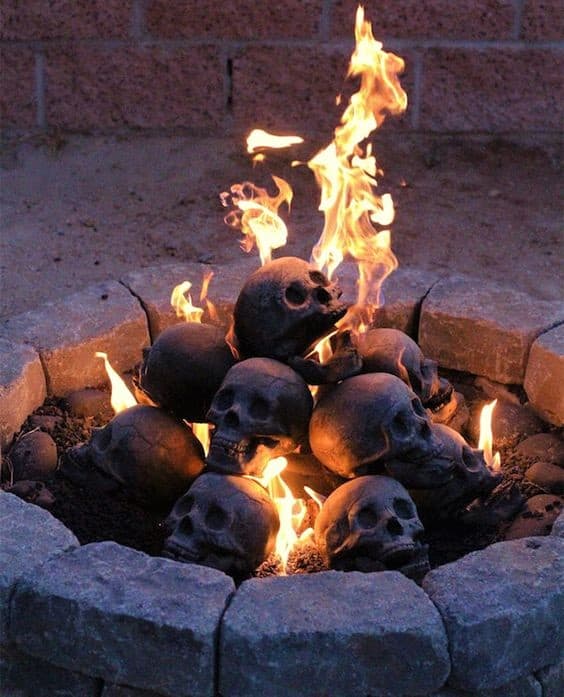
These are amazing! You can buy or make these fireproof skulls for your Halloween night full moon bonfire.
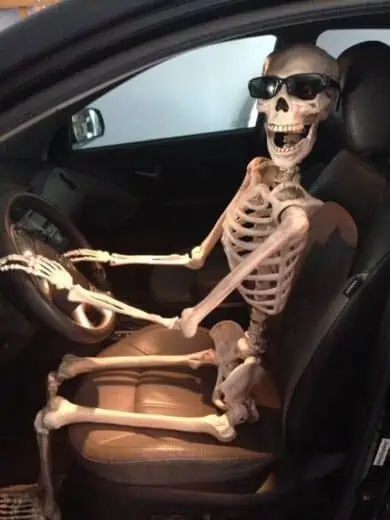
Whether it’s a prank or decor for Halloween night this is a wickedly hysterical idea for a skeleton.
Best Dollar Store Pumpkin Pail DIY Decor Ideas
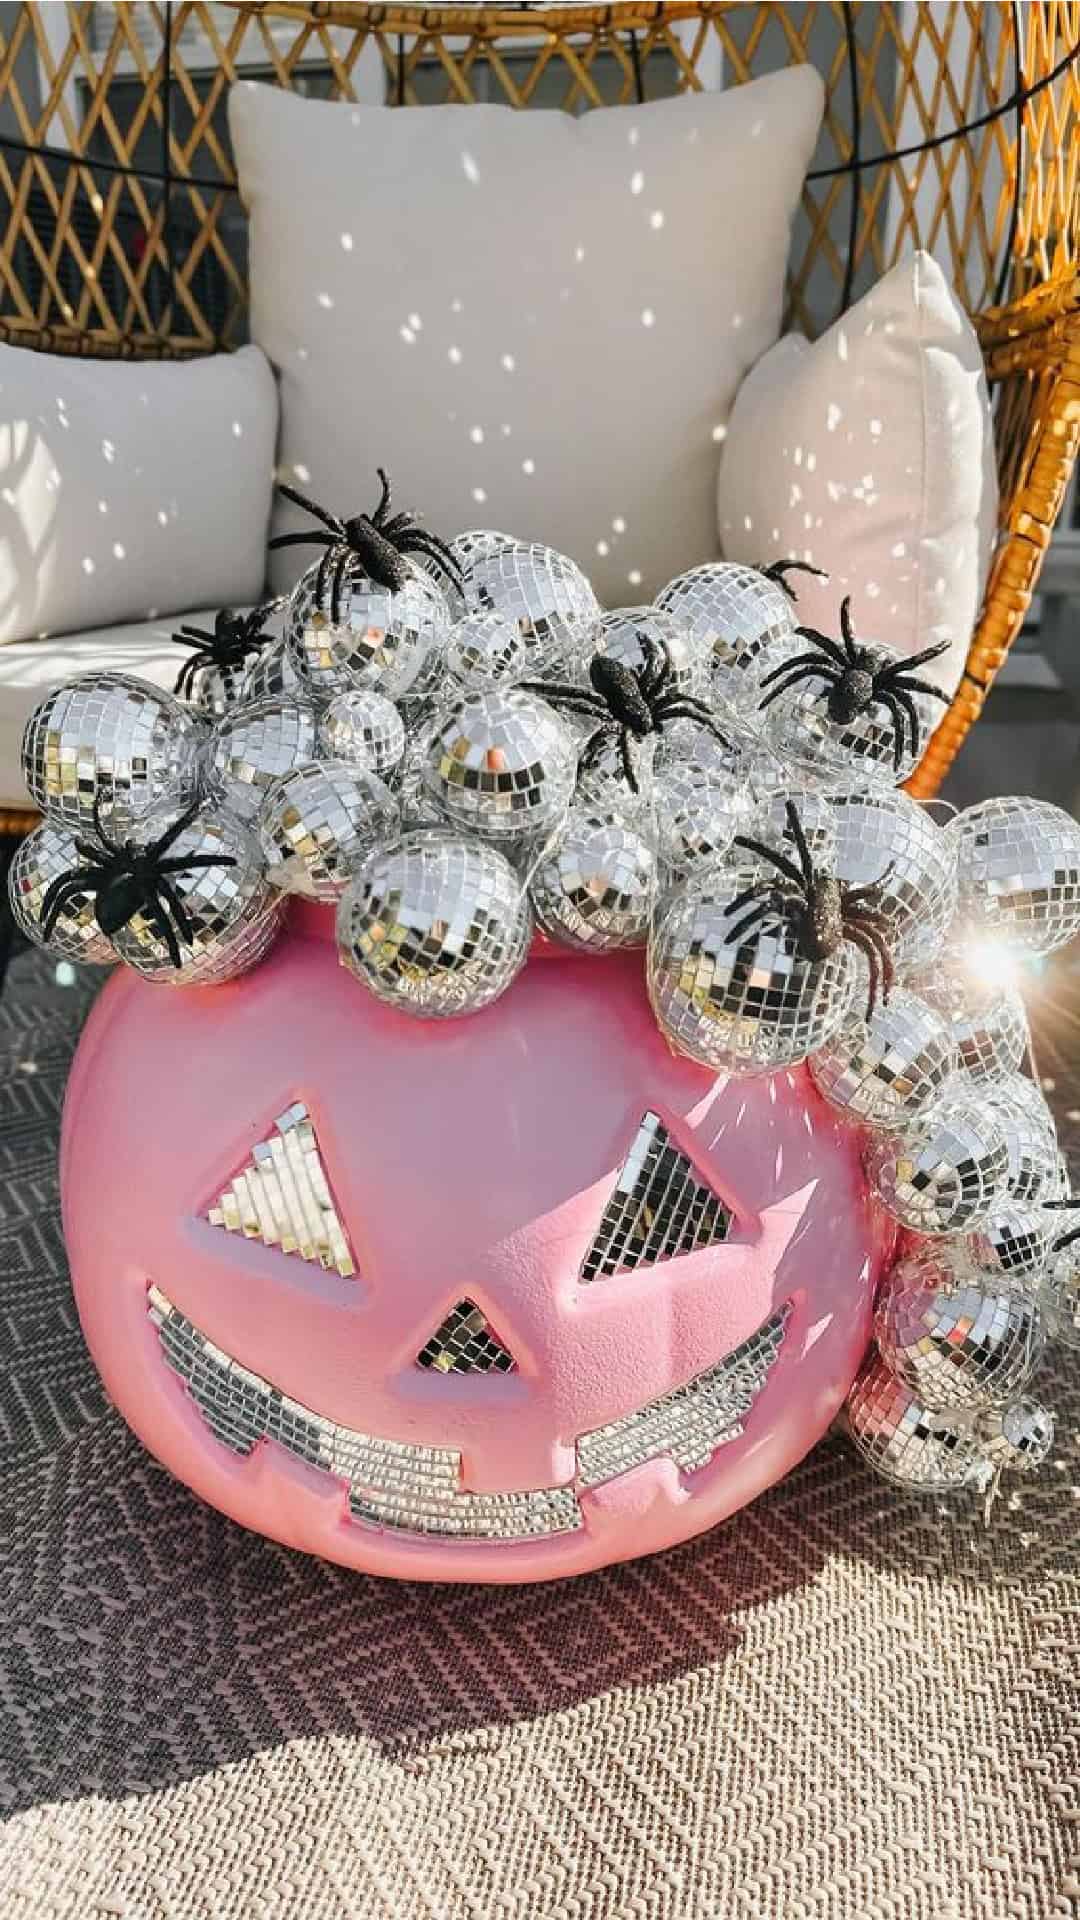
Transform a cheap plastic pumpkin pail into the shimmering porch or table decoration above using pink paint, mirrored disco ball tape from Dollar tree (for the eyes and mouth), and disco ball ornaments and spiders also from Dollar Tree.
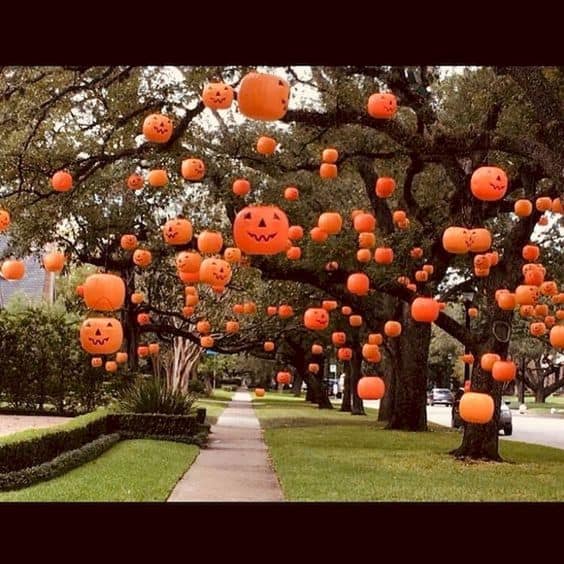
Dollar store Pumpkin pails transform any tree into a Halloween Tree! You can add solar lights for night time.
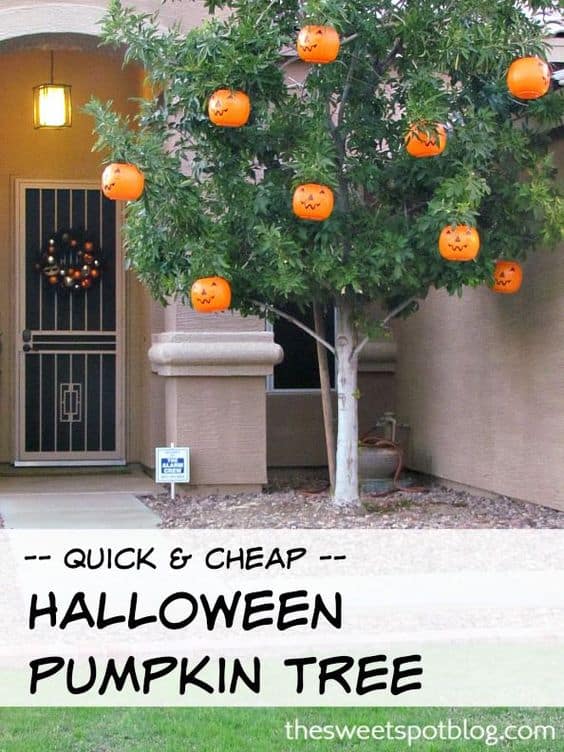
You can use this for virtually any size tree, the dollar store also sells mini pumpkin pails you can use on indoor trees or plants.
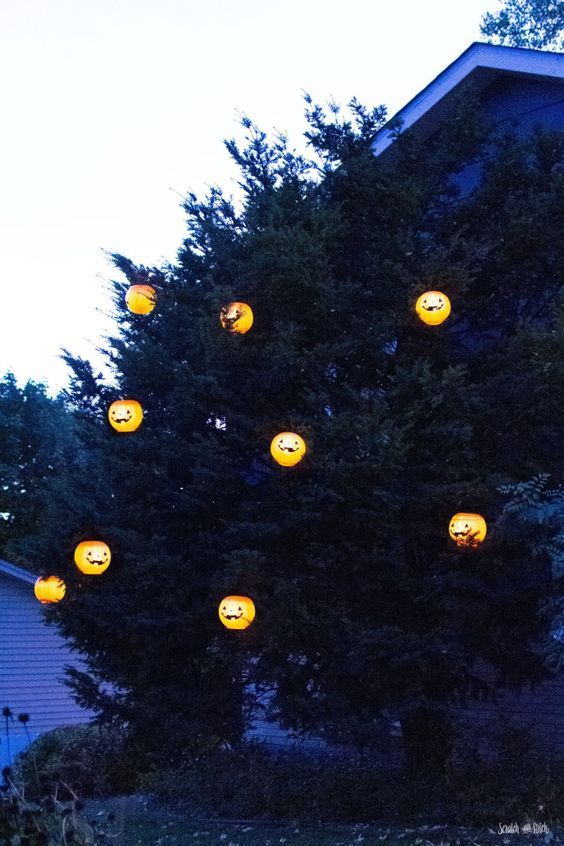
This idea uses solar lights in the plastic pumpkins so they automatically light up at night without the need for glowsticks or battery tea lights.

Grab a Dollar Store plastic Pumpkin pail and paint it to create a decorative Nightmare Before Christmas Jack Skellington vase or planter (pictured above)!
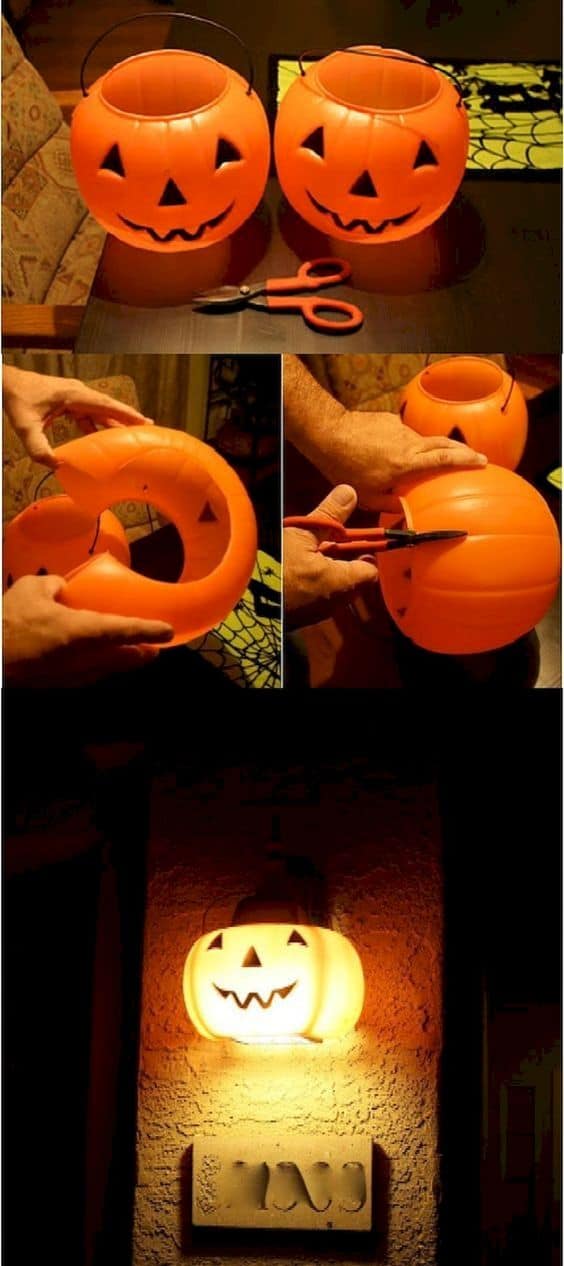
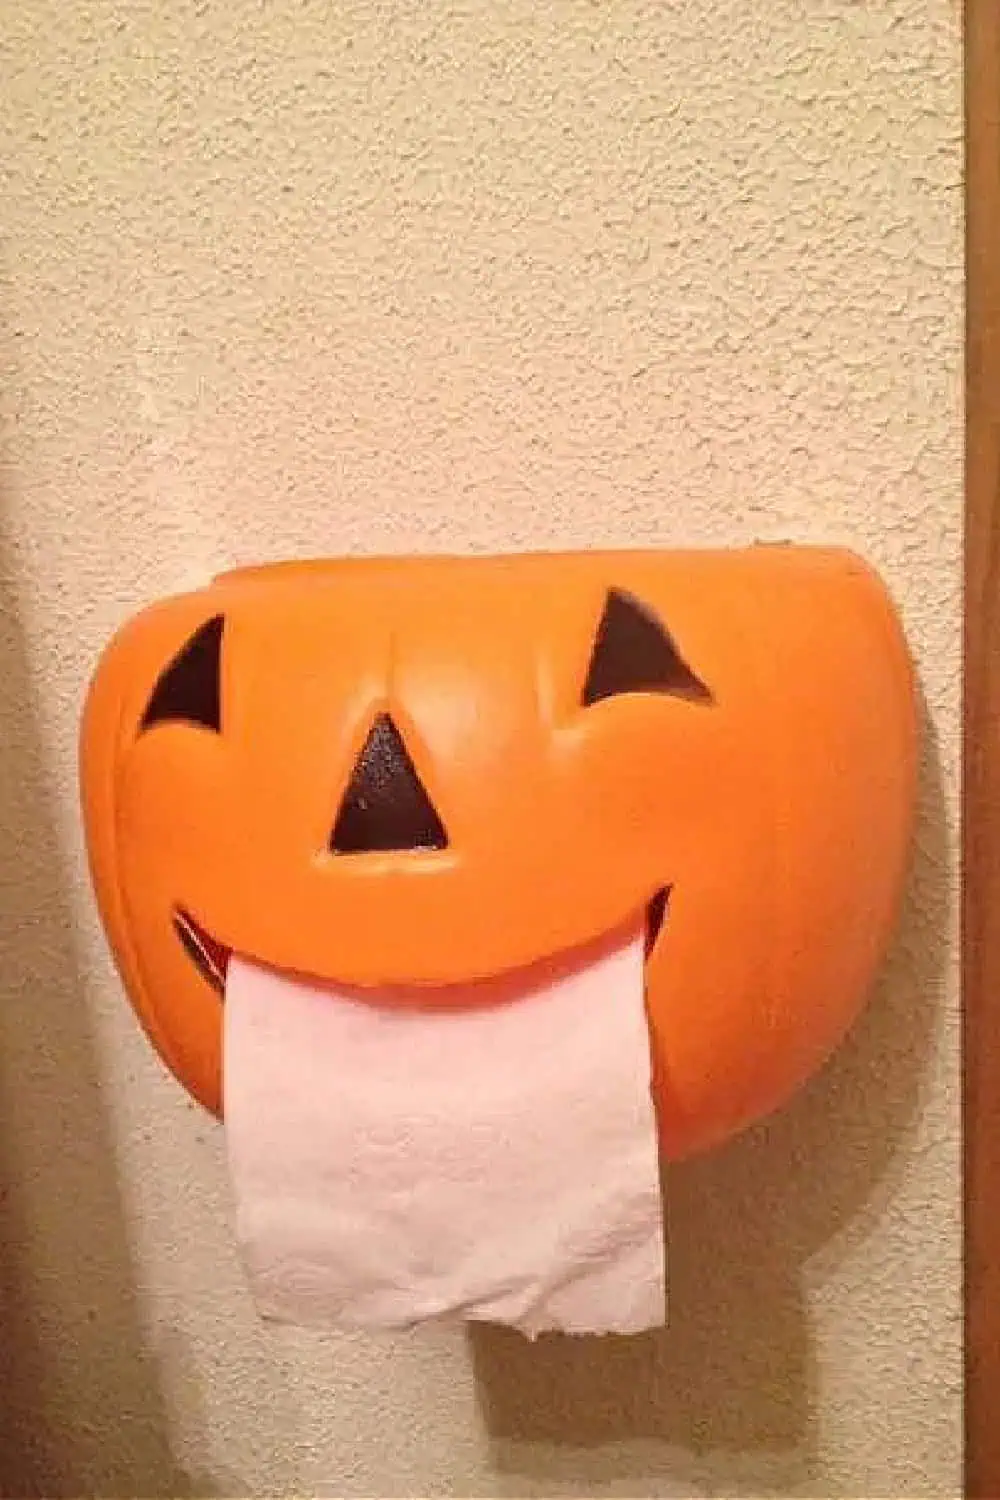
Need a cheap, quick, and easy Halloween decoration for your porch? Cut open a dollar store pumpkin pail and place it over your porch light.
This DIY craft decoration will take you from Halloween to Thanksgiving.
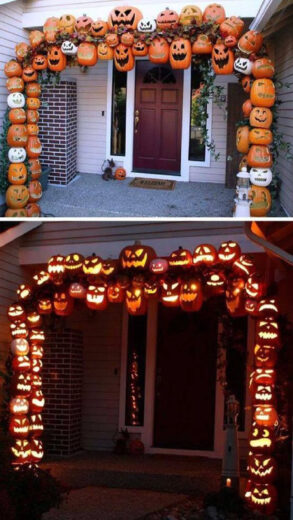
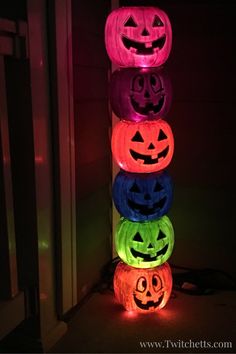
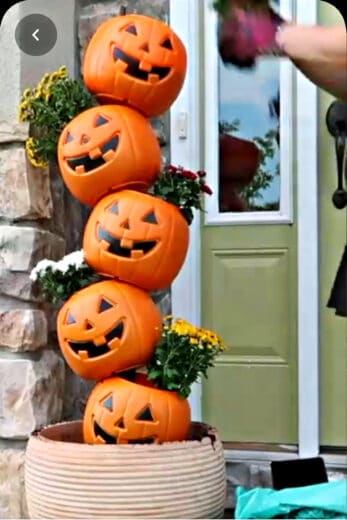
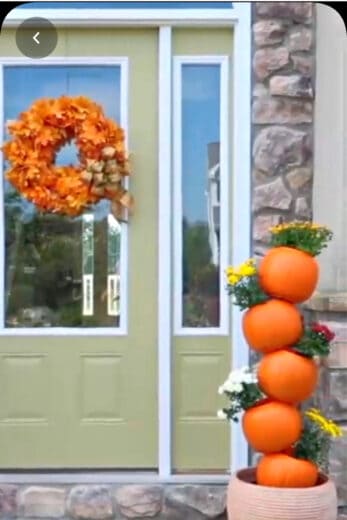
Make an easy totem pumpkin light out of dollar store pumpkin pails and lights.
When Halloween is over, simply turn it around for Thanksgiving.
Dollar store pumpkin pails can easily be converted into Halloween planters too and double as Thanksgiving decor once turned around.
Pumpkin Pails can also be painted to fit any decor or color scheme like these faux stone ones.
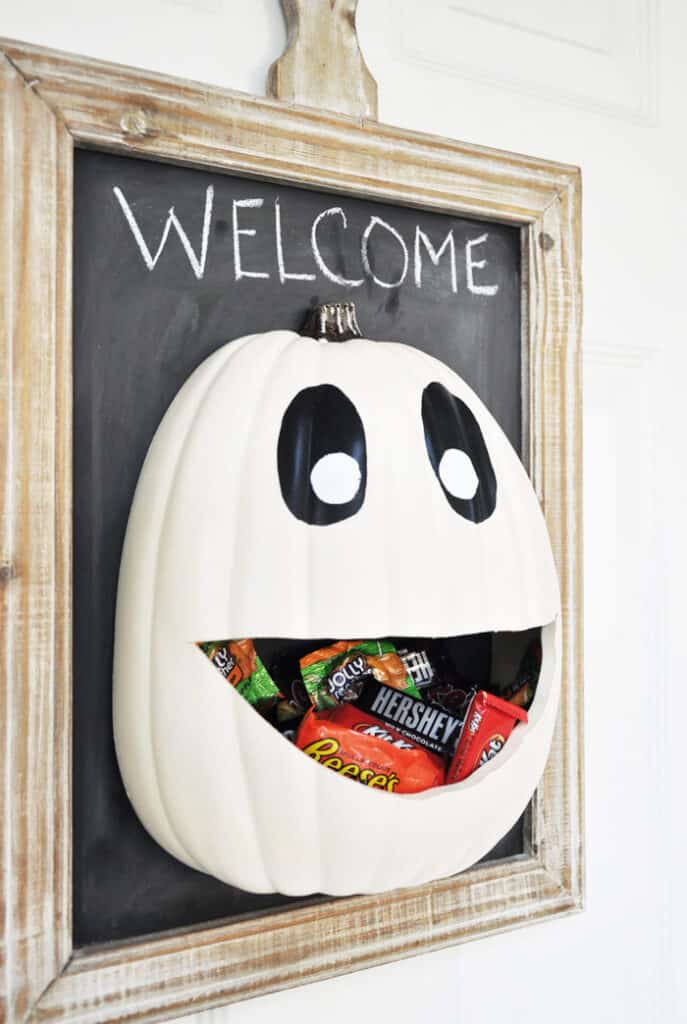
A faux pumpkin is easily transformed into a hanging candy dispenser for trick or treaters to help themselves to.
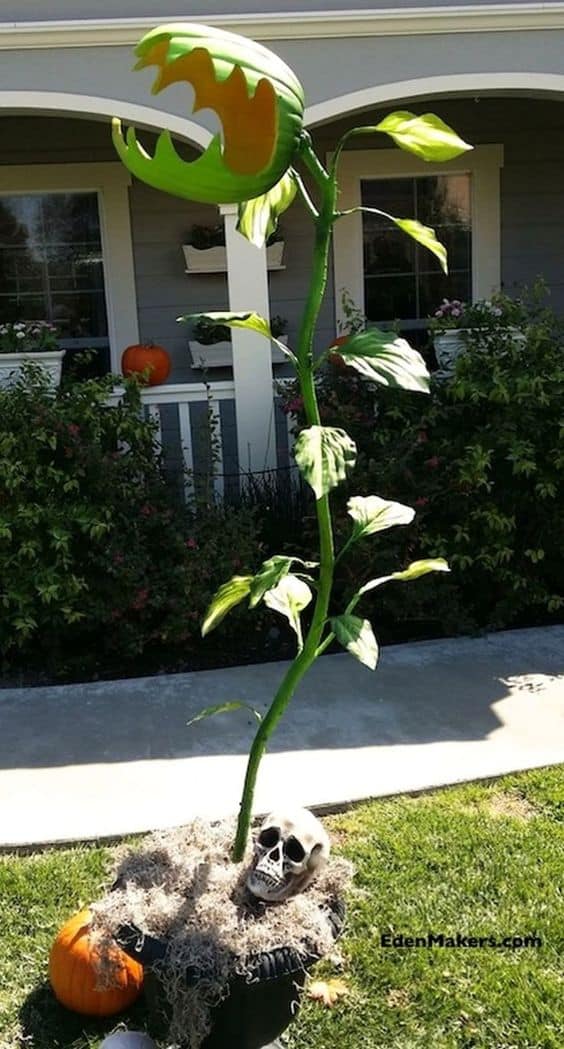
A faux pumpkin also serves as a unique man eating fly trap for your haunted garden.
In this post we showed you the best DIY outdoor Halloween decoration ideas that’ll turn your home into a haunted masterpiece and take you from Halloween to Thanksgiving, and even Christmas.
We hope you found some amazing and easy crafts to make your home the envy of the neighborhood! Feel free to show us your pics and check out some of our other Halloween decor posts below that will make your party an absolute hit!
OTHER POSTS YOU’LL LOVE…