25 Useful Summer Crafts To Do When You’re Bored (You’ll Actually Want To Keep)
Scrolling your life away? We’ve all hit that point where the boredom gets real. Instead of doom-scrolling or refreshing your socials for the 10th time today, why not get your hands busy with something cute, creative, and actually useful?
These summer crafts are trending for a reason: they’re easy, aesthetic, and (most importantly) they turn out good. Whether you’re organizing your space, making your own bedroom decor, or just looking for something to do on a lazy summer afternoon, this list is full of DIYs that won’t end up in the trash.
From a Dollar Store nail polish rack I made myself to beachy photo frames, you’ll find amazing ideas you’ll be thankful you made!
*This post may contain affiliate links, which in NO WAY influences the content. We choose products we love, use ourselves, or recommend to family and friends. Read the full disclosure here.
1. DIY Nail Polish Rack
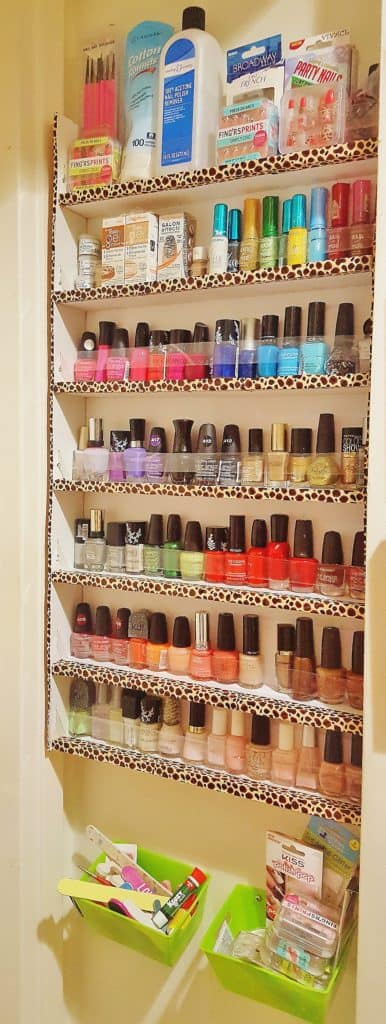
This nail polish rack was seriously LIFE CHANGING. I made it with foam boards, hot glue, and shipping tape. It’s been 7 years and it still looks brand new and holds over 100 bottles. Organize your manicure essentials in a super aesthetic way with this useful Diy!
DIY FOAM BOARD NAIL POLISH RACK TUTORIAL
- Supplies: Foam boards, hot glue gun, X-Acto knife, shipping tape, decorative tape, and nails.
- Decor tip: Wrap the shelves in marble contact paper or decorative tape
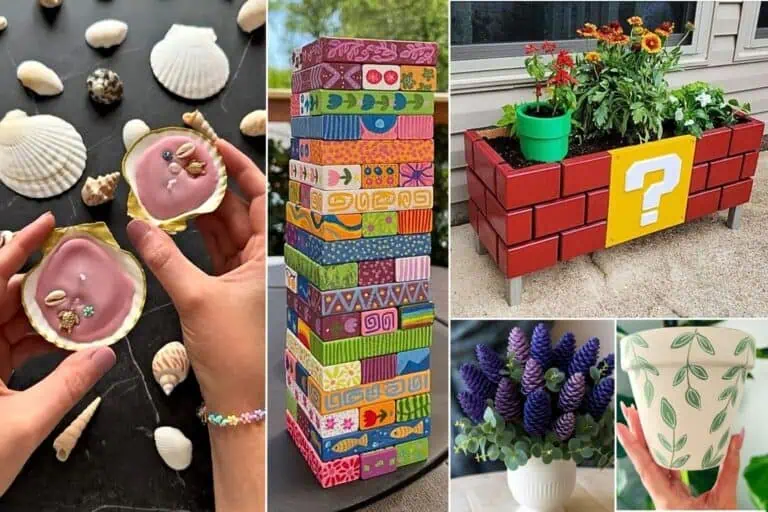
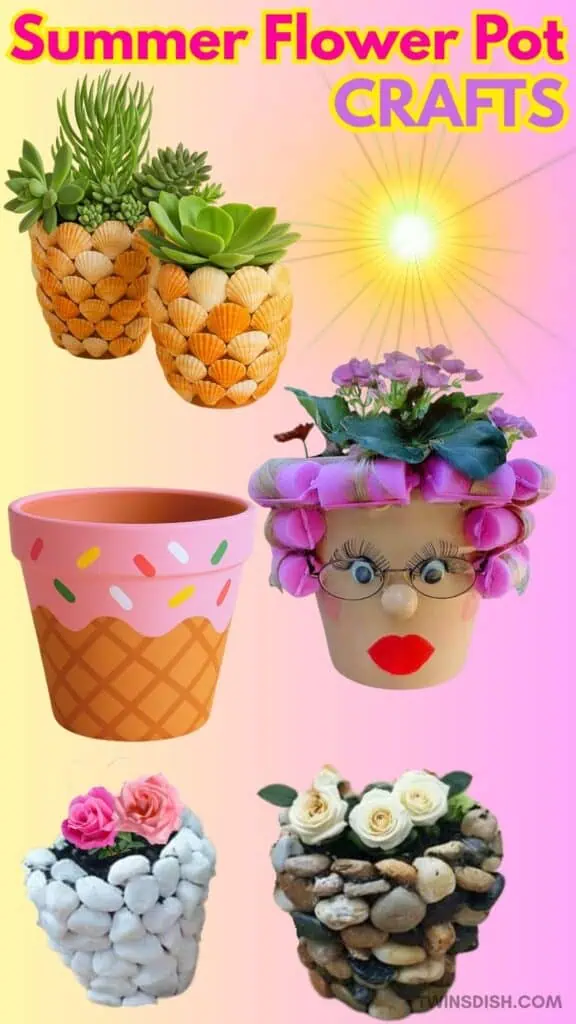
2. DECORATED POTS
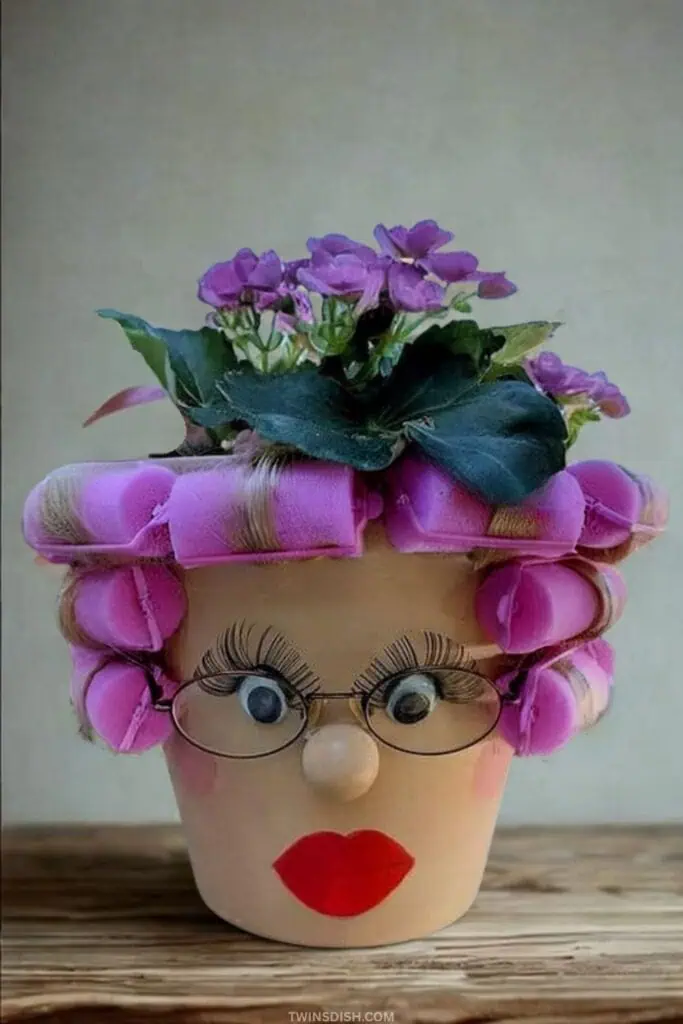
Upgrade your boring terracotta pots with super fun decorations, summer colors or aesthetic patterns. These also make great Diy gifts! Here are some gorgeous ideas:
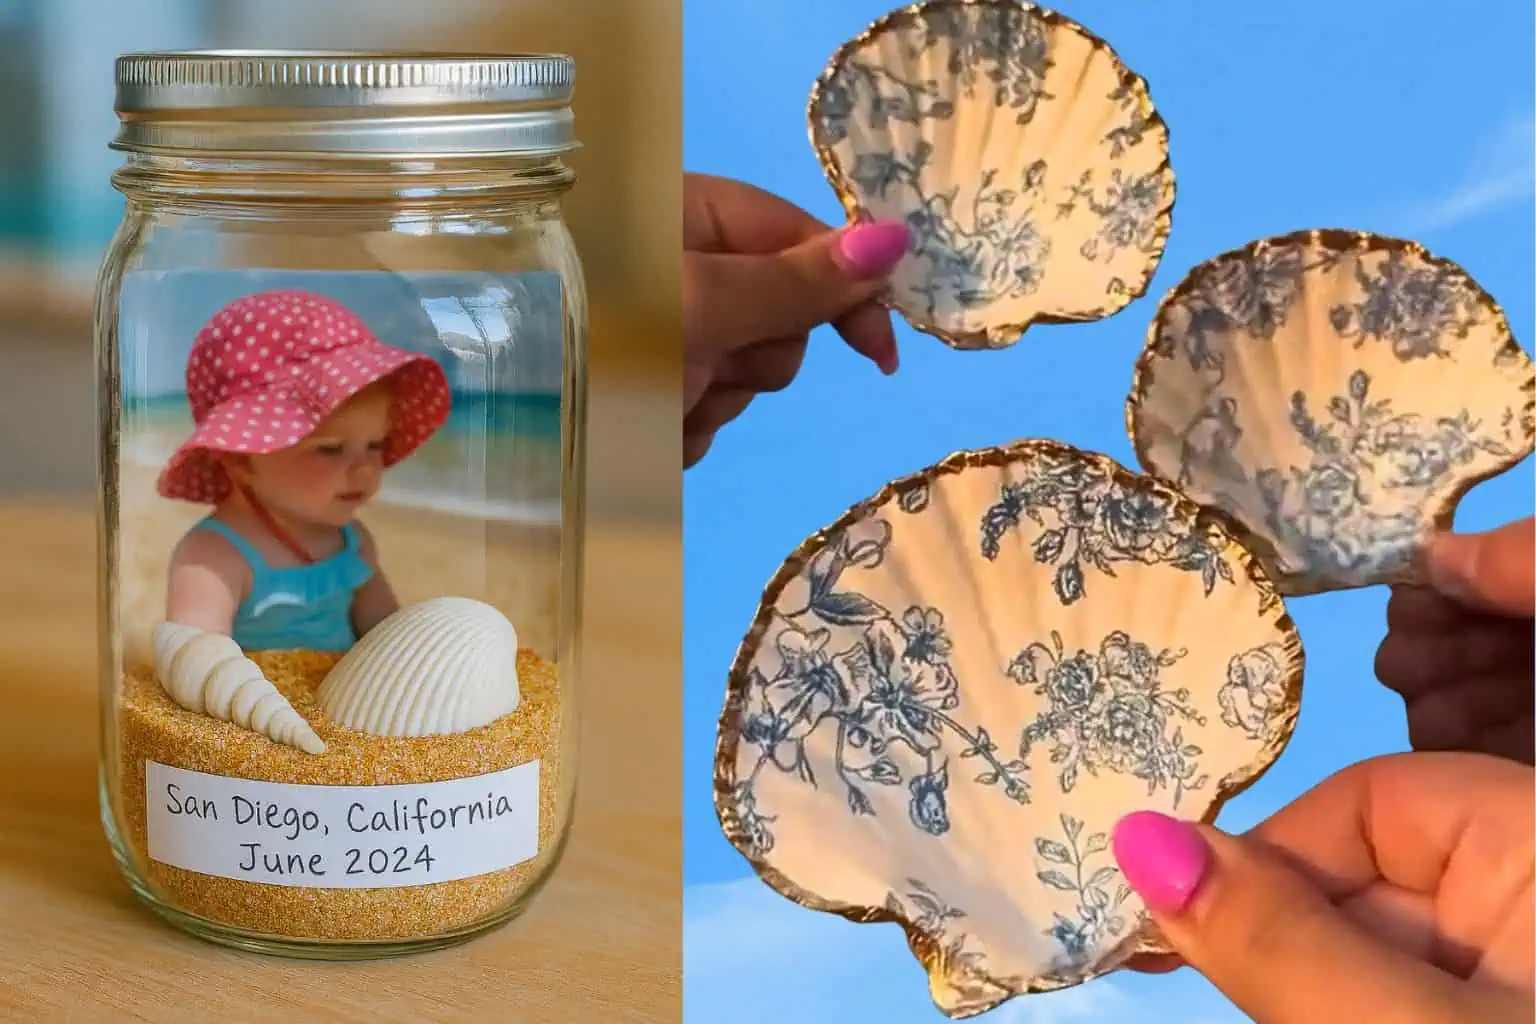
3. DIY BEACH PHOTO MEMORY JAR

Easily make this adorable memory jar by filling a jar with a little bit of sand and seashells from a beach trip and adding your favorite photo! Write the date on a piece of paper and you have a precious keepsake! Make it extra nautical by wrapping the cap with rope or twine!
4. SEASHELL JEWELRY DISH
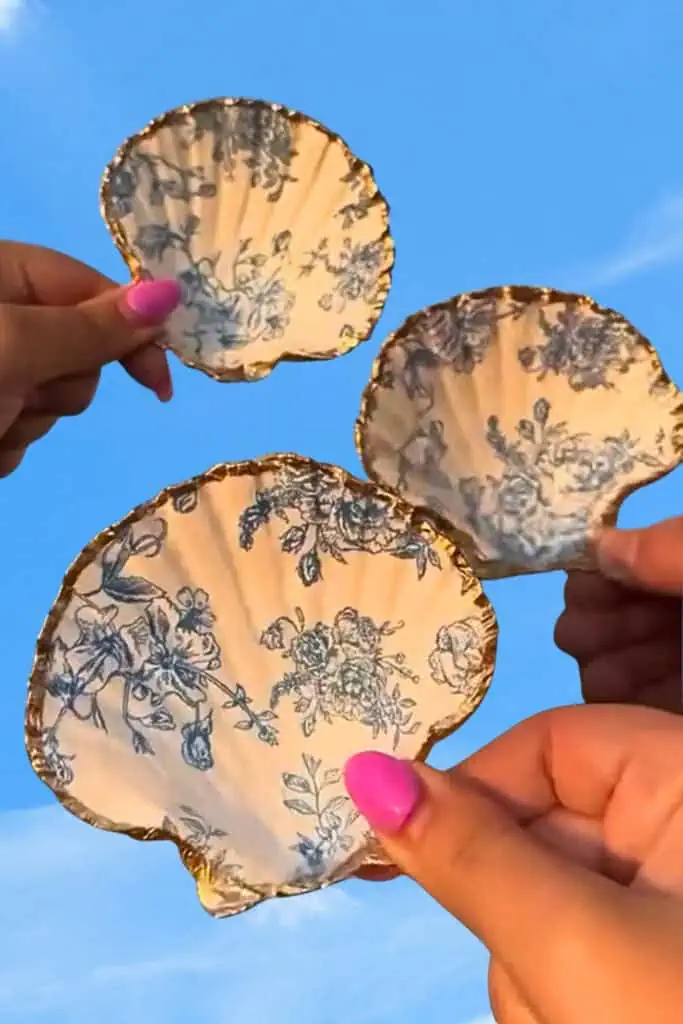
Use store bought or beach-found seashells to make these gorgeous upscale trinket dishes. Here’s the easy tutorial and all the supplies you’ll need:
- Clean dry seashells (either store bought on amazon or Dollar Tree)
- White acrylic paint (find exact one used here on amazon)
- Mod Podge
- Metallic Gold Leafing Paint
- Grandma print, or coastal flower print napkins (get them here)
Follow the direction in this quick and easy video tutorial or read them below:
-
Clean and dry your seashells thoroughly.
- Paint a thin layer of acrylic paint with a small brush and let dry.
-
Cut out a square section of the napkin to fit inside the shell. Separate it into a single layer if needed.
-
Apply a thin layer of Mod Podge to the inside of the shell.
-
Carefully place the napkin into the shell, smoothing it out with your fingers or a soft brush.
-
Seal with another thin layer of Mod Podge on top. Let dry completely.
- Trim or pull off excess napkin around edges of shells
-
Paint the outer rim of the shell with gold paint for a luxe finish.
-
Let everything dry, and your jewelry dish is ready to use!
-
These make amazing gifts or craft fair items!
-
Try different napkin patterns for seasonal or holiday variations.
-
Use as ring dishes, soap holders, or even small snack trays (if sealed with food-safe varnish).
5. TIN CAN PENCIL HOLDER
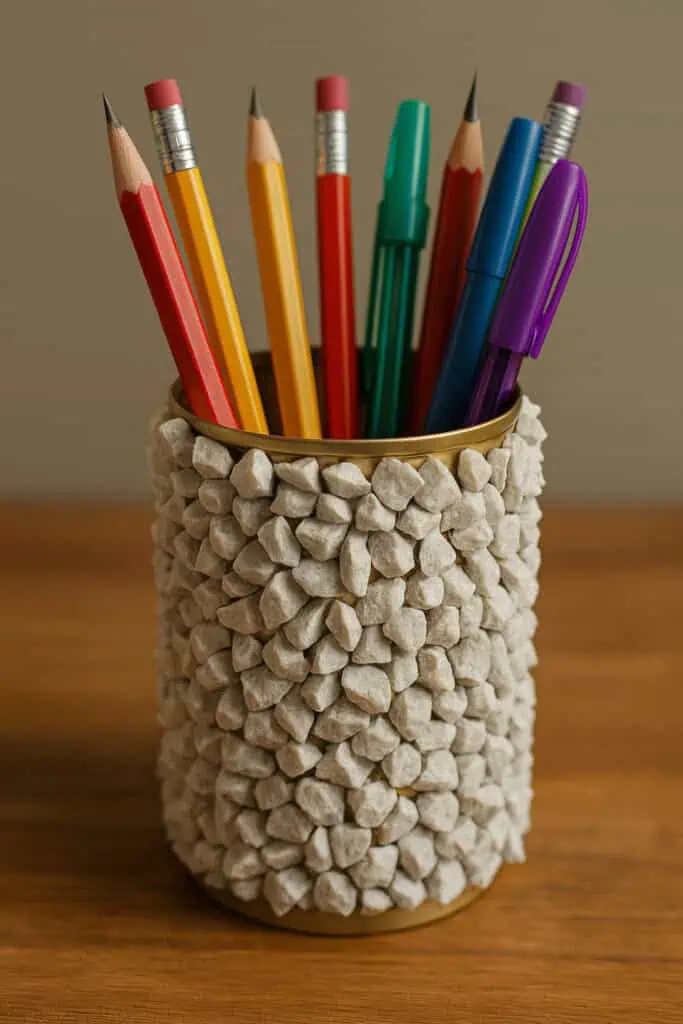
We remember making adorable tin can pencil holders like these as far back as elementary school. You can make them with stones from your yard or Dollar Tree, seashells, decoupage, glitter, or fabric! Here’s how:
🛠️ Supplies:
-
Empty tin can (cleaned and label removed)
-
Small decorative stones (from Dollar Tree, Amazon, or craft stores)
-
Gorilla Glue Gel or E6000 (for strong hold)
-
Optional: gold spray paint for the inside
-
Optional: clear sealer spray or Mod Podge
-
Toothpick or craft stick (for glue spreading)
-
Gloves (optional for messy glues)
🧪 Instructions:
-
Clean the can
Remove the label and any glue residue. Dry completely. -
Paint the inside (optional)
For the gold look like in the image, spray paint the inside of the can and let it dry fully. -
Apply the glue
-
Use Gorilla Glue Gel or E6000—both are great for sticking stone to metal.
-
Work in sections: apply a generous amount of glue to a small area of the can (about 2 inches tall).
-
Use a toothpick or stick to smooth it out if needed.
-
-
Attach the stones
-
Press each stone into the glue, fitting them snugly.
-
You can create a random pattern or line them up for a more uniform look.
-
Work all the way around the can in layers.
-
-
Let dry completely
-
Let the holder sit upright for at least 12–24 hours depending on the glue used.
-
Avoid handling it too soon or the stones may slide.
-
-
Seal it (optional)
-
Spray with a clear acrylic sealer or brush on a coat of Mod Podge Hard Coat if you want a shinier or more durable finish.
-
DIY PINECONE LILAC FLOWERS/BOUQUET
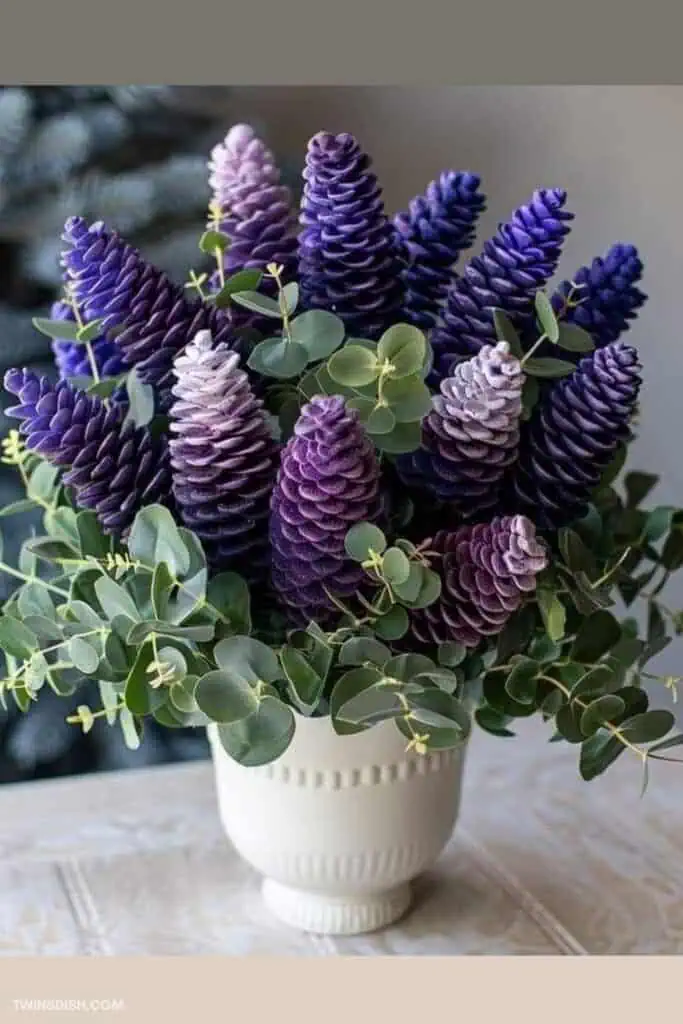
Make a Lilac bouquet that’ll last forever by dipping pinecones in acrylic paint diluted with water and hanging upside down to dry and open up again. The sticks were purchased at Walmart and glued into a drilled hole at the bottom of each pinecone. Add leaves to give the appearance of a lilac plant or stick the pinecones in an existing faux plant.

Why stop at lilacs? Paint them to resemble any flower or season you want! Place them in a flowering tin for a rustic look.
Pin your favorites, grab your supplies, and don’t forget to share your creations—especially that nail polish rack (trust me, it’s a conversation starter). These crafts aren’t just time-killers. They’re the kind you’ll actually want to keep, gift, or show off all over your summer socials.